
Are you struggling to get comfortable on your recumbent bike? Positioning it just right can make all the difference in your workout.
Exclusive Deals
Limited-time Exclusive Deals. Check current discount on Amazon.
Check Price on Amazon As an Amazon Associate I earn from qualifying purchases.When your seat and pedals are set perfectly, you’ll pedal longer, reduce strain, and avoid injury. In this guide, you’ll learn simple steps to adjust your bike for maximum comfort and efficiency. Keep reading to discover how small changes can transform your ride and help you get the most out of every session.
Choosing The Right Location
Choosing the right location for your recumbent bike matters a lot. The right spot makes your workouts safer and more enjoyable. It also protects your bike and keeps your space neat. Think about size, light, air, and the floor where you place it.
Space Requirements
Find a place with enough room around the bike. You need space to get on and off easily. Leave some room for stretching or small movements. Avoid tight corners or crowded spots. Make sure you can move freely without hitting anything.
Exclusive Deals
Limited-time Exclusive Deals. Check current discount on Amazon.
Check Price on Amazon As an Amazon Associate I earn from qualifying purchases.Lighting And Ventilation
Good light helps you stay alert during exercise. Natural light is best. Place the bike near a window if possible. Fresh air keeps the room comfortable and cool. A fan or open window helps prevent stuffiness. Avoid dark or poorly ventilated rooms to stay fresh.
Flooring Considerations
Choose a floor that supports your bike well. Hard floors like wood or tile work best. Use a mat to protect the floor and reduce noise. Avoid soft carpets that make the bike unstable. A firm surface keeps your bike steady and safe.

Adjusting Seat Height
Adjusting the seat height on a recumbent bike is key for a comfortable ride. A proper seat height helps you pedal smoothly and avoid pain. It also supports good posture. Taking time to set it right will improve your cycling experience.
Exclusive Deals
Limited-time Exclusive Deals. Check current discount on Amazon.
Check Price on Amazon As an Amazon Associate I earn from qualifying purchases.Finding Optimal Leg Extension
Your leg should almost straighten at the pedal’s lowest point. Too bent or too straight causes discomfort. Sit on the bike and place your foot on the pedal. Adjust the seat until your knee is slightly bent when the pedal is down. This position gives good power and comfort.
Preventing Knee Strain
Incorrect seat height can cause knee pain or injury. If the seat is too low, knees bend too much. Too high makes you stretch and strain. Check your knees after a short ride. Adjust the seat height to avoid any pain. Proper height keeps knees safe and helps long rides.
Setting Seat Position
Setting the seat position on a recumbent bike is key for a smooth ride. A correct seat setup helps avoid pain and improves pedal power. It also keeps your body aligned and balanced. Take time to adjust the seat properly. This step makes every ride more enjoyable and effective.
Aligning With Pedals
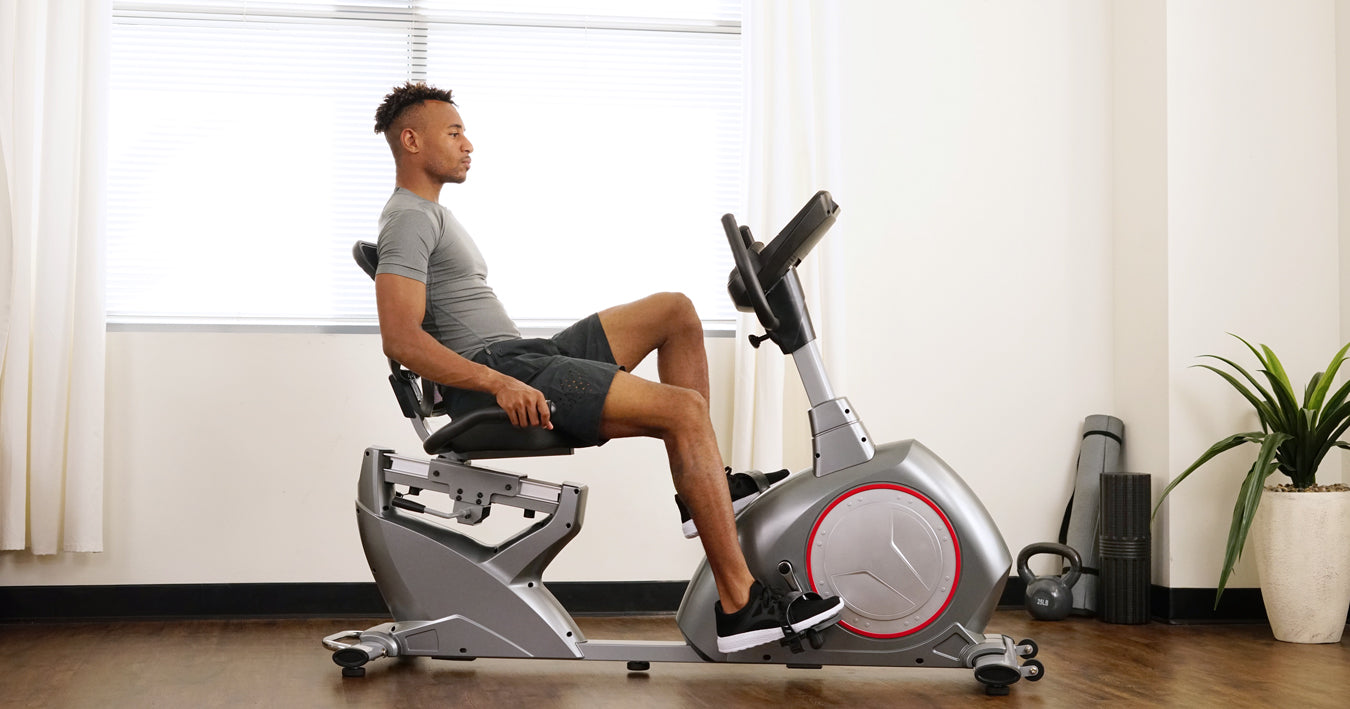
Start by sitting on the bike. Place your feet on the pedals. Your legs should be almost straight when the pedal is farthest away. Avoid locking your knees. Adjust the seat forward or backward to reach this position. Proper alignment helps your muscles work well. It reduces stress on your joints and knees.
Ensuring Comfort During Rides
Check if the seat feels comfortable. You should sit with your back fully supported. Your hips should not rock side to side. Use a cushion if the seat feels hard. Adjust the seat height for better comfort. A good seat position stops pain and soreness. Comfort helps you ride longer and enjoy more.
Handlebar Placement
Handlebar placement plays a key role in comfort and performance on a recumbent bike. Properly set handlebars help maintain good posture and reduce strain during your ride. Adjusting them correctly ensures better control and less fatigue. This section explains how to position handlebars for the best experience.
Proper Reach And Grip
Reach is the distance from your seat to the handlebars. It should allow a slight bend in your elbows. This position avoids overreaching or feeling cramped. Your hands should grip the bars naturally without stretching. A relaxed grip improves control and reduces hand fatigue. Adjust the handlebars forward or backward to find the best reach.
Reducing Shoulder Tension
Handlebars set too high or too low cause shoulder discomfort. Keep them at a height that allows your shoulders to relax. Avoid lifting or hunching your shoulders while riding. Proper placement helps keep your upper body calm and tension-free. This adjustment leads to longer, more comfortable rides without pain.
Pedal Strap Adjustment
Adjusting the pedal straps on a recumbent bike is key to a safe and efficient workout. Proper strap adjustment keeps your feet secure and improves your pedaling power. It also prevents slipping and reduces the risk of injury. Let’s explore how to adjust the pedal straps for the best riding experience.
Securing Feet Safely
Start by placing your feet comfortably on the pedals. Tighten the straps just enough to hold your feet firmly. Avoid straps that are too tight, which can cause discomfort or restrict blood flow. The goal is to keep feet steady without pain. Secure feet reduce slipping during fast pedaling or sudden stops.
Improving Pedal Efficiency
Proper strap tension helps transfer more power to the pedals. It allows you to push and pull through each pedal stroke. This balanced motion uses leg muscles better and boosts overall workout efficiency. Adjust straps to maintain firm contact without cutting off circulation. Efficient pedaling leads to better endurance and faster results.

Customizing Resistance Levels
Customizing resistance levels on a recumbent bike lets you control workout intensity. Adjusting resistance can make your exercise easier or harder. It helps you work at the right pace. This keeps your training effective and safe.
Matching Fitness Goals
Set resistance based on what you want to achieve. For building strength, increase resistance slowly. Use higher levels for shorter periods. For endurance, keep resistance moderate and ride longer. Light resistance suits warm-ups and cool-downs. Adjust settings to fit your daily goals.
Avoiding Overexertion
Start with low resistance to prevent strain. Increase resistance in small steps only. Listen to your body’s signals. Stop if you feel pain or extreme tiredness. Balanced resistance keeps your heart safe. It reduces risk of injury and fatigue.
Testing And Fine-tuning
Testing and fine-tuning your recumbent bike position ensures comfort and efficiency. Proper adjustments reduce strain and improve your riding experience. It takes time and attention to find the best setup for your body.
Short Trial Sessions
Start with brief rides to test your bike position. Short sessions help you notice discomfort or awkward angles. Take notes on how your legs, back, and arms feel. Pay attention to any pain or stiffness. These quick tests prevent long-term problems and guide your adjustments.
Making Incremental Changes
Adjust your seat or pedals in small steps. Minor changes make it easier to find the right fit. Change one thing at a time for clear results. After each tweak, test again with a short ride. This careful approach avoids confusion and helps you improve steadily.
Maintenance Tips For Setup
Maintaining your recumbent bike setup is key to a smooth and safe ride. Proper care helps the bike last longer and perform better. Focus on regular checks and cleaning to keep it in top shape.
Regular Inspection
Check the bike parts often. Look for loose bolts and screws. Tighten anything that feels weak. Inspect the seat position and pedals for wear. Make sure the frame is steady. Early detection stops big problems.
Lubrication And Cleaning
Keep moving parts smooth with light oil. Apply lubricant to the chain and joints. Wipe off excess oil to avoid dirt build-up. Clean the bike frame with a soft cloth and mild soap. Dry it well to stop rust. Clean parts work better and last longer.
Frequently Asked Questions
How Do I Adjust Seat Height On A Recumbent Bike?
To adjust seat height, loosen the seat lever or knob. Slide the seat up or down until your legs are slightly bent at the pedal bottom. Tighten the lever securely to avoid movement during cycling. Proper seat height ensures comfort and prevents knee strain.
What Is The Best Pedal Position For Recumbent Bikes?
The best pedal position is when your knees have a slight bend at the pedal’s lowest point. This reduces joint strain and maximizes power. Adjust the seat forward or backward to achieve this pedal position for efficient and comfortable pedaling.
How To Position The Backrest For Comfort?
Set the backrest angle to support your lower back naturally. It should be reclined enough to relax muscles but upright enough for effective pedaling. Adjust the recline to avoid slouching and maintain good posture throughout your workout.
Why Is Proper Recumbent Bike Positioning Important?
Proper positioning improves comfort, prevents injuries, and enhances workout efficiency. It ensures correct joint alignment and muscle engagement. Poor setup can cause pain or reduce exercise benefits. Always adjust seat, pedals, and backrest carefully before riding.
Conclusion
Positioning your recumbent bike correctly boosts comfort and efficiency. Adjust the seat and pedals to fit your body. Proper setup helps avoid pain and injury during workouts. Take time to check and fine-tune settings. This small effort leads to better rides every time.
Enjoy your exercise with ease and safety. Keep these tips in mind for a smooth cycling experience.

