
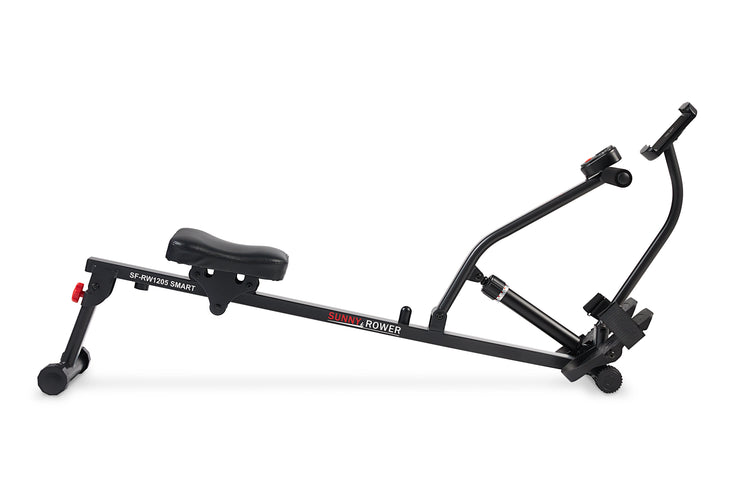
To assemble the Sunny Rowing Machine, follow the instruction manual provided and use the included tools. Begin by attaching the front stabilizer to the mainframe.
Exclusive Deals
Limited-time Exclusive Deals. Check current discount on Amazon.
Check Price on Amazon As an Amazon Associate I earn from qualifying purchases.The Sunny Rowing Machine is a popular fitness equipment choice for home workouts. It offers a full-body workout, targeting various muscle groups. Assembly is straightforward with clear instructions and tools included in the package. This machine is designed to provide a smooth and efficient rowing experience, helping users achieve their fitness goals.
Exclusive Deals
Limited-time Exclusive Deals. Check current discount on Amazon.
Check Price on Amazon As an Amazon Associate I earn from qualifying purchases.The compact design makes it suitable for small spaces. Regular use can improve cardiovascular health and increase endurance. Assembling the machine correctly ensures optimal performance and longevity. Invest time in proper setup to enjoy the benefits of a well-constructed rowing machine.

Exclusive Deals
Limited-time Exclusive Deals. Check current discount on Amazon.
Check Price on Amazon As an Amazon Associate I earn from qualifying purchases.Credit: m.youtube.com
Tools Needed
Assembling your Sunny Rowing Machine can be a breeze if you have the right tools. Ensuring you have all the necessary tools before starting will save you time and effort. Let’s dive into the essential and optional tools you might need.
Essential Tools
- Wrench: A wrench is crucial for tightening bolts.
- Screwdriver: You will need both Phillips and flat-head screwdrivers.
- Allen Wrench: Often included in the package, it’s used for specific bolts.
Optional Tools
While the essential tools will get the job done, having some additional tools can make the assembly process even smoother.
- Rubber Mallet: Helps to gently tap parts into place.
- Socket Set: Speeds up the tightening process.
- Lubricant: Reduces friction and makes assembly easier.
Having these tools on hand will ensure a smooth and efficient assembly process for your Sunny Rowing Machine.
Unboxing
Unboxing your Sunny Rowing Machine is the first exciting step. It sets the stage for assembly.
Checking The Package
Before you start, ensure you have the right package.
- Check the box for any damages.
- Ensure all tape and seals are intact.
Open the box carefully. Use a box cutter or scissors. Avoid damaging the contents.
Once open, remove the top layer of packaging. Take out the manual first. The manual will guide you through the process.
Organizing Parts
Now, it’s time to organize the parts.
Lay out all parts on a clean surface.
Use the manual to identify each part. Check off each item as you go.
| Part | Description |
|---|---|
| Main Frame | The largest piece in the box. |
| Seat | Where you will sit while rowing. |
| Handlebar | Used for rowing. |
| Foot Pedals | Place your feet here. |
| Screws and Bolts | For assembling the parts together. |
Keep small parts in a container. This prevents loss. Arrange parts in the order of assembly.
Having everything organized makes assembly easier. You will know where each part is.
Now that you have checked and organized everything, you are ready for the next step.
Setting Up The Frame
Setting up the frame of your Sunny Rowing Machine is the first crucial step. A strong frame ensures your rowing machine is stable. Follow these steps for a smooth setup.
Positioning The Base
The base is the foundation of your rowing machine. Proper placement is vital for stability.
- Place the base on a flat surface.
- Ensure the area is clear of obstacles.
- Align the base with the front and rear stabilizers.
Use a level to check if the base is even. This prevents wobbling during use.
Securing The Frame
Once the base is positioned, you must secure the frame. This ensures the machine stays intact.
- Attach the front stabilizer to the base.
- Use the bolts provided in the assembly kit.
- Tighten the bolts with a wrench.
- Repeat the process for the rear stabilizer.
Double-check all bolts are tightly secured. This adds to the safety and longevity of your machine.
By following these steps, you ensure a stable foundation for your Sunny Rowing Machine. Proper setup enhances your workout experience.
Attaching The Seat
Attaching the seat on your Sunny Rowing Machine is easy. Follow these steps to ensure a smooth assembly process. This section will guide you through sliding the seat onto the rail and securing it properly.
Sliding The Seat Onto The Rail
First, locate the rail. Make sure it is clean and free of debris. Take the seat and align the rollers with the rail. Gently place the seat on the rail. Slide it back and forth to ensure it moves smoothly.
Follow these steps:
- Align the rollers with the rail.
- Place the seat gently on the rail.
- Slide the seat back and forth to check smoothness.
Securing The Seat
Next, secure the seat to prevent it from wobbling. Use the bolts and screws provided in your assembly kit. Locate the holes on the rail and seat. Insert the bolts through these holes.
Here’s a quick guide:
- Locate the holes on the rail and seat.
- Insert the bolts through the holes.
- Tighten the bolts using a wrench.
Make sure all bolts are tight. This ensures the seat is secure and stable during use.
| Step | Description |
|---|---|
| 1 | Align rollers with rail |
| 2 | Place seat gently on rail |
| 3 | Slide seat to check smoothness |
| 4 | Insert bolts through holes |
| 5 | Tighten bolts using a wrench |
Following these steps ensures your seat is properly attached. Now, your Sunny Rowing Machine is almost ready for use.
Installing The Foot Pedals
Assembling the Sunny Rowing Machine is a straightforward task. One crucial step is installing the foot pedals. Proper installation ensures a safe and efficient workout. Let’s break down this process into simple steps.
Aligning The Pedals
First, make sure you have the correct pedals for each side. The left pedal goes on the left side, and the right pedal on the right side. Look for the labeled markings “L” and “R” on the pedals.
To align the pedals, place each pedal over the footrest. Ensure the holes in the pedals align with the holes in the footrest. This alignment is crucial for proper installation.
Tightening The Screws
Once the pedals are aligned, it’s time to secure them. Use the screws provided in your assembly kit. Insert the screws through the holes in the pedals and into the footrest.
Using a screwdriver, tighten the screws. Make sure they are snug but not overly tight. Over-tightening can strip the screw holes or damage the pedals.
Check that the pedals are secure and don’t wobble. Properly installed pedals will provide stability during your workout.
If you have any trouble, refer to the instruction manual. It has detailed diagrams and tips.

Credit: support.sunnyhealthfitness.com
Connecting The Console
Assembling your Sunny Rowing Machine involves several steps. One key step is connecting the console. The console is where you track your workout progress. It monitors time, distance, and calories burned.
Mounting The Console
First, locate the console and the console mounting bracket. You will find screws and a screwdriver in the package. Follow these steps to mount the console:
- Align the console with the mounting bracket holes.
- Insert the screws into the holes.
- Use the screwdriver to tighten the screws.
Ensure the console is securely attached. It should not wobble or move.
Connecting The Wires
Next, you need to connect the wires. These wires link the console to the rowing machine sensors. Here’s how to do it:
- Locate the wires coming from the console.
- Find the wires on the rowing machine frame.
- Connect the matching color-coded wires together.
Make sure all connections are tight and secure. Loose connections can cause the console to malfunction.
With the console mounted and wires connected, your Sunny Rowing Machine is almost ready. You can now proceed to the next steps of the assembly process.
Final Adjustments
Once you have assembled your Sunny Rowing Machine, it’s time for the final adjustments. These steps ensure your machine is safe and ready to use. Follow these simple steps to complete the process efficiently.
Tightening All Screws
Start by tightening all screws on the rowing machine. Use a wrench or screwdriver for this task. Make sure each screw is secure but not too tight. Over-tightening can damage the machine. Check the screws on the seat, foot pedals, and frame.
- Ensure seat screws are tight.
- Secure foot pedal screws.
- Check frame screws for stability.
Testing The Machine
After tightening all screws, it’s time to test the machine. Sit on the seat and place your feet on the pedals. Pull the handle to simulate rowing. Listen for any unusual noises. The machine should feel stable and smooth.
- Test the seat for comfort and stability.
- Check the foot pedals for security.
- Ensure the handle moves smoothly.
If you notice any issues, re-check the screws and connections. Adjust as needed for optimal performance.
Maintenance Tips
Maintaining your Sunny Rowing Machine ensures it functions smoothly and lasts longer. Follow these tips to keep your equipment in top shape. Regular care is essential for optimal performance.
Regular Cleaning
Clean your rowing machine regularly to remove dust and sweat. Use a soft cloth to wipe down the frame and seat. For stubborn dirt, use a mild detergent. Avoid using harsh chemicals that can damage the machine.
- Wipe the display screen gently.
- Clean the handle and foot pedals.
- Keep the rail free of debris.
Periodic Inspections
Inspect your rowing machine periodically to identify any wear and tear. Check for loose bolts and screws. Tighten them if necessary. Examine the chain or belt for signs of damage.
- Check the seat rollers for smooth movement.
- Inspect the foot straps for wear.
- Ensure the display monitor is functioning properly.
Regular inspections help prevent major issues. It ensures your rowing machine remains in excellent condition.
Credit: sunnyhealthfitness.com
Frequently Asked Questions
How Do You Assemble A Rowing Machine?
To assemble a rowing machine, follow the manual instructions. Attach the main frame, seat, and handlebars. Secure all screws tightly. Connect the footrests and display console. Ensure all parts are stable and properly aligned.
How Do You Build Up On A Rowing Machine?
Start with a warm-up. Gradually increase resistance and duration. Maintain proper form. Incorporate interval training for variety. Track progress regularly.
How Long Does It Take To Put Together A Rowing Machine?
Assembling a rowing machine typically takes about 30 minutes to an hour. It depends on the model and your experience.
How Do You Fold A Sunny Row And Ride Machine?
To fold a Sunny Row-N-Ride machine, first, pull the locking pin. Then, fold the frame and secure it with the pin.
Conclusion
Assembling the Sunny Rowing Machine is straightforward with the right steps. Follow the manual and our guide for success. Ensure all parts are securely tightened. Enjoy your rowing experience and the health benefits it brings. Share your assembly tips and experiences in the comments below.
Happy rowing!

