To adjust an indoor cycling bike, start by setting the seat height to hip level. Next, adjust the handlebars for comfort and posture.
Exclusive Deals
Limited-time Exclusive Deals. Check current discount on Amazon.
Check Price on Amazon As an Amazon Associate I earn from qualifying purchases.Indoor cycling is a fantastic way to stay fit. Proper bike adjustment ensures a comfortable and effective workout. Begin by standing next to the bike and aligning the seat with your hip bone. This setup helps prevent knee strain. Next, position the handlebars so your back remains straight, avoiding unnecessary pressure on the wrists.
Exclusive Deals
Limited-time Exclusive Deals. Check current discount on Amazon.
Check Price on Amazon As an Amazon Associate I earn from qualifying purchases.Test the pedal resistance and make adjustments for a smooth ride. Correct bike adjustment enhances performance and reduces injury risks. By following these simple steps, you can enjoy a productive and enjoyable indoor cycling experience.

Exclusive Deals
Limited-time Exclusive Deals. Check current discount on Amazon.
Check Price on Amazon As an Amazon Associate I earn from qualifying purchases.Credit: www.pinterest.com
Choosing The Right Bike
Choosing the right indoor cycling bike is crucial for your exercise routine. A bike that fits your needs enhances comfort and performance. Here, we’ll guide you on what to consider when selecting an indoor bike.
Types Of Indoor Bikes
There are several types of indoor bikes available. Each type serves different needs. Below are the main types:
- Upright Bikes: These are similar to regular outdoor bikes. They offer a traditional riding experience.
- Recumbent Bikes: These bikes have a reclined seat. They provide more back support and are easier on the joints.
- Spin Bikes: These are designed for high-intensity workouts. They mimic the feel of road biking and are popular in spin classes.
Key Features To Consider
When choosing an indoor bike, consider the following key features:
| Feature | Description |
|---|---|
| Adjustability | Ensure the bike allows for seat and handlebar adjustments. |
| Resistance | Look for adjustable resistance to vary your workouts. |
| Display | A good display shows speed, distance, and calories burned. |
| Comfort | Check for comfortable seats and padded handlebars. |
| Stability | Ensure the bike is stable and does not wobble during use. |
By understanding these types and key features, you can make an informed decision. This will help you choose the best indoor cycling bike for your needs.
Proper Bike Fit
Getting the proper bike fit on your indoor cycling bike is crucial. It helps prevent injuries, maximizes comfort, and improves performance. Adjusting your bike correctly can make your workouts more enjoyable and effective.
Importance Of Proper Fit
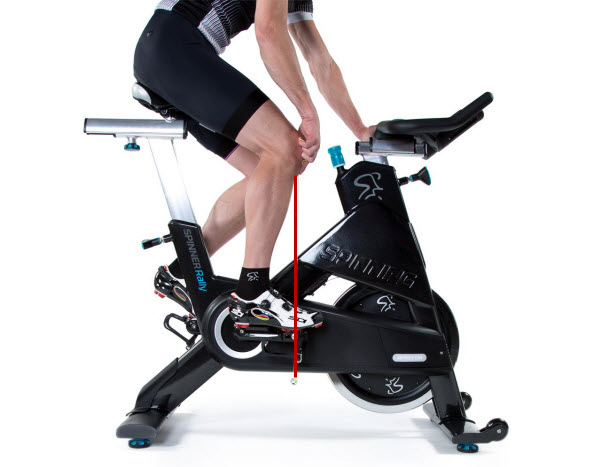
Credit: spinning.com
A proper bike fit ensures that your body aligns correctly with the bike. This alignment reduces strain on your joints and muscles. It also allows for efficient energy transfer from your legs to the pedals.
Key benefits of a proper fit include:
- Reduced risk of injury
- Increased comfort during rides
- Improved performance and endurance
Common Fit Mistakes
Many people make mistakes while adjusting their bikes. These mistakes can lead to discomfort and injury. Here are some common fit mistakes:
| Mistake | Impact |
|---|---|
| Saddle too high | Causes hip rocking and knee strain |
| Saddle too low | Reduces power and strains knees |
| Handlebars too far | Strains back and shoulders |
| Handlebars too close | Causes cramped posture |
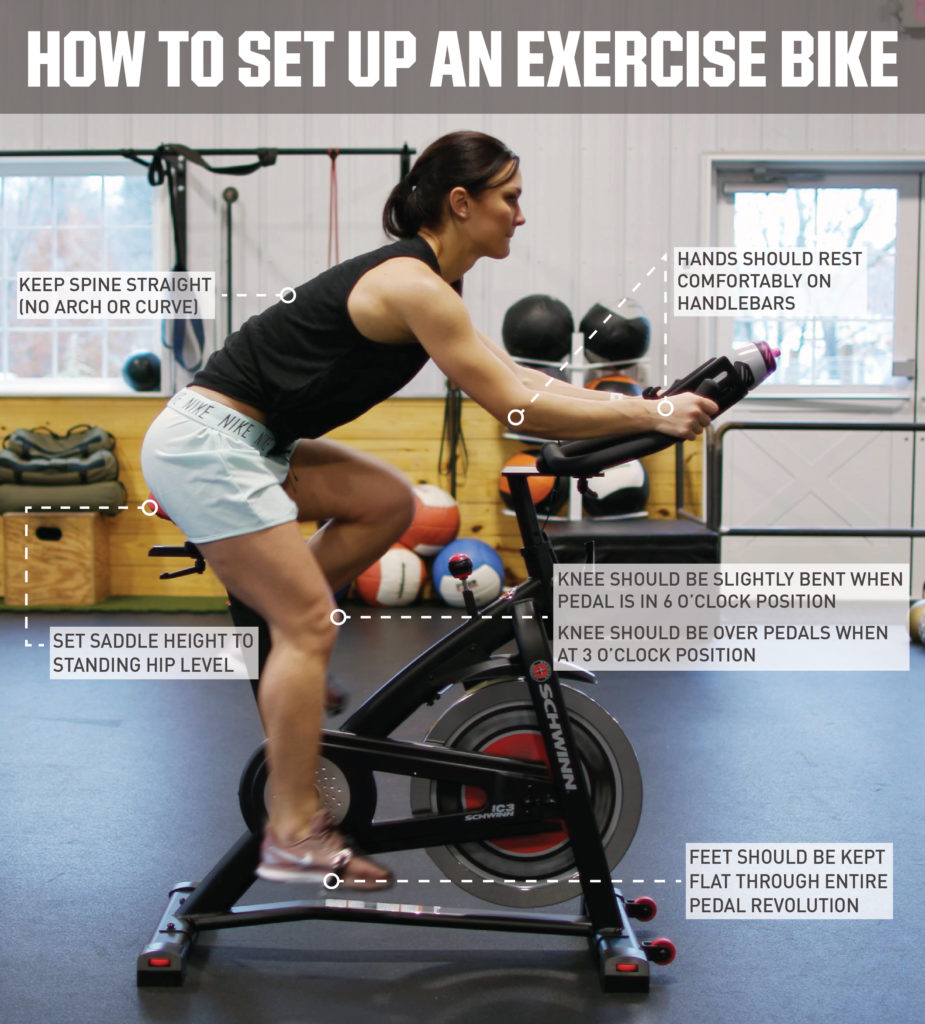
To avoid these mistakes, follow these simple steps:
- Adjust the saddle height so your knee is slightly bent at the bottom of the pedal stroke.
- Set the saddle fore/aft position to align your knee with the pedal axle.
- Adjust the handlebar height to match your comfort level.
- Set the handlebar distance to avoid overreaching.
By following these guidelines, you can achieve the perfect fit on your indoor cycling bike.
Adjusting Seat Height
Setting the correct seat height on your indoor cycling bike is crucial. It ensures comfort and prevents injury during your ride. A properly adjusted seat height helps you maximize your workout efficiency.
Ideal Seat Height
The ideal seat height allows a slight bend in your knee. This bend should be around 25-35 degrees when the pedal is at the lowest point. To find this height, stand next to your bike. Align the seat with your hip bone. This position usually provides the right height.
Tools For Adjustment
Most indoor cycling bikes come with a knob or lever. This tool allows easy adjustment of the seat height. Ensure the bike is stable before making adjustments. Use the following steps to adjust the seat height:
- Locate the adjustment knob or lever.
- Turn the knob or release the lever.
- Slide the seat up or down to the desired height.
- Tighten the knob or secure the lever.
Check if the seat is firm and doesn’t wobble. This ensures safety during your workout.
Credit: www.dickssportinggoods.com
Setting Handlebar Position
Adjusting the handlebar position on your indoor cycling bike is crucial. It ensures comfort and prevents injuries. Proper handlebar settings help maintain good posture. This guide explains how to set the handlebar height and distance.
Handlebar Height
Start by adjusting the handlebar height. The handlebar should be level with the seat. If you’re new to cycling, raise it slightly higher. This reduces strain on your back and neck.
- Locate the adjustment knob or lever under the handlebar.
- Loosen the knob or lever to move the handlebar up or down.
- Set the height to your desired level.
- Secure the knob or lever tightly.
Recheck the height while sitting on the bike. Ensure your arms and back feel comfortable. Make small adjustments if necessary.
Handlebar Distance
Next, adjust the handlebar distance from the seat. This is essential for a comfortable reach. Your elbows should be slightly bent.
- Sit on the bike and place your hands on the handlebar.
- Check if your elbows are slightly bent.
- If not, locate the knob or lever at the handlebar base.
- Loosen it to slide the handlebar closer or farther.
- Secure the knob or lever once you find the right distance.
Recheck the distance while pedaling. Ensure it feels natural and comfortable.
Remember, a good handlebar position enhances your cycling experience. It prevents discomfort and injury. Always take time to adjust it properly.
Fine-tuning Pedals
Adjusting the pedals on your indoor cycling bike is crucial. Proper adjustment ensures comfort and efficiency. Let’s dive into the details.
Pedal Types
There are different types of pedals available. Each type offers unique benefits. The three main types are:
- Flat Pedals: These are standard pedals. They are easy to use.
- Toe Clip Pedals: These have straps. They secure your feet.
- Clipless Pedals: These use cleats. They attach to cycling shoes.
Choose the right type based on your needs. Flat pedals are good for beginners. Toe clip pedals add security. Clipless pedals provide the best connection.
Cleat Positioning
Cleat positioning is vital for comfort. It also prevents injuries. Follow these steps to adjust your cleats:
- Find the Ball of Your Foot: Locate the ball of your foot. This is the widest part.
- Align the Cleats: Position the cleats below the ball of your foot. This ensures optimal power transfer.
- Adjust the Angle: The cleats should face forward. Avoid inward or outward angles.
- Tighten the Screws: Secure the cleats with screws. Ensure they are tight.
Proper cleat positioning enhances your cycling experience. It also helps maintain knee alignment. Regularly check the cleats for wear and tear.

Credit: www.pinterest.com
Optimizing Resistance
Optimizing Resistance on your indoor cycling bike can enhance your workout experience. Proper resistance settings allow for effective training, improving strength and endurance. Let’s dive into how you can optimize resistance for a better ride.
Types Of Resistance
Indoor cycling bikes typically feature two main types of resistance: magnetic and friction.
- Magnetic Resistance: Uses magnets to create resistance. It is quiet and offers smooth transitions.
- Friction Resistance: Uses brake pads to create resistance. It provides a realistic road feel but can be noisier.
Adjusting Resistance Levels
Adjusting resistance levels on your bike is crucial for effective workouts. Follow these steps to ensure optimal settings:
- Start with a low resistance level.
- Turn the resistance knob or lever gradually.
- Increase resistance until you feel a moderate challenge.
- Ensure you can maintain a steady pace.
Use the table below to understand resistance levels better:
| Resistance Level | Intensity | Recommended Duration |
|---|---|---|
| Low | Warm-Up | 5-10 minutes |
| Medium | Steady-State | 20-30 minutes |
| High | Interval Training | 1-5 minutes |
Remember to always listen to your body. Adjust resistance according to your fitness level and goals. Happy cycling!
Maintaining Proper Posture
Proper posture is crucial for effective indoor cycling. It helps prevent injuries and boosts performance. Let’s explore some essential tips and common mistakes.
Posture Tips
- Keep your back straight: A straight back ensures better alignment.
- Engage your core: Tighten your abdominal muscles for better stability.
- Relax your shoulders: Keep your shoulders down and away from your ears.
- Align your knees: Your knees should be in line with your feet.
- Grip the handlebars lightly: Avoid gripping too tightly to reduce strain.
Common Posture Errors
| Error | Description | Correction |
|---|---|---|
| Hunched back | Leaning forward too much, causing a rounded back. | Keep your spine neutral and shoulders relaxed. |
| Locked elbows | Elbows straightened out completely. | Maintain a slight bend in your elbows. |
| Forward head position | Head jutting forward, causing neck strain. | Align your head with your spine. |
| Knees flaring out | Knees pointing outward, not in line with feet. | Ensure knees track over the middle of your feet. |
| Gripping handlebars tightly | Holding the handlebars too tight, causing tension. | Hold handlebars gently, with relaxed hands. |
Ensuring Regular Maintenance
Regular maintenance of your indoor cycling bike is essential. It ensures smooth operation and extends the bike’s lifespan. Proper maintenance also enhances your workout experience. Follow these simple steps to keep your bike in top condition.
Cleaning Tips
Cleaning your bike regularly prevents dust and sweat buildup. Use a soft cloth and mild detergent. Wipe down the frame, handlebars, and seat after each use. Pay attention to the flywheel and pedals.
- Wipe the frame and handlebars.
- Clean the seat and pedals.
- Use a mild detergent.
- Dry the bike thoroughly.
Routine Checks
Perform routine checks to identify any issues early. Regular inspections help maintain performance. Check the following parts of your indoor cycling bike:
- Bolts and Screws: Ensure all bolts and screws are tight.
- Brake Pads: Inspect brake pads for wear and tear.
- Drive Belt: Check the drive belt for tension and condition.
- Pedals: Ensure pedals are secure and in good condition.
| Maintenance Task | Frequency |
|---|---|
| Clean bike frame | After each use |
| Inspect brake pads | Weekly |
| Check bolts and screws | Monthly |
| Examine drive belt | Monthly |
Regular maintenance keeps your bike running smoothly. It also ensures a safe workout environment. Make these steps part of your routine.
Frequently Asked Questions
How Do You Adjust Your Stationary Bike?
To adjust your stationary bike, first set the seat height at hip level. Adjust the handlebars for comfort. Ensure the seat is level. Position the pedals correctly for your feet. Fine-tune until you feel comfortable.
How To Properly Set Up An Indoor Cycling Bike?
Adjust the seat height to hip level. Set the handlebars at a comfortable height. Align the seat horizontally. Ensure proper pedal strap tightness. Check for stability before riding.
What Height Should Handlebars Be On A Stationary Bike Seat?
Handlebars on a stationary bike should be level with or slightly higher than the seat. Adjust for comfort and posture.
How High Should Your Stationary Bike Seat Be?
Adjust your stationary bike seat to hip height. Ensure a slight bend in your knee at the bottom pedal stroke. Proper height prevents injury.
Conclusion
Adjusting your indoor cycling bike ensures comfort and efficiency. Follow the steps above to optimize your ride. Proper adjustments help prevent injuries and improve performance. Enjoy a more comfortable and effective workout session. Remember, a well-tuned bike makes all the difference.
Happy cycling!