Yes — most inversion tables require some assembly, but the process is usually simple and tool-light.
Exclusive Deals
Limited-time Exclusive Deals. Check current discount on Amazon.
Check Price on Amazon As an Amazon Associate I earn from qualifying purchases.I’ve spent years testing home fitness gear and helping friends pick and set up equipment. If you’ve searched "Do inversion tables require assembly," you’re in the right place. This guide explains what assembly looks like, how long it takes, common pitfalls, and real tips from hands-on experience. Read on to learn whether you’ll need tools, how to speed up setup, and when to choose a pre-assembled or pro-installed option.

Do inversion tables require assembly?
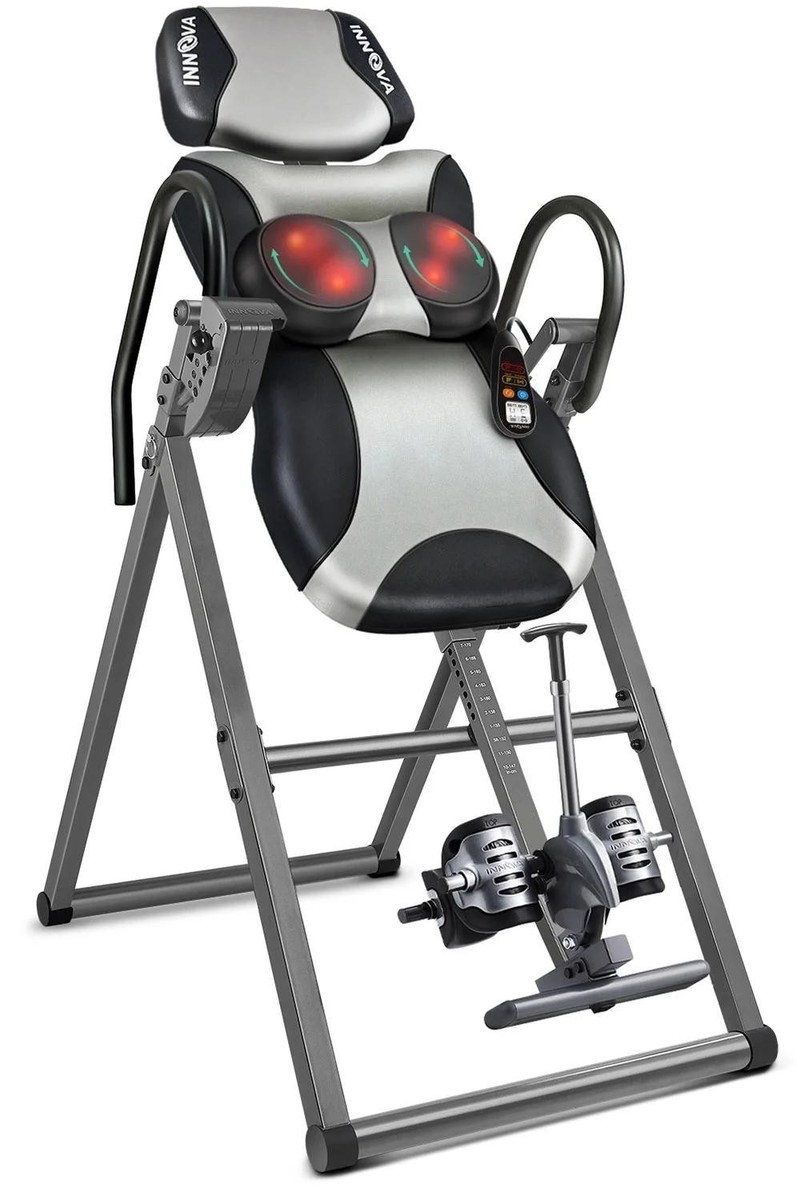
An inversion table is a frame with a padded backrest that tilts you upside down. Most models ship partially disassembled to save space and shipping costs. So yes, do inversion tables require assembly in almost every case, but the work is usually straightforward.
Exclusive Deals
Limited-time Exclusive Deals. Check current discount on Amazon.
Check Price on Amazon As an Amazon Associate I earn from qualifying purchases.Typical items you will attach include the base frame, pivot arms, bed/backrest, ankle locking system, and safety straps. Many brands include clear manuals, labelled parts, and the basic tools needed. Some premium models arrive nearly assembled with only a few bolts left to tighten.
Why manufacturers ship them disassembled:
- Save on shipping volume and cost.
- Make packaging safer and lighter.
- Allow room for larger, sturdier frames that would be bulky otherwise.
What to expect when assembling an inversion table:
Exclusive Deals
Limited-time Exclusive Deals. Check current discount on Amazon.
Check Price on Amazon As an Amazon Associate I earn from qualifying purchases.- A one- to two-person job.
- Simple hand tools like Allen keys or wrenches.
- Clear step-by-step instructions and parts labelled for ease.
Step-by-step assembly process
Here is a common, simplified assembly flow you’ll see for many inversion tables. Follow your specific manual, but this gives a good overview.
Unbox and inventory parts
- Lay out all parts and hardware on a soft surface.
- Check the parts list and screws against the manual.
Assemble the base and feet
- Bolt together the base frame.
- Tighten finger-tight first, then fully secure later.
Attach the uprights and pivot mechanism
- Connect pivot arms to the base.
- Add washers and spacers where shown.
Mount the bed/backrest
- Slide the backrest onto the pivots.
- Ensure it moves freely before tightening.
Install ankle locking system
- Fit pads and lock bars.
- Test comfort and locking strength while standing.
Add safety features
- Attach safety straps, limit chains, or tethering points.
- Check that the table stops at the correct angle.
Final tightening and inspection
- Tighten all bolts to the torque suggested in the manual.
- Test the table empty and then with a careful short inversion.
Quick tips during assembly:
- Work with a partner for heavy parts.
- Don’t overtighten bolts until everything is aligned.
- Keep small parts in labelled bowls to avoid losing them.

PAA-style quick questions (short answers)
Do I need power tools to assemble an inversion table?
Most models require only hand tools included in the box. A cordless drill can speed up the job but is not necessary.
Are there safety checks after assembly?
Yes. Check pivot smoothness, ankle locks, and safety straps before first use. Do a slow inversion test with a spotter.
How long does assembly take and what is the difficulty level?
Time and difficulty vary by model and experience. Here are common ranges:
- 30 to 90 minutes — Basic, simple models with few parts.
- 60 to 180 minutes — Mid-range models with robust frames and extras.
- 2 to 4 hours — Complex or heavy-duty tables, or single-person assembly.
Difficulty factors:
- Skill level — If you’ve built furniture, this is easier.
- Tools available — Proper Allen keys and wrenches speed things up.
- Clear instructions — Good manuals cut assembly time by half.
Pro tips to save time:
- Read the manual fully before starting.
- Pre-sort parts and hardware into piles.
- Assemble on the floor to avoid scratches and dropped bolts.
If you ask "Do inversion tables require assembly" and hate building, choose a model marketed as pre-assembled or use professional assembly services.

Common assembly mistakes and how to avoid them
Even simple builds trip people up. Here are mistakes I’ve seen and how to prevent them.
Loose bolts after first use
- Mistake: Not retorquing bolts after initial tests.
- Fix: Recheck and retighten after the first few sessions.
Misaligned pivot points
- Mistake: Tightening before alignment causes binding.
- Fix: Hand-tighten first, verify movement, then fully tighten.
Wrong orientation of parts
- Mistake: Installing a bracket upside down.
- Fix: Compare parts to manual photos and dry-fit components.
Skipping safety devices
- Mistake: Not attaching straps or limiters to avoid complexity.
- Fix: Always install all safety parts and test them.
Ignoring weight capacity
- Mistake: Assuming all tables are equal for size and weight.
- Fix: Verify rated capacity and pick a model that fits your needs.

Benefits and limitations of assembling your inversion table yourself
Benefits
- Cost savings — DIY assembly keeps price down by avoiding assembly fees.
- Learning — You understand how the table works and how to fix issues.
- Flexibility — You can adjust parts for personal comfort.
Limitations
- Time and effort — Assembly takes time and may be physically demanding.
- Risk of error — Improper setup can harm users or void warranty.
- Need for tools — You may need extra tools for some models.
Warranty and return notes:
- Some warranties require professional assembly for full coverage.
- Keep all manuals and proof of purchase to support warranty claims.

Alternatives to self-assembly
If you’d rather not build the table, consider these options:
Pre-assembled models
- Best for convenience and faster use.
- Often cost more due to shipping and size.
Professional assembly services
- In-home assembly by a technician for a fee.
- Good if you want strict adherence to torque specs.
Local store pickup with assembly
- Some retailers assemble in store before delivery.
- Ask about disassembly fees for returns.
Simpler inversion products
- Inversion chairs or slant boards require minimal setup.
- They might serve light needs without complex assembly.

Personal experience and expert tips
I’ve assembled several inversion tables for myself and friends. My key lessons:
- Always clear a wide workspace. I once lost a tiny washer under a bench and spent 20 minutes finding it.
- Use a magnetic tray or small containers to keep screws organized.
- Tighten bolts in stages. I learned that aligning pivots first avoids wobble.
- Test the ankle locking system while standing. A snug fit matters more than you think.
- If you feel unsure, call customer support—some brands walk you through assembly step by step.
Real-life tip: mark the torque or tightness level with a small marker on bolts after you finish the final tightening. It helps for follow-up checks.

Frequently Asked Questions of Do inversion tables require assembly
Do all inversion tables require assembly?
Most inversion tables arrive partially disassembled to save shipping space. Only a few premium models come fully assembled.
Can one person assemble an inversion table alone?
It is possible for lighter models, but two people make alignment and lifting safer and faster.
What tools are usually needed to assemble an inversion table?
Common tools include Allen keys, wrenches, and sometimes a screwdriver. Many brands include the required tools.
How do I know if my assembly is safe?
Perform a full visual check, test pivot movement, verify ankle locks, and do a slow inversion test with someone spotting you.
Will assembly affect my warranty?
Some warranties require correct installation. Read the warranty terms; professional assembly may be needed for full coverage.
Conclusion
Asking "Do inversion tables require assembly" is smart when shopping for one. Most models do need some assembly, but the work is usually straightforward, well-documented, and doable with basic tools. Take your time, follow the manual, and test safety features before regular use. If you prefer zero fuss, opt for pre-assembled units or hire a pro.
Take action: choose a model that fits your space and strength, read its assembly guide before buying, and start with a slow, careful test session. If this guide helped, leave a comment or share your assembly tips and experiences.