Learning how to improve strength training form is the most effective way to protect your joints while maximizing your results. Consistent, high-quality movement patterns allow you to move heavier loads safely and effectively over time.
As of 2026, data from the National Strength and Conditioning Association confirms that technical proficiency is the primary indicator of long-term training longevity. Refining your technique ensures that the target muscle groups do the heavy lifting rather than your passive structures.
Today's Exclusive Deals
Limited-time Exclusive Deals. Check current discount on Amazon.
Check Price on Amazon As an Amazon Associate I earn from qualifying purchases.Quick Answer
Improving your form requires slow and controlled movement. Focus on your joint alignment in every rep. Record yourself to spot subtle technical errors.
Decrease the weight if your technique breaks down. Consistent practice builds better motor control.
Why Form is Your Safest Path to Strength Gains
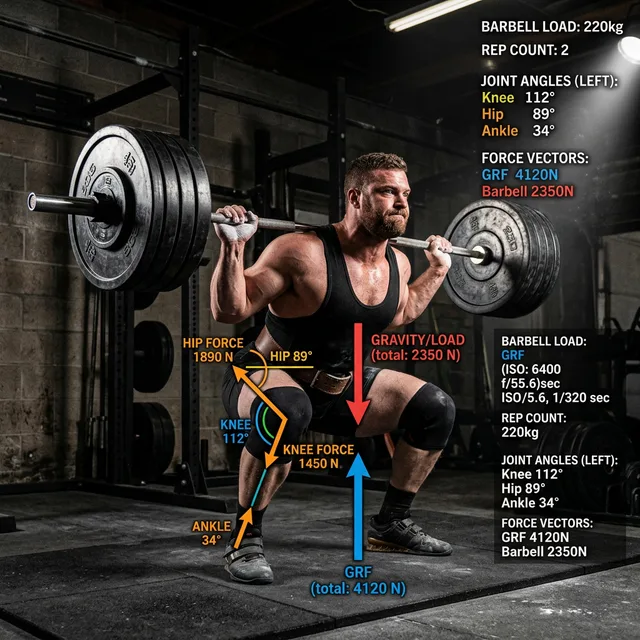
Image source: Bing (Web (fair-use with source credit))
Correct technique serves as the foundation for every successful routine focused on building muscle. When you prioritize form, you ensure that tension is placed exactly where it belongs: on the muscles you intend to stimulate. Relying on momentum might allow you to complete a set, but it bypasses the neurological and physiological stress required for muscle adaptation.
Proper mechanics reduce the shear forces acting on your spinal discs and ligaments. If you are starting your journey with a basic kit for novice lifters, establishing these habits early prevents the development of compensation patterns. These are movements where secondary muscles work overtime to stabilize a load, often leading to overuse injuries.
Choosing the right gear for strength training can also play a subtle role in your form. A bar that feels balanced in your hands allows for more precise control during complex movements like rows or overhead presses. Once your form is locked in, you gain the confidence to apply progressive overload safely, knowing your body is moving in its strongest possible alignment.
The Anatomy of a Perfect Rep: Core Stability and Alignment
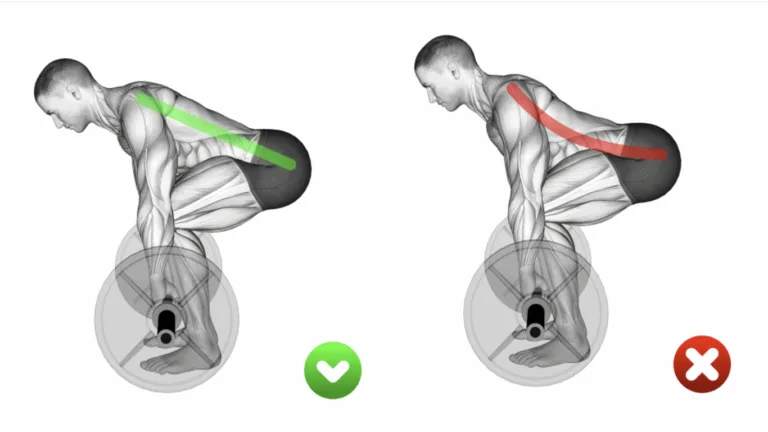
Image source: Bing (Web (fair-use with source credit))
Core stability is not just about abdominal strength; it is about rigid control of the torso. When we talk about a neutral spine, we mean keeping your vertebrae in their natural alignment without excessive rounding or arching. This is vital whether you are using compact equipment for small areas or a full gym setup.
Bracing is the technical term for creating intra-abdominal pressure. You accomplish this by taking a deep breath into your belly and contracting your core muscles as if you are preparing for a punch. This pressure acts as an internal belt, supporting your lower back during heavy lifts.
You should maintain this brace for the entire duration of the repetition.
Key alignment checkpoints:
- Shoulder Blades: Retract and depress them to create a stable base for presses.
- Glute Engagement: Squeezing your glutes prevents the lower back from hyperextending.
- Foot Pressure: Distribute weight evenly across the entire foot to maintain balance.
Poor alignment often stems from neglected mobility. If your hips are too tight, your lower back will likely round to compensate during a squat. Focusing on your setup before the first rep, even if you are just using basic gear for full body work, ensures your kinetic chain functions as one cohesive unit.
Troubleshooting Common Movement Patterns
Even experienced athletes deal with form breakdown when fatigue sets in. The goal is to recognize the technical failure point. This is the moment your technique slips, even if you could theoretically grind out a few more repetitions.
Stopping here is a sign of experience, not weakness.
One common issue is the knee cave during squats, where the knees collapse inward. This typically happens because the hip abductors are not firing correctly. You can often fix this by focusing on pushing your knees outward against an imaginary band during the descent and ascent.
Managing common technical errors:
- Lower Back Rounding: Often caused by deadlifting with a load that exceeds your current core capacity.
- Excessive Neck Extension: Keeping your gaze locked forward during a deadlift can strain the cervical spine; keep your neck neutral.
- Weight Shifting: If your heels rise during a press, you are likely too far forward; reset your stance to center your gravity.
If you find your form suffering, check your affordable home equipment setup. Sometimes the height of your rack or the diameter of your bar changes how you interact with the weight. Small adjustments to your starting position often clear up these issues immediately.
Building a Better Mind-Muscle Connection
The mind-muscle connection is the ability to consciously contract a specific muscle through the full range of motion. It is not just a mental exercise; it is a way to ensure the target muscle does the work. When you perform a row, visualize the movement starting at your shoulder blades.
If you just pull with your hands, your forearms will exhaust before your back does.
Begin by using lighter weights to practice feeling the contraction. If you are training at home, your selected gear for gym performance should allow for smooth transitions and controlled movement. Slow the eccentric phase, the part of the lift where you lower the weight, down to three seconds.
This pause forces your muscles to stabilize the weight without help from momentum.
Strategies to enhance awareness:
- Tactile Cues: Lightly touch the working muscle during a lighter set to provide sensory feedback.
- Mental Imagery: Imagine your limbs are levers and the muscle is the engine moving them.
- Isolation: Start your workout with isolation movements to pre-exhaust the target area.
Research into motor control suggests that external focus, thinking about the movement path of the weight, can be just as effective as internal focus. Try alternating between focusing on the muscle contraction and focusing on the path of the bar. You will find that one of these methods helps you feel more connected to the lift.
How to Perform a Technical Self-Audit

Image source: Web (Bing) / pinterest.com (Web image (fair-use with source credit))
Video analysis is the gold standard for honest feedback. You might feel like you are squatting to parallel, but a camera will show you exactly what is happening from the side or front. If you are trying to improve your Olympic lifting technique, recording from the side is non-negotiable for spotting bar path deviations.
Set your phone at hip height to capture your full range of motion. Do not try to analyze every detail in one go. Pick one specific element for each set, such as your spine angle or knee travel.
This prevents you from getting overwhelmed by the sheer amount of data in a single recording.
Step-by-step audit process:
- Placement: Position your camera perpendicular to the movement.
- Angle: Keep the lens at or near waist height to avoid parallax errors.
- Observation: Watch the video in slow motion, noting where your form degrades.
- Correction: Make one change at a time during your next set.
If you are refining your powerlifting mechanics, the camera reveals subtle flaws that your proprioception misses. The best lifters in the world constantly film their sets. They understand that what feels right and what is right are often different things.
Use this data to adjust your cues and refine your movement.
Essential Safety Protocols for Injury Prevention
Safety begins with acknowledging your current physical limits. Pushing for a personal best without first mastering the movement pattern is the fastest path to a setback. You should treat the movement itself as the primary load during your initial sessions, even if you feel like you could handle more weight.
Consistent movement is safer than sporadic, high-intensity efforts. The Occupational Safety and Health Administration emphasizes the importance of proper ergonomics and mechanics, which applies just as much to the gym as it does to any physical workspace. Your joints are designed to handle load within specific ranges; moving outside of those ranges, or with poor posture, creates unnecessary wear.
Staying safe while you progress:
- Warm-up: Dedicate 5 to 10 minutes to dynamic mobility work. Cold muscles are prone to strain, whereas warmed tissue is more pliable.
- Safety Equipment: Always use safety pins or a spotter when training with heavy free weights. Know exactly how to bail out of a lift if you lose control.
- Listen to pain: There is a distinct difference between muscle fatigue and joint pain. If you feel sharp, stinging, or popping sensations, stop the movement immediately.
Consistency is your best safeguard. When you maintain a regular schedule, your connective tissues adapt gradually to the stress of your workouts. Trying to catch up on missed sessions by over-training leads to fatigue, which is when most technical mistakes occur.
Frequently Asked Questions About Strength Training Form
How long does it take to fix bad form?
Most people can correct a technical flaw in two to four weeks of focused practice. You need to strip back the weight and emphasize the new, correct movement pattern in every repetition. If you are inconsistent, the process takes significantly longer as your body defaults to old, inefficient habits.
Is it normal to feel soreness in my joints?
Joint pain is rarely a normal part of strength training. Muscle soreness, which usually appears 24 to 48 hours after a workout, is a sign of adaptation. If you feel pain in your wrists, elbows, knees, or lower back during the lift, you are likely using incorrect form or excessive weight.
Can I train if I have limited mobility?
You should adjust your range of motion to fit your current mobility limits while working to improve them over time. Do not force yourself into a full squat if your ankles or hips restrict you. Use a box or bench to limit the depth until your mobility improves through consistent daily stretching.
Why does my lower back hurt during deadlifts?
Lower back pain during deadlifts usually indicates a loss of spinal rigidity. You are likely failing to brace your core or your hips are starting too low, which forces your back to compensate. Focus on pulling the slack out of the bar before the weight leaves the floor to lock your spine in place.
How do I know when to increase the weight?
Only increase the weight when you can complete all prescribed sets and repetitions with perfect technique. If your final reps look shaky or messy, you are not ready for a heavier load. Strength is built through precision, not by forcing sloppy reps with heavy plates.