Snowboarding is all about freedom, speed, and fun on the slopes. But before you glide down the mountain, you must know how to strap into a snowboard properly. Many beginners feel awkward or frustrated when learning this basic step, but it’s easier than it looks.
Doing it right is not just about comfort—it’s crucial for safety, control, and confidence on the snow.
Let’s break down the process, share some expert tips, and help you avoid common mistakes. Whether you’re getting ready for your first lesson or want to improve your technique, this guide will make sure you start every run with your boots locked in and your mind focused on the ride.
Understanding Your Snowboard Bindings
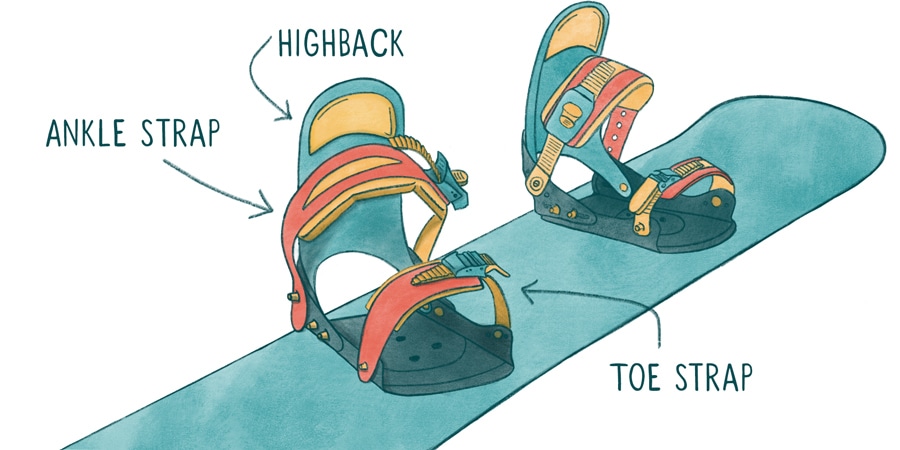
Before strapping in, you need to know what you’re working with. Snowboard bindings are the devices that connect your boots to your board. There are two main types:
- Strap Bindings: These use two straps to secure your boot—one over the toe and one over the ankle. They are the most common and offer good control.
- Rear-Entry Bindings: These open at the back, making it quicker to get in and out. They are popular for their convenience.
Each type has its fans, but the strapping-in process is similar for both. Make sure your bindings match your boot size for a snug, not crushing, fit.
| Binding Type | Entry Method | Best For |
|---|---|---|
| Strap Bindings | Toe & ankle straps | All skill levels |
| Rear-Entry Bindings | Fold-down highback | Beginner to intermediate |
Understanding your bindings helps you work with your equipment, not against it.
Preparing Before You Strap In
Preparation makes strapping in smoother and faster, especially in cold weather. Here’s what you should do:
- Check your gear: Make sure your boots are properly laced and snug. Loose boots make it hard to control the board.
- Find a flat spot: Avoid slopes. A flat area gives you balance and time to practice.
- Brush off snow: Knock snow off your boots and bindings. Packed snow can keep straps from closing tightly.
- Position your board: Place your board flat on the ground, with the bindings facing up.
These simple steps help prevent problems before they start.
Step-by-step: How To Strap Into A Snowboard
Now, let’s get into the core process. Follow these steps, and you’ll be ready to ride in no time.
1. Sit Down Or Stay Standing
Most beginners find it easier to sit down on the snow. If you have good balance, you can also strap in while standing. Try both and see what feels comfortable.
- Sitting: Sit with your board in front of you, knees bent, and bindings facing up.
- Standing: Place your board flat and stand with one foot next to it for stability.
2. Insert Your Lead Foot
Your lead foot is usually the one you kick a ball with. Place your boot into the front (toe-side) binding.
- Make sure your heel is pressed all the way back into the binding.
- Your boot should fit snugly, but not painfully tight.
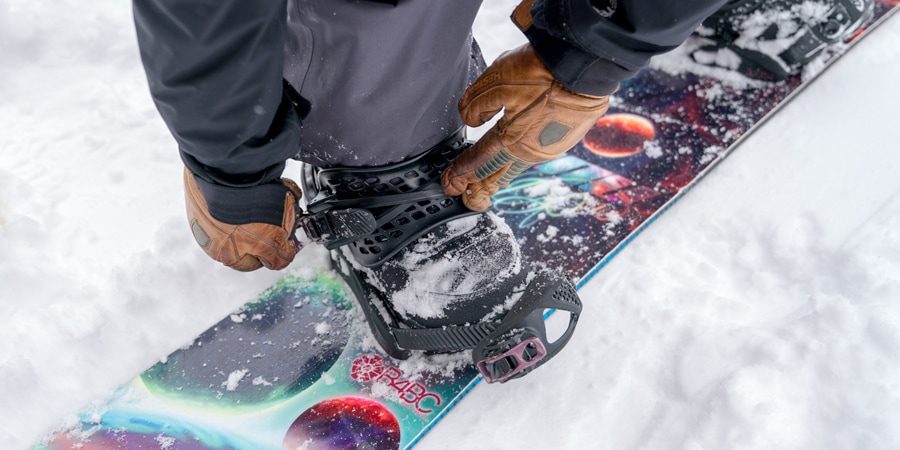
3. Secure The Straps
Start with the ankle strap. Pull it over the center of your boot and into the ratchet. Tighten until it feels secure but not uncomfortable.
Next, do the toe strap. Some bindings have a cap strap that goes over the front of the boot, while others go across the top. Make sure the strap covers the boot evenly. Tighten the ratchet until your foot feels locked in.
- Double-check both straps for even tension.
- Wiggle your foot. There should be little to no movement.
4. Repeat For The Rear Foot
If you’re at the top of the hill and ready to ride, repeat the same process for your back foot. On most chairlifts, you’ll ride with one foot out, so only strap in both feet before heading downhill.
5. Stand Up
Push yourself up with your hands or use your board for leverage. Shift your weight forward, bend your knees, and stand in a balanced stance. You’re now ready to start riding.
6. Final Checks
Look over your bindings one more time:
- Are the straps tight and centered?
- Is your boot fully seated in the binding?
- Are your laces still snug?
These checks take seconds but can prevent uncomfortable or dangerous rides.
Common Mistakes When Strapping In
Even experienced snowboarders make mistakes when strapping in. Here are some to watch out for:
- Snow under straps or boots: This causes loose bindings and poor control.
- Over-tightening: Too much pressure can cut off circulation, causing numb feet.
- Loose boots: If your boots aren’t laced well, the straps won’t hold you properly.
- Crooked straps: Straps should be centered over your boot for even pressure.
- Wrong foot first: Always start with your lead foot. It helps with balance and control.
Learning to spot these errors early makes your snowboarding experience safer and more enjoyable.
Strapping In On A Slope Or Chairlift
Sometimes you’ll need to strap in on a sloped surface or after getting off a chairlift. Here’s how to handle those situations:
- On a slope: Position your board perpendicular to the hill to prevent sliding. Sit down with your board below you, so gravity doesn’t pull you downhill.
- After a chairlift: Slide off the lift with your front foot strapped in and your back foot free. Move to a safe area, then strap in your rear foot as described above.
Practice makes these situations easier. With time, you’ll strap in quickly and confidently, no matter the location.
Quick Tips For Faster Strapping In
- Keep straps open: Before you sit or stand, make sure the straps are open and out of the way.
- Practice at home: Strap in and out while watching TV. Muscle memory makes it second nature.
- Use gloves with grip: Snowboard gloves with rubberized palms help you handle cold, wet straps.
- Try rear-entry bindings: If you want speed, these can reduce time on the ground.
- Check for ice: Build-up can block the ratchets—knock it off before you start.
Small improvements save time and keep you warm.

Snowboard Stance And Binding Position
Strapping in isn’t just about the straps—it’s also about your stance and binding position. A good stance improves balance, control, and comfort.
| Stance Type | Angle (Front/Back) | Best For |
|---|---|---|
| Duck Stance | +15° / -15° | Freestyle, park riding |
| Forward Stance | +15° / 0° | All-mountain, beginners |
| Alpine Stance | +21° / +6° | Carving, racing |
If you’re a beginner, start with a forward stance. As you gain experience, experiment to find what feels best.
Equipment Maintenance For Easy Strapping In
Keeping your equipment in good shape makes strapping in easier and safer.
- Clean bindings: After each session, remove snow and ice. Dry your bindings to avoid rust.
- Check screws: Loose screws can lead to wobbly bindings or even accidents. Tighten them regularly.
- Inspect straps and ratchets: Look for cracks or wear. Replace damaged parts right away.
- Condition boots: Dry boots overnight and check for worn laces or broken eyelets.
Regular care extends the life of your gear and reduces frustration on the mountain.
Key Insights Beginners Often Miss
Many new riders focus only on getting the straps tight, but there are two critical insights:
- Foot Position Matters: Before you tighten anything, make sure your heel is pushed back firmly. If it isn’t, even the tightest straps won’t give you good control.
- Strap Order Is Important: Always secure the ankle strap first, then the toe strap. This sequence locks your heel in place and gives you better board response.
Ignoring these small details can lead to sore feet, poor turns, and less fun on the hill.
Safety Reminders When Strapping In
Safety always comes first. Here’s what you need to remember:
- Stay clear of crowded paths: Move to the side of the trail or designated strapping zones.
- Be aware of others: Other snowboarders and skiers may not see you sitting down.
- Avoid icy spots: Icy ground can cause slips and falls while you’re strapping in.
A few seconds of caution can prevent injuries and equipment damage.
Advanced Tips For Experienced Riders
If you’re comfortable with the basics, try these advanced tips:
- Micro-adjust your straps: Some bindings allow you to fine-tune the length of the straps for a perfect fit.
- Experiment with forward lean: Adjusting the highback angle can change your riding style and performance.
- Quick-release systems: Some high-end bindings have fast-release features for speed and convenience.
These small changes can make a big difference in comfort and control, especially for all-day sessions.
Comparing Snowboard Binding Brands
Choosing the right bindings can affect how easy it is to strap in and ride. Here’s a quick comparison of popular brands:
| Brand | Known For | Price Range (USD) |
|---|---|---|
| Burton | Durability, innovation | $150 – $400 |
| Union | Lightweight, freestyle | $120 – $350 |
| Flow | Rear-entry speed | $180 – $350 |
Try different models if possible, and don’t be afraid to ask for recommendations in snowboard shops or online forums.
Where To Learn More
If you want to see videos, diagrams, or more in-depth guides, the official Wikipedia Snowboarding page is a trusted resource for all things snowboarding.
Frequently Asked Questions
How Tight Should My Snowboard Bindings Be?
Your bindings should be snug but not painful. Tighten until your boots don’t move, but stop if you feel pressure points or numbness. You should be able to wiggle your toes.
Can I Strap In While Standing?
Yes, but it takes practice. Stand on a flat surface and keep your board steady. Many beginners prefer sitting down until they gain more balance.
Why Does Snow Get Stuck In My Bindings?
Snow or ice buildup is common, especially on powder days. Brush off your boots and bindings before strapping in. This ensures a secure connection and easier riding.
Do All Bindings Fit Every Snowboard Boot?
Most bindings are adjustable, but they come in different sizes. Check compatibility between your boot and binding brands. Test the fit before you buy.
Should I Strap In Both Feet At The Top Of The Lift?
Usually, you only strap in your front foot before getting off the lift. Move to a safe zone, then strap in your rear foot before heading downhill.
Mastering how to strap into a snowboard is a key step toward a better, safer, and more enjoyable time on the mountain. With practice, it will become second nature—just like riding itself. So gear up, check your setup, and get ready to carve your own path on the snow.