Improving how you move under a load is the smartest way to ensure you stay injury-free while getting stronger. You don't need a perfect physique to start, but you do need to master basic movement patterns before piling on the plates.
As of 2026, data from the National Strength and Conditioning Association confirms that technical proficiency is the primary indicator for long-term athletic durability. By slowing down and auditing your mechanics, you can build a stable foundation that supports your growth for years to come.
Today's Exclusive Deals
Limited-time Exclusive Deals. Check current discount on Amazon.
Check Price on Amazon As an Amazon Associate I earn from qualifying purchases.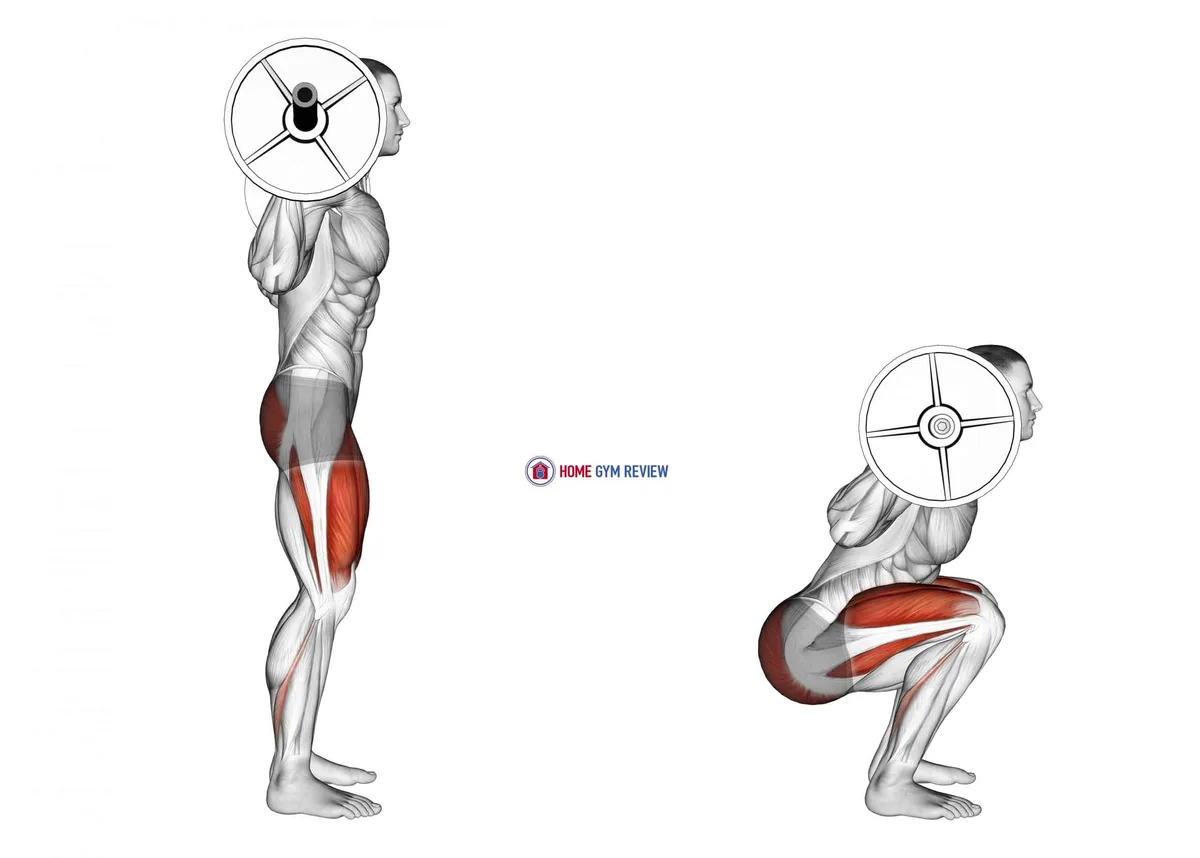
Quick Answer
Improving your lifting technique starts with mastering bodyweight movement patterns first. Record your sets to spot and correct technical flaws early. Maintain a neutral spine position during every single repetition.
Use controlled tempos to build necessary neuromuscular stability. Always prioritize your form over the amount of weight lifted.
Why Your Technique Matters More Than the Weight on the Bar
Most people head to the gym with one goal: adding more weight to the bar. While progressive overload is essential, chasing personal records with sloppy form is the fastest way to get sidelined. Technique is essentially the efficiency of your movement.
When you move well, your muscles work together in harmony to produce force. When you move poorly, your joints and connective tissues absorb the stress that should be going into your muscles.
Building a reliable piece of equipment is only half the battle. If you don't know how to use it safely, you risk acute injury or chronic wear and tear. You want to train in a way that respects your anatomy.
Focus on the quality of your repetitions rather than the total tonnage. The strength you build with perfect technique is much more functional and permanent than strength built on momentum and compensation.
The Biomechanics of Safe Lifting: Setting Your Foundation
Safety starts with your structural alignment before the bar ever moves. A neutral spine is the most critical component of almost every compound lift. It involves maintaining the natural curves of your back while keeping your core braced and rigid.
This position protects your vertebrae by distributing forces evenly through your muscles rather than your discs.
Before you begin, establish a solid base. If you are looking for an ideal Olympic kit, ensure your floor space allows for a firm, non-slip stance. Proper foot pressure is just as important as back position.
Imagine you are trying to screw your feet into the floor to create outward tension. This simple cue activates your glutes and provides a stable platform for your entire movement. According to research from the American College of Sports Medicine, foundational stability is the precursor to safe intensity.
How to Audit Your Own Form Using Video and Internal Cues
The easiest way to improve is to see yourself move. What you feel during a lift is often different from what is actually happening. Set up your phone at hip level and capture a side view of your movement.
Watch for deviations like knees caving inward during a squat or your hips rising too early during a deadlift.

Internal cues act as mental shortcuts to fix these issues. If you notice your back rounding, tell yourself to show the chest to the wall. If your basic starter kit feels shaky, focus on gripping the bar as hard as possible to engage your lats.
You don't need a degree in kinesiology to spot obvious errors. Just look for where your body deviates from a straight line or where joints look uncomfortable. Keep your notes simple and focus on one single improvement each time you hit the gym.
Mastering Tempo and Tension for Better Motor Control
Tempo training is the hidden secret for those stuck on a plateau. If you consistently rush your reps, you never give your stabilizer muscles enough time to adjust to the load. A 3-1-1 tempo means you take three seconds to lower the weight, pause for one second at the bottom, and take one second to push it up.
This forces you to control the movement at every single inch of the path.
This approach is perfect when you are building a powerlifting base and need to eliminate bouncing off the bottom of a lift. By pausing, you remove all kinetic energy and force your muscles to generate raw power from a dead stop. This builds incredible motor control.
You will likely need to lower the weight significantly at first, but the quality of your movement will improve drastically. The goal is tension, not just movement. When you stay tight, you stay safe and strong.
Common Technical Breakdowns and How to Fix Them
Even experienced lifters encounter form drift as fatigue sets in. The most common error is compensatory movement, where your body takes the path of least resistance to finish a rep. For instance, if your quads tire during a squat, you might shift the load to your lower back by hinging too early.
If you are using specialized tools for muscle growth, you must watch for these common red flags:
- The Valgus Knee: Your knees cave inward toward each other. Fix this by actively pushing your knees out against a resistance band during your warm-up sets.
- Bar Path Deviation: The bar drifts away from your center of gravity. For overhead presses, keep the bar path vertical and tucked close to your face to maximize leverage.
- Heel Lift: Your weight shifts forward onto your toes. Focus on driving through your mid-foot and using a flatter shoe or a specialized lifting shoe if your ankle mobility is limited.
When these breakdowns occur, stop the set immediately. Pushing through poor mechanics reinforces bad habits and increases your risk of joint stress. Reset your stance, take a deep breath, and approach the next set with a renewed focus on your weakest point.
Integrating Progressive Overload Without Sacrificing Stability
Progressive overload is the process of gradually increasing the difficulty of your training over time. Many people mistake this for just adding weight every week. True overload includes increasing repetitions, improving your tempo, or decreasing your rest periods between sets.
If you are setting up a small gym footprint, you have limited iron plates, so mastering these other variables becomes vital for continued progress.
- Small Increments: Use fractional plates to increase the weight by as little as one or two pounds. Big jumps often lead to immediate technical failure.
- Repetition Consistency: Keep the weight the same until you can hit every rep with perfect, pause-controlled technique. Once you reach the top end of your rep target with perfect form, then, and only then, increase the weight.
- The Last Rep Test: If your last rep looks exactly like your first rep, you have successfully integrated overload. If the last rep looks like a struggle, stick with that weight for one more session.
When to Seek Professional Coaching: Identifying Your Limits
Sometimes, you cannot see your own mistakes no matter how many videos you record. A qualified strength coach provides immediate, actionable feedback that takes months to discover on your own. If you have been working with a full-body training kit for six months and your joints consistently ache, it is time to seek an objective set of eyes.
Look for coaches who prioritize fundamental movement quality over flashy personal records. They can evaluate your unique mobility constraints and adjust your form to fit your specific body type. If you have a history of past injuries, or if you feel pain that does not resolve after a simple deload week, consult a professional who understands biomechanics.
Their job is to ensure you can keep training for decades, not just through the end of the year.
FAQs: Troubleshooting Common Lifting Questions
How do I know if my lifting pain is normal?
Muscle soreness is a normal sign of tissue adaptation after training. Sharp, shooting pain or localized discomfort in joints like your knees, shoulders, or lower back is not normal. Stop immediately if you feel joint pain and re-evaluate your technique or reduce the intensity until you find a pain-free range of motion.
Should I wear a weight belt to fix my form?
No, a belt should never be used as a crutch for poor technique. It is meant to provide a wall to brace your core against, which can help increase intra-abdominal pressure during maximal efforts. Master your bracing technique without the belt first before considering it as a tool for heavier lifting.
How often should I film my sets?
You should aim to record at least one work set for each major compound movement every week. Consistent filming keeps you accountable and helps you catch small, subtle form drifts before they turn into ingrained habits. Compare your current footage against your older videos to track your technical progress.
What is the best way to breathe while lifting?
The Valsalva maneuver is standard for heavy lifting. Take a deep breath into your belly, not your chest, and hold it while you create tension against your core muscles. This creates a rigid cylinder of pressure that supports your spine.
Exhale only once you have passed the most difficult point of the repetition.
Can I improve my technique with lighter weights?
Yes, using lighter weights is the most effective way to refine your mechanics. It removes the psychological pressure of moving heavy loads and allows you to focus purely on muscular control and bar path. Once your technique is flawless with light weight, the strength gains from heavier loads will come much easier.