
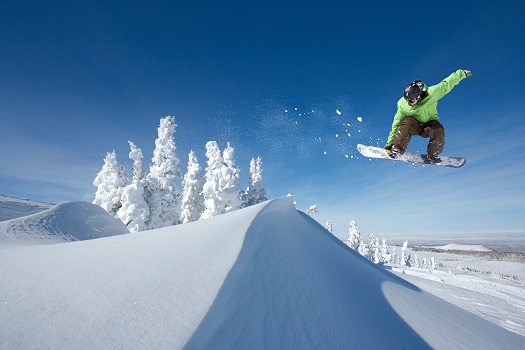
Snowboard jumping is one of the most exciting skills you can learn on the slopes. The feeling of flying through the air, even for a moment, is what draws many riders to snowboarding in the first place. But learning how to do a snowboard jump safely and with style is not as easy as it looks.
Exclusive Deals
Limited-time Exclusive Deals. Check current discount on Amazon.
Check Price on Amazon As an Amazon Associate I earn from qualifying purchases.Many beginners rush into jumping, only to end up with falls, injuries, or a loss of confidence. To help you master this skill, this guide breaks down everything you need to know—step by step. Whether you’re just starting out or want to take your jumps higher, you’ll find practical tips, clear instructions, and expert advice here.
Understanding The Basics Of Snowboard Jumping
Before you try your first jump, it’s important to know what a snowboard jump actually involves. At its core, a jump is a combination of speed, balance, and timing. You ride toward a ramp or a small bump, use your legs to push off (called “popping”), fly through the air, and then land smoothly.
Each part of the jump has its own technique and common mistakes.
Exclusive Deals
Limited-time Exclusive Deals. Check current discount on Amazon.
Check Price on Amazon As an Amazon Associate I earn from qualifying purchases.Why Start Small?
Many riders want to go big right away, but starting small is smarter. Learning on small jumps helps you get comfortable with the feeling of leaving the ground. It also reduces the risk of injury. Even advanced snowboarders practice on small features to keep their technique sharp.
The Key Elements
A snowboard jump has four main parts:
- Approach: How you ride toward the jump.
- Takeoff: The moment you leave the snow.
- Flight: How you move while in the air.
- Landing: Coming back down safely and smoothly.
Each part is important. If you rush any step, you’re more likely to lose control or fall.
Exclusive Deals
Limited-time Exclusive Deals. Check current discount on Amazon.
Check Price on Amazon As an Amazon Associate I earn from qualifying purchases.Gear And Preparation
Having the right gear can make a big difference in your jump experience. It’s not just about the board—your boots, bindings, and even clothing all play a part in safety and comfort.
Essential Gear For Jumping
- Snowboard: Freestyle boards are best for jumping. They are shorter, lighter, and have more flex, which helps with pop and control.
- Bindings: Make sure your bindings are tight and responsive. Loose bindings can cause your feet to slip during takeoff or landing.
- Boots: Stiff boots give you more support, but some riders prefer medium flex for a softer feel.
- Helmet: Always wear a helmet. Head injuries are common in jumps, and a helmet can save your life.
- Pads: Wrist, knee, and hip pads offer extra protection, especially for beginners.
Clothing Tips
Wear clothing that allows you to move easily. Avoid baggy jackets or pants that could catch on your board. Layering is smart, as you might get warm after a few tries.
Pre-jump Warm-up
Before your first jump, do some stretches and basic riding to warm up your muscles. Focus on your legs, back, and shoulders. Warm muscles react faster and help prevent injuries.
How To Do A Snowboard Jump: Step-by-step
Now let’s break down exactly how to do a snowboard jump, from your first approach to your landing. Practicing each step separately will help you build confidence.
1. Scouting The Jump
Look at the jump before you ride toward it. Check the takeoff, landing area, and run-out (the area after the landing). Make sure there are no obstacles, ice patches, or other riders in your way.
2. The Approach
- Speed: Start with a moderate speed. Too slow and you won’t clear the jump; too fast and you might lose control. Watch other riders to see how fast they go.
- Body Position: Keep your knees slightly bent, back straight, and arms relaxed. Look forward, not down at your feet.
- Edge Control: Stay flat on your base, not on your edges, as you approach. This gives you the most control.
3. Takeoff (“popping”)
As your board reaches the lip of the jump:
- Crouch Down: Bend your knees deeper and prepare to spring upward.
- Pop Up: Push down with your legs and then quickly straighten them to “pop” off the jump. Think of jumping straight up, not forward.
- Shoulders and Arms: Keep your shoulders parallel to the board. Don’t twist your upper body, or you might spin accidentally.
4. Flight
- Stay Compact: Keep your knees bent and body tight. This helps you stay balanced.
- Look Forward: Focus on where you want to land, not straight down.
- Hands: Keep your hands over your board for better balance.
5. Landing
- Spot the Landing: As you start to come down, look at the landing area.
- Absorb the Impact: Bend your knees as you land to absorb the shock. Try to land on the “downhill” side of the jump, not the flat area.
- Stay Centered: Don’t lean too far forward or back. Land with your weight centered over the board.
6. Riding Out
After landing, keep your knees soft and ride away smoothly. If you feel off balance, use small adjustments with your hips and arms to stay upright.
Common Mistakes And How To Avoid Them
Even advanced riders make mistakes when jumping. Knowing these mistakes can help you avoid them.
Approaching Too Fast Or Slow
Misjudging your speed is a common problem. If you’re not sure, start slow and build up as you get more comfortable.
Leaning Back
Many beginners lean back during takeoff or flight. This often leads to “back seat” landings, where you fall on your butt.
Not Committing
Hesitation can cause you to “case” the jump—landing on the edge instead of the slope—or fall sideways. Commit to your pop and look forward.
Stiff Legs
If you keep your legs stiff on landing, you’re more likely to bounce or crash. Keep your knees bent and relaxed.
Not Looking Ahead
Looking down at your board can throw off your balance. Always look toward your landing spot.
Practicing On Flat Ground
You don’t need a big jump to practice. Many coaches recommend learning the “pop” on flat snow first.
- Stand on your board, knees bent.
- Jump straight up, keeping your shoulders level.
- Land with knees bent, absorbing the impact.
This simple drill builds muscle memory for the real thing.
Progressing To Bigger Jumps
As you gain confidence, you’ll want to try larger jumps. Progress slowly. Each new size brings its own challenges.
Park Jumps Vs. Natural Features
Snow parks often have well-shaped jumps with smooth takeoffs and landings. Natural jumps (like bumps or knolls on the mountain) can be unpredictable. Try both, but always inspect natural features first.
Table Of Jump Sizes
Here’s a quick comparison of typical jump sizes found in snow parks:
| Jump Size | Height | Best For |
|---|---|---|
| Small | 0.5–1 meter | Beginners, warm-up |
| Medium | 1–2 meters | Intermediate riders |
| Large | 2+ meters | Advanced tricks |
Start small and only move up when you feel totally comfortable.

Safety And Injury Prevention
Jumping can be risky, so safety comes first.
Protective Gear
Helmets and pads are a must. Wrist injuries are common in snowboarding, so wrist guards are a smart investment.
Know Your Limits
Don’t try tricks or jumps beyond your level. Snowboard injuries often happen when riders push themselves too hard, too soon.
Avoid Peer Pressure
It’s tempting to follow friends, but go at your own pace. Confidence comes from repetition, not risk.
Weather And Snow Conditions
Ice, slush, or heavy snow can change the way a jump feels. Check the conditions before each session.
Adding Style: Grabs And Spins
Once you’re landing basic jumps, you may want to add style. The easiest way is with grabs—holding the board in the air.
Popular Grabs
- Indy: Back hand grabs the toe edge between your feet.
- Mute: Front hand grabs the toe edge between your feet.
- Melon: Front hand grabs the heel edge.
Practice grabs on small jumps first. Spins (180, 360, 540 degrees) come later, once you’re comfortable with straight jumps.
Table: Common Grabs And Difficulty
| Grab Name | How to Do It | Difficulty |
|---|---|---|
| Indy | Back hand on toe edge (middle) | Easy |
| Mute | Front hand on toe edge (middle) | Easy |
| Melon | Front hand on heel edge (middle) | Medium |
| Tail Grab | Back hand on tail | Medium |
For spins, always learn 180s before trying a full 360. Try spinning on flat ground first to build coordination.
Tips For Faster Progress
- Film Yourself: Watching videos of your jumps helps you spot problems and improve technique.
- Take a Lesson: Even one session with a coach can fix bad habits quickly.
- Ride with Better Boarders: Observing skilled riders gives you ideas and motivation.
Real-world Example
Consider this: A 2018 study found that snowboarders who practiced on small jumps for at least 10 sessions had 40% fewer injuries than those who moved to big jumps early. Slow progress is often the fastest way to master jumps.
Table: Injury Rate By Jump Size
| Jump Size | Injury Rate (per 1000 jumps) |
|---|---|
| Small | 0.8 |
| Medium | 2.5 |
| Large | 6.0 |
This data shows the importance of building your skills before going big.
The Mental Side Of Jumping
Many riders find the mental part harder than the physical. Fear is normal. The best way to overcome it is by visualizing success and focusing on the steps, not the outcome. Take deep breaths before each jump. If you feel nervous, step back and watch others for a few minutes.
Frequently Asked Questions
How Do I Know If I’m Ready To Try A Snowboard Jump?
If you can ride comfortably on blue runs, control your speed, and stop easily, you’re probably ready for small jumps. Start with flat-ground pops first.
What Should I Do If I Fall During A Jump?
Stay relaxed and try to roll with the fall. Avoid putting your hands out straight, as this can cause wrist injuries. Always check yourself for injuries before riding again.
Can I Do Jumps With Any Snowboard?
Technically yes, but freestyle boards are easier for jumping. All-mountain boards work too, but they may feel heavier and less “poppy.”
How Can I Get More Height On My Jumps?
Focus on timing your pop at the very edge of the jump. Bend your knees more and push up quickly. Speed also helps, but control is more important than height.
Are Snowboard Jumps Safe For Kids?
With proper gear and supervision, kids can learn small jumps safely. Use features designed for young riders and always wear a helmet.
Learning how to do a snowboard jump is a journey. With practice, patience, and the right approach, you’ll be flying higher and landing smoother every season. For more details on snowboarding safety and progression, check out this Wikipedia snowboarding guide. Remember: Start small, focus on technique, and have fun on the mountain!

