
Ice climbing is an adventure that challenges both your body and mind. As you step into frozen landscapes, your clothing becomes a key tool, not just a cover. The right outfit can mean the difference between an enjoyable climb and a dangerous, uncomfortable struggle.
Whether you’re new to ice climbing or want to improve your setup, knowing what to wear is essential for safety, warmth, and performance.
Climbing ice is not like hiking or regular mountaineering. You face cold, wind, sweat, ice chips, and the risk of getting wet from melting ice. The right clothing protects you from these elements and keeps you moving freely. But with so many options—base layers, shells, gloves, and more—the choices can be confusing.
Let’s break down exactly what you need, why it matters, and how to build a reliable system for any ice climbing adventure.
The Layering System: Your Protection Strategy
Layering is the foundation of effective ice climbing clothing. This system uses three main types of layers: base, mid, and outer. Each layer serves a unique purpose, and together, they keep you warm, dry, and comfortable.
Base Layer: Moisture Management
Your base layer sits next to your skin. Its main job is to wick sweat away, keeping you dry and reducing the risk of chilling. For ice climbing, synthetic materials like polyester or merino wool are best. Cotton is a big mistake—it holds moisture and makes you cold.
- Top Tip: Choose a snug fit for better moisture movement. A loose base layer won’t wick as well.
Mid Layer: Insulation
The mid layer traps body heat to keep you warm. Common choices are fleece jackets, lightweight down, or synthetic insulated jackets. On very cold days, you might need two mid layers.
- Example: A thin fleece plus a light puffy jacket.
- Non-obvious insight: Synthetic insulation (like Primaloft) works even if it gets wet, while down loses warmth when damp.
Outer Layer: Weather Protection
This is your shield against wind, snow, and dripping ice. Look for a waterproof, breathable shell—either a hardshell or a softshell, depending on weather and activity level.
- Hardshell jackets (like Gore-Tex) are best in wet, stormy weather.
- Softshell jackets breathe better and are comfortable in dry, cold conditions.
- Always check the hood: It must fit over your helmet.
What To Wear On Your Upper Body
Clothing for your upper body must balance warmth, flexibility, and protection from wind and water.
- Base Layer Top: Long-sleeve merino or synthetic shirt. Avoid cotton.
- Light Fleece Pullover: A thin grid fleece for extra insulation.
- Insulated Jacket: Lightweight synthetic or down puffy.
- Outer Shell Jacket: Waterproof, windproof, with helmet-compatible hood.
Pro tip: On belay, you cool down quickly. Bring a heavier “belay parka” to throw over everything when you’re not moving.
What To Wear On Your Lower Body
Your legs also need careful layering, but mobility is more important here. Too many layers can make movement difficult.
- Base Layer Bottoms: Synthetic or merino leggings.
- Softshell Pants: Durable, stretchy, and water-resistant. These are most climbers’ go-to for ice.
- Hardshell Pants: For wet or very windy days. Wear over your softshells if needed.
- Insulated Pants: Only for extreme cold or standing around. Most people skip these while climbing.
Non-obvious insight: Many new climbers overdress their legs, leading to sweat and discomfort. Start with less; you can always add more at the base.
Head, Face, And Neck Protection
Your head loses heat quickly, and cold wind on your face can be painful—or dangerous.
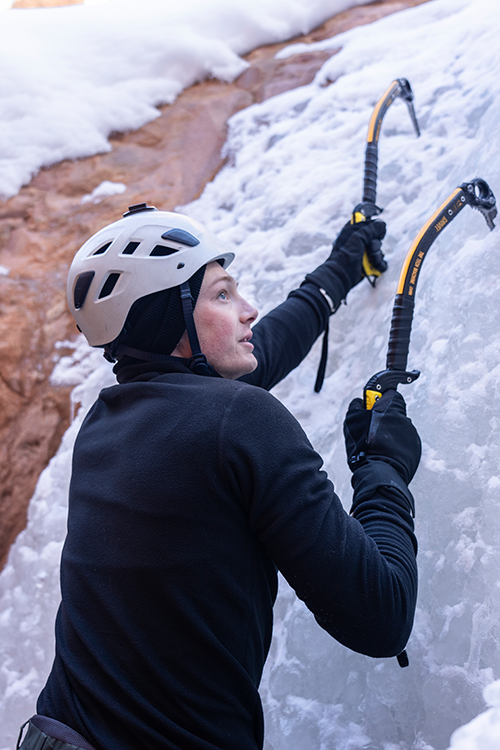
- Helmet: Essential for falling ice and rock. Choose one that fits well with a hat or balaclava underneath.
- Thin Beanie or Skull Cap: Fits under your helmet. Merino wool is great.
- Balaclava or Neck Gaiter: Covers your face and neck when wind or cold bites.
- Sunglasses or Goggles: Protect your eyes from glare and ice chips.
Practical tip: Bring two head coverings—one for climbing, one for resting—so you always have something dry.
Handwear: Gloves And Mitts
Ice climbing is rough on hands. You need to balance dexterity (to grip tools and tie knots) with warmth.
- Thin Liner Gloves: For hiking in, setting up, or as backup.
- Climbing Gloves: Waterproof, insulated, and flexible. You may need two pairs: one for climbing, one for belaying.
- Belay Mitts: Thick, warm mittens for waiting or belaying. Not for climbing, but vital when you stop moving.
Key insight: Gloves get wet from sweat and melting ice. Always bring spares—a cold, wet glove can ruin your day.
Footwear: Socks And Boots
Your feet are close to the cold surface, so keeping them warm and dry is critical.
- Socks: Medium-thickness merino or synthetic. Thin liner socks under thicker socks can help. Avoid thick socks that crowd your boots.
- Mountaineering Boots: Stiff, insulated, and waterproof. Look for boots compatible with crampons. Double boots (with removable liners) are best for very cold climbs.
- Gaiters: Protect your lower legs from snow and ice entering your boots.
Pro tip: Boots should fit snug, but not tight. Pinched toes get cold faster.
Hands-on Comparison: Key Clothing Features
To help you choose, here is a side-by-side look at three important layers:
| Layer | Main Function | Best Material | Common Mistake |
|---|---|---|---|
| Base Layer | Moisture Wicking | Merino Wool, Synthetics | Cotton (holds moisture) |
| Mid Layer | Insulation | Fleece, Synthetic, Down | Too bulky (limits movement) |
| Outer Layer | Weather Protection | Gore-Tex, Softshell | No hood/Not helmet compatible |
Accessories You Should Not Forget
Some small items make a big difference on the ice.
- Harness: Wear over your outer layers. Make sure it fits with all your clothing on.
- Ice Climbing Tools: Leashes or leashless, protect your hands from cold metal handles.
- Headlamp: Winter days are short; always pack a light.
- Hand Warmers: Useful on very cold days or during long belays.
- Backpack: Holds extra layers, snacks, water, and emergency gear.
Experience-based tip: Keep snacks in an easy-to-reach pocket—eating boosts energy and warmth.
Mistakes Beginners Make When Dressing For Ice Climbing
Even with good gear, small mistakes can cause big problems. Here are some common issues:
- Wearing Too Many Layers: This leads to sweating, then chilling. Start cool—you’ll warm up as you climb.
- Using Cotton: Once wet, it stays wet, making you cold and miserable.
- Forgetting Spare Gloves: Your hands will get wet and cold. Always bring extras.
- Ignoring Feet Fit: Boots that are too tight or too loose cause blisters and cold toes.
- Not Adjusting Layers: Remove a layer before you start climbing uphill to avoid sweating.
- Poor Hood Fit: If your jacket hood does not fit over your helmet, your head gets wet and cold.
- No Eye Protection: Sun and ice glare can damage your eyes, even on cloudy days.
- Leaving Off Gaiters: Snow and ice in your boots can end your day quickly.
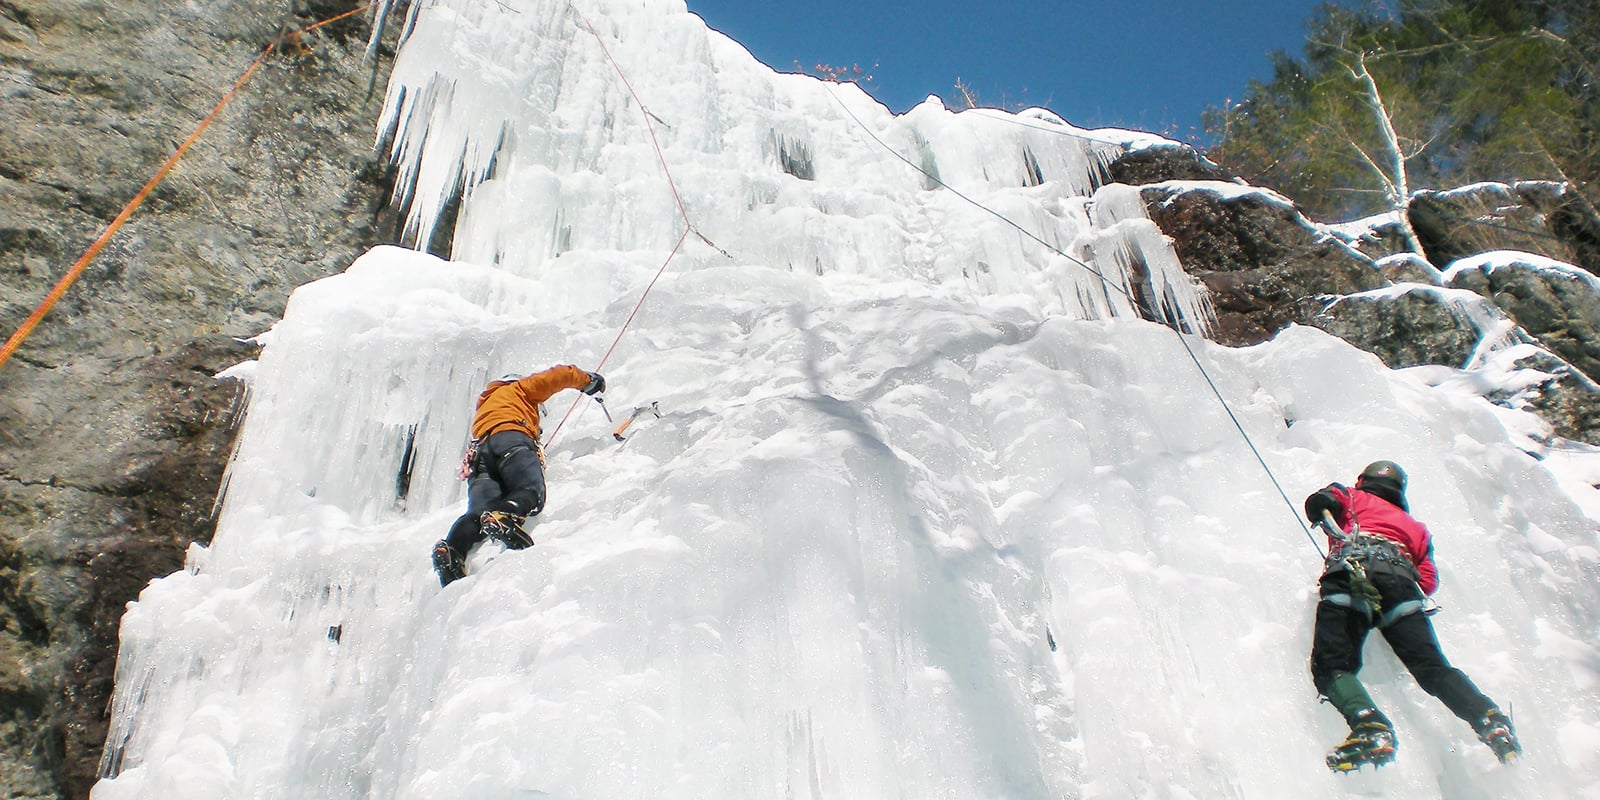
Real World Example: Typical Ice Climbing Outfit
Here’s how an experienced climber might dress for a typical day:
- Base: Merino wool long-sleeve top and leggings
- Mid: Light fleece pullover, synthetic puffy jacket
- Shell: Gore-Tex hardshell jacket with helmet-compatible hood, softshell pants
- Feet: Medium-thickness wool socks, insulated mountaineering boots, gaiters
- Head: Thin beanie under helmet, balaclava, sunglasses
- Hands: Thin liner gloves, main climbing gloves, thick belay mitts in pack
This setup allows for quick changes based on weather and activity. Layers can be added or removed as needed.

Table: When To Use Different Outer Layers
Weather changes fast in the mountains. Here’s a quick reference for outer layers:
| Condition | Best Outer Layer | Reason |
|---|---|---|
| Dry, Cold, No Wind | Softshell Jacket | Breathes well, flexible |
| Snowing or Raining | Hardshell Jacket | Waterproof, windproof |
| Extreme Cold (Belaying) | Insulated Parka | Maximum warmth when not moving |
Why The Right Clothing Matters
Choosing the right clothing is not just about comfort—it’s about safety. Cold, wet, or restricted clothing can lead to hypothermia, frostbite, or dangerous mistakes. The right outfit lets you focus on climbing, not your discomfort.
A study by the American Alpine Club found that exposure and clothing issues were factors in over 30% of ice climbing accidents. Most could have been prevented with better gear choices and knowledge.
How To Test And Adjust Your Ice Climbing Clothing
Before your first climb, try your full outfit in cold, wet conditions close to home. Move, stretch, and simulate climbing. Notice where you get cold, wet, or restricted. Adjust layers, test gloves, and make changes before you hit real ice.
Hidden expert tip: Pack a small garbage bag as an emergency waterproof layer. It weighs nothing and can save you in sudden storms.
Where To Find Reliable Gear Advice
For up-to-date reviews and tips, check trusted sources like the Outdoor Gear Lab. Real-world gear testing helps you avoid costly mistakes.
Frequently Asked Questions
What Is The Best Material For Ice Climbing Base Layers?
Merino wool and synthetic fibers (like polyester) are best. They wick sweat, dry quickly, and keep you warm even if damp. Avoid cotton, as it stays wet and makes you cold.
How Many Pairs Of Gloves Should I Bring Ice Climbing?
At least two pairs: one for climbing (dexterous, waterproof) and one for belaying (thicker, warmer). Many climbers bring three, because wet gloves are common.
Can I Use Regular Hiking Boots For Ice Climbing?
No. You need stiff, insulated mountaineering boots that can attach to crampons. Hiking boots are too flexible and cold for ice climbing.
Do I Need Special Pants For Ice Climbing?
Yes. Softshell pants are ideal—they stretch, block wind, and shed water. For very wet or cold conditions, add hardshell pants over your softshells.
How Do I Stay Warm While Belaying?
Put on a thick insulated parka over your climbing layers, use warm mittens, and keep moving your toes and fingers. Use hand warmers if it’s very cold.
Ice climbing rewards those who prepare well. Invest in good clothing, test your layers, and you’ll enjoy every minute on the ice—even when the temperatures drop.
