Dry tooling is a unique and challenging discipline within the world of ice climbing. It blends elements of rock climbing and ice climbing, requiring both physical strength and technical skill. If you are new to ice climbing, you may have heard the term “dry tooling” and wondered what it involves.
Exclusive Deals
Limited-time Exclusive Deals. Check current discount on Amazon.
Check Price on Amazon As an Amazon Associate I earn from qualifying purchases.This article explores dry tooling in detail, from basic definitions to advanced techniques, gear requirements, safety, and how it fits into the broader climbing world.
What Is Dry Tooling?
Dry tooling means using ice climbing tools—mainly ice axes (also called ice tools) and crampons—on rock, rather than on ice or snow. Instead of swinging your ice axe into a frozen waterfall or glacier, you hook and torque the pick onto edges, cracks, and holds in the rock. Your feet, fitted with crampons, also find purchase on rock features. The aim is to move up or across rock that is often too smooth or difficult to climb using hands and feet alone.
Dry tooling evolved as a way for climbers to move between sections of ice separated by rock, especially on mixed climbs. Over time, it has become its own specialized activity, with dedicated routes and competitions.
Exclusive Deals
Limited-time Exclusive Deals. Check current discount on Amazon.
Check Price on Amazon As an Amazon Associate I earn from qualifying purchases.The Origins And Evolution Of Dry Tooling
Dry tooling is relatively new compared to traditional rock or ice climbing. In the early days of alpine climbing, mountaineers would occasionally use their ice axes on rocky passages out of necessity. But as the sport advanced, climbers began to develop routes that mixed ice and rock.
By the 1990s, dry tooling was gaining popularity, especially in Europe and North America.
Modern dry tooling often takes place on routes with little to no ice. Some climbing gyms even have artificial dry tooling walls, making it accessible year-round. The rise of competitions, such as the UIAA Ice Climbing World Cup, has further shaped the style, gear, and ethics of the sport.
Exclusive Deals
Limited-time Exclusive Deals. Check current discount on Amazon.
Check Price on Amazon As an Amazon Associate I earn from qualifying purchases.
Why Do Climbers Practice Dry Tooling?
There are several reasons why climbers choose to practice dry tooling:
- Training for mixed climbing: Dry tooling helps improve skills needed for routes that mix rock and ice.
- Improved tool handling: It teaches precise placement and movement with ice tools.
- Off-season training: When there is no ice, dry tooling keeps skills sharp.
- Physical and mental challenge: Dry tooling demands balance, core strength, and creative problem-solving.
- Competitions: Many climbers enjoy the competitive aspect, where dry tooling is the main event.
A common misconception is that dry tooling damages rock unnecessarily. However, most dedicated dry tooling routes are on less popular or poor-quality rock where traditional rock climbing is not practical.
Essential Gear For Dry Tooling
Dry tooling requires some specific equipment. Here’s a breakdown of what you need:
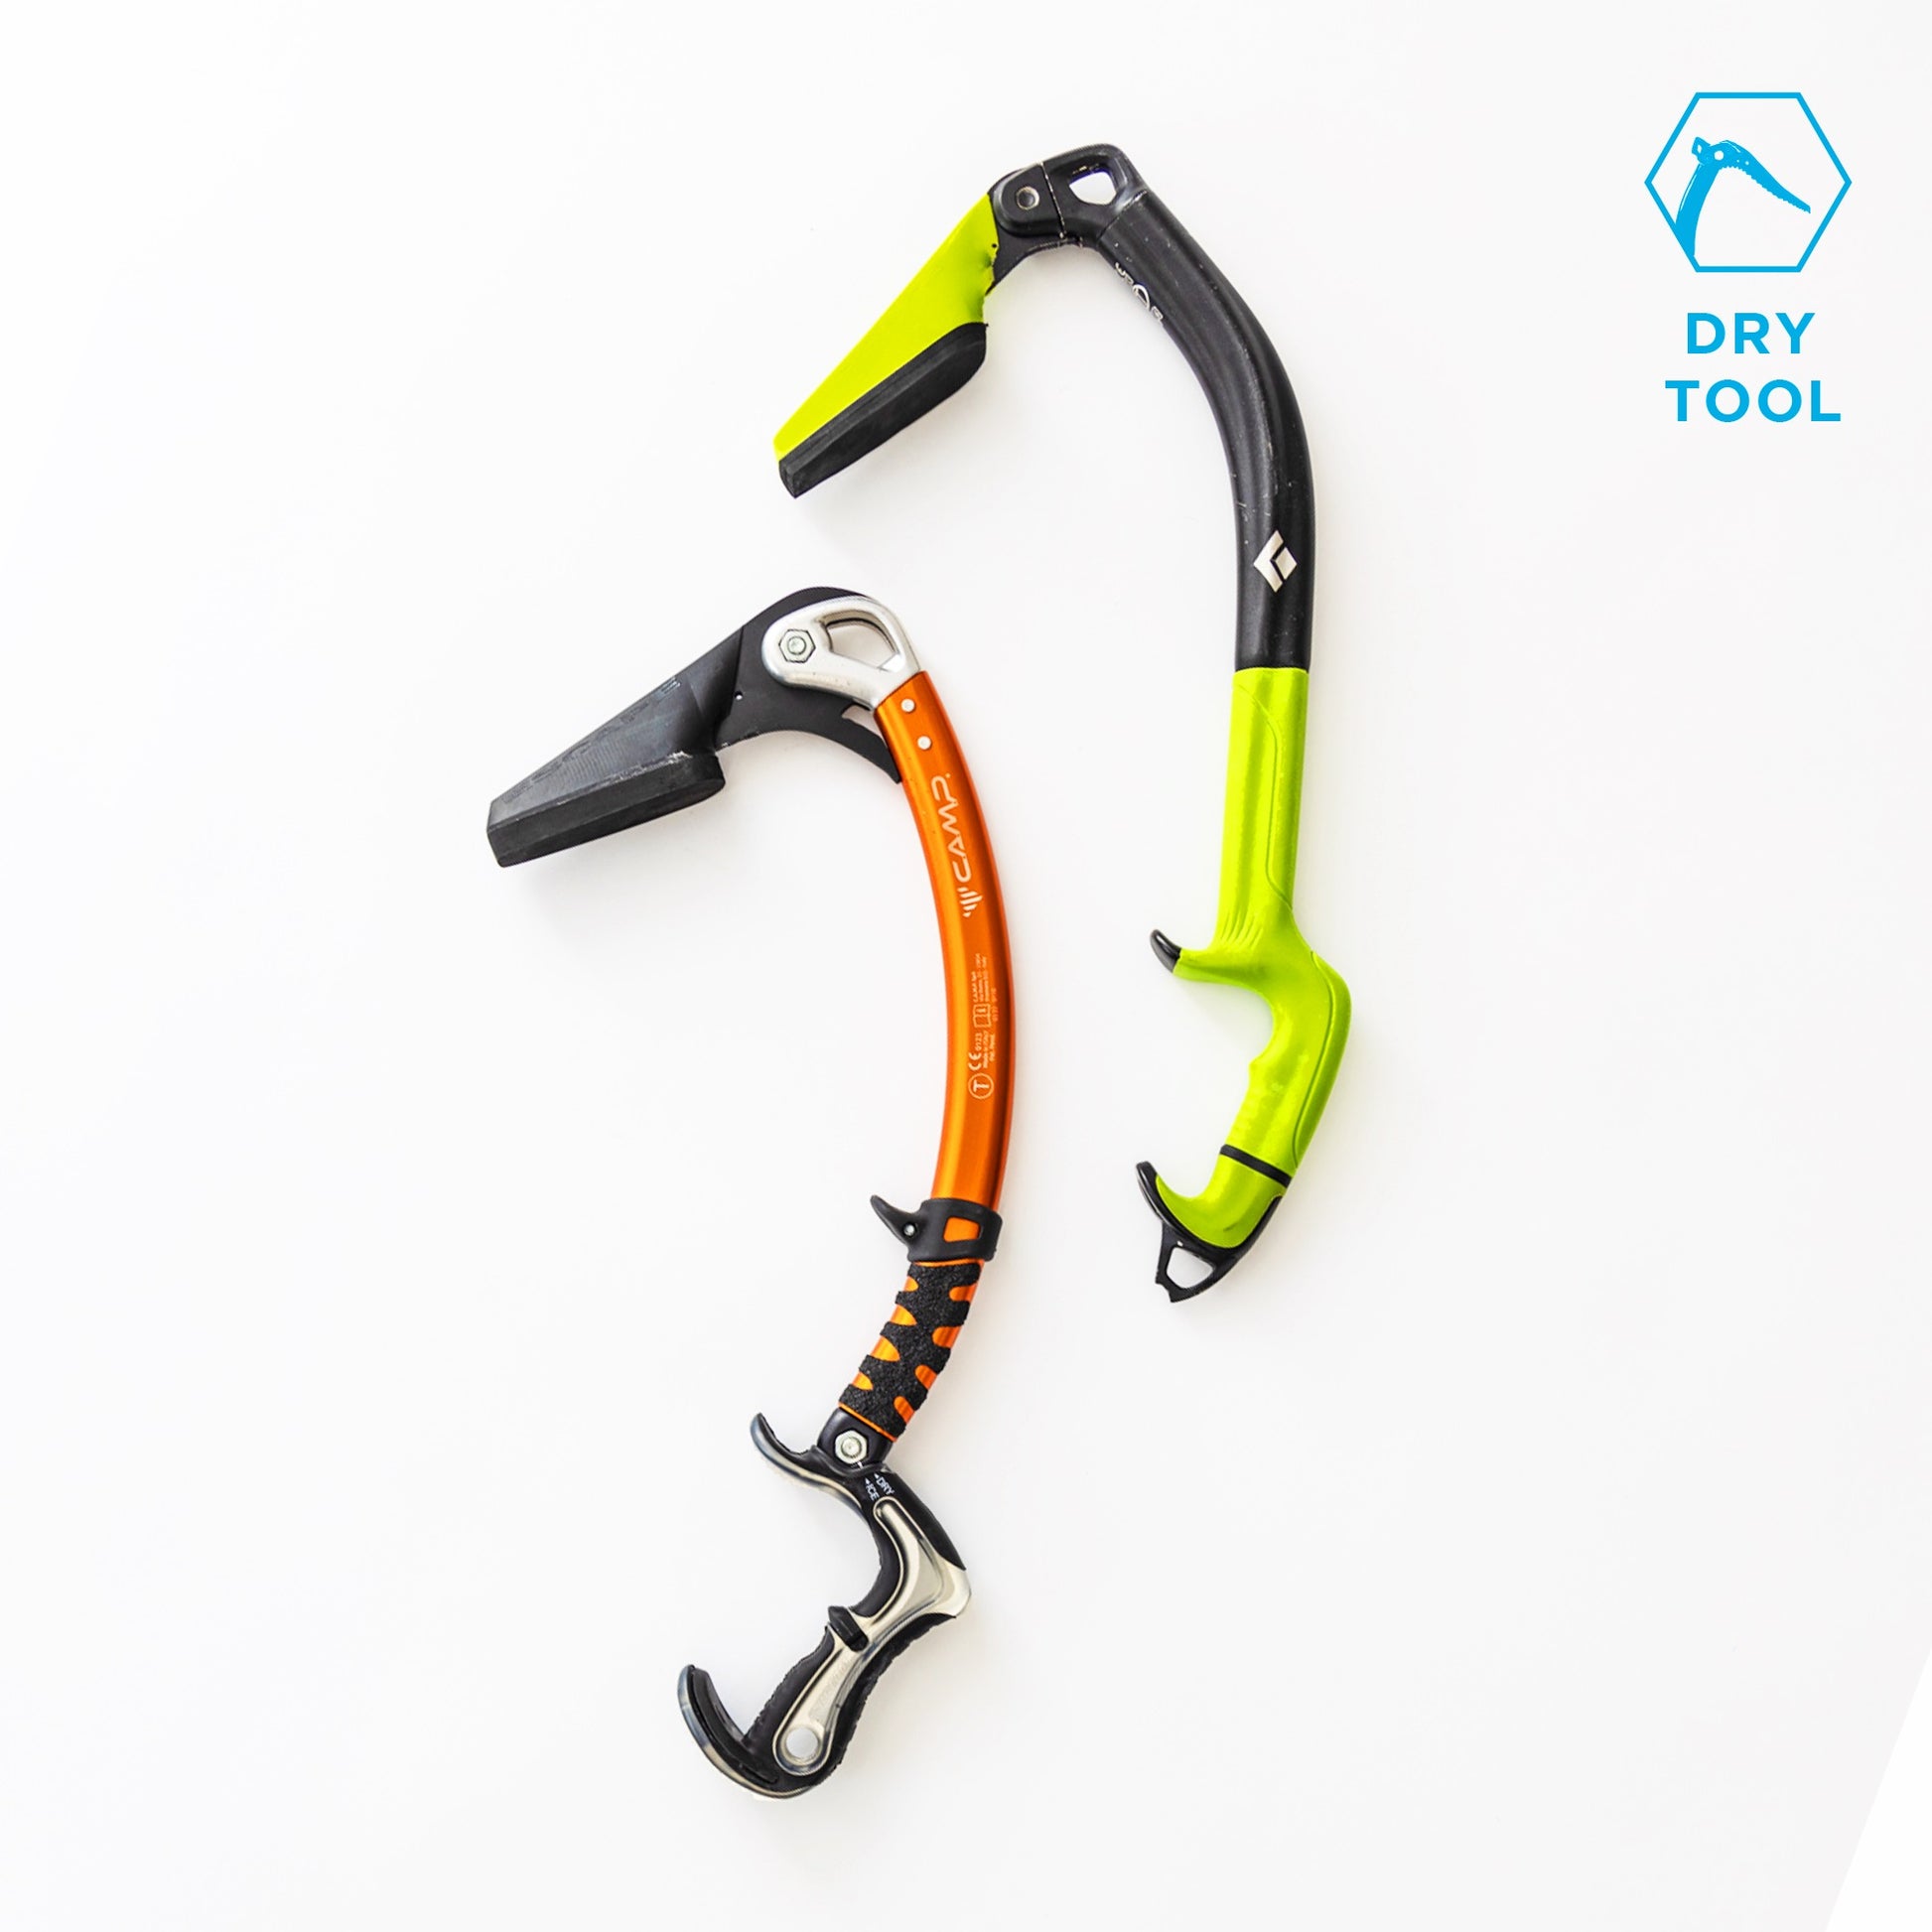
Ice Tools
Dry tooling axes are different from regular ice axes. They are usually:
- Curved or aggressively shaped for better hooking and torqueing.
- Leashless for greater freedom of movement.
- Rubberized grips to prevent slipping.
Crampons
Dry tooling crampons have:
- Mono-points (single, sharp front points) for precise placements.
- Secondary points for stability on rock edges.
- Some advanced climbers use specialized “fruit boot” shoes with integrated crampon points.
Helmets
A helmet is essential to protect against falling rock or gear.
Gloves
Thin, sticky gloves offer dexterity and grip without sacrificing too much warmth.
Harness And Protection
You’ll need a standard climbing harness and a rack of quickdraws, slings, and sometimes trad gear (cams and nuts) for protection.
Clothing
Layered, flexible clothing is best. You need freedom of movement and some protection from cold or wet conditions.
Optional: Chalk And Tape
Some climbers use liquid chalk to keep hands dry or finger tape to protect against abrasions.
Here’s a quick comparison of key gear for dry tooling versus traditional ice climbing:
| Equipment | Dry Tooling | Ice Climbing |
|---|---|---|
| Ice Tools | Aggressive, curved, leashless | Curved or straight, sometimes leashed |
| Crampons | Mono-point, precise | Duo-point, designed for ice |
| Footwear | Fruit boots or stiff boots | Insulated boots |
| Gloves | Thin, sticky grip | Insulated, thick |
Basic Dry Tooling Techniques
Dry tooling is not simply rock climbing with ice tools. The movement is different, and the techniques are unique.
Hooking
Instead of swinging the tool, you “hook” the pick over edges, flakes, or into cracks. The key is to keep the tool steady and balanced without over-gripping.
Torqueing
In cracks, you can twist the pick so it wedges and holds your weight. This is called torqueing. It requires confidence and an understanding of the tool’s limits.
Footwork
Precise foot placement is essential. Crampon points must land on small edges or divots. Sometimes, you’ll “smear” the front points against the rock for friction.
Body Position
Climbers often keep their hips close to the wall for better balance. You need strong core muscles to move efficiently.
Resting
Dry tooling is tiring for the forearms. Finding “rests”—stable positions where you can shake out your arms—is a critical skill.
Here’s how movement in dry tooling compares with ice and rock climbing:
| Aspect | Dry Tooling | Ice Climbing | Rock Climbing |
|---|---|---|---|
| Hand Placement | Ice tools on rock features | Ice tools in ice | Hands on holds |
| Footwork | Crampons on rock | Crampons on ice | Climbing shoes on rock |
| Movement Style | Hooking, torqueing | Chopping, swinging | Smearing, edging, jamming |
Advanced Dry Tooling Skills
As you gain experience, you’ll learn advanced moves:
- Figure-four: Hook one leg over your arm to gain height and rest.
- Figure-nine: Like a figure-four, but with the opposite leg.
- Stein pull: Lock the tool’s pick behind an edge and pull down and out.
- Undercling: Hold the tool upside down under a ledge and pull upwards.
These moves require practice, flexibility, and good judgment. Many experienced dry toolers train indoors on artificial walls before trying them outside.
Where Can You Try Dry Tooling?
Dry tooling is not allowed everywhere. Some crags and parks ban it because it can damage popular rock climbs. Dedicated dry tooling areas are usually on:
- Overhanging or chossy rock (rock that is too loose or poor for regular climbing)
- Artificial walls with drilled holds
- Private climbing gyms with dry tooling setups
Always check local regulations before you start. Respect for the climbing community and environment is essential.
Some well-known dry tooling locations include:
- Vail, Colorado, USA
- Ouray Ice Park, Colorado, USA
- Kandersteg, Switzerland
- Rjukan, Norway
Dry Tooling Grades And Difficulty
Dry tooling routes have their own grading systems. The most common is the “M” (mixed) scale, ranging from M1 (easiest) to M15 (hardest). An M1 route might be a simple, low-angle climb with big holds, while M10 and above require steep overhangs, tiny holds, and advanced tricks.
Some competitions use their own grading standards, but the “M” system is the most widely recognized.
Here’s a quick overview:
| Grade | Description |
|---|---|
| M1 – M3 | Easy, low angle, big holds |
| M4 – M6 | Vertical, small edges, some overhangs |
| M7 – M9 | Steep, overhanging, technical moves |
| M10 – M12 | Very steep, sustained, requires advanced techniques |
| M13 – M15 | Extreme, competition-level, gymnastic |
It’s important to start with low-grade routes and progress as your skills improve. Even experienced rock climbers find dry tooling physically and mentally demanding.
Safety And Common Risks
Dry tooling is safe if you use the correct gear and techniques, but it does have risks:
- Falling: Protection can be less reliable on rock than on ice.
- Rockfall: Dislodged rocks are a danger, especially on poor-quality cliffs.
- Tool failure: Picks and crampons can break or slip unexpectedly.
- Injury: Tools are sharp—accidents can cause serious cuts or punctures.
To stay safe:
- Always wear a helmet and eye protection.
- Double-check your gear before every climb.
- Use proper belay techniques.
- Communicate clearly with your climbing partner.
- Practice moves on low, safe routes before moving to harder climbs.
A non-obvious tip: inspect your picks and crampon points often. Rock wears them down faster than ice, making them less effective and more dangerous over time.
How To Start Dry Tooling As A Beginner
If you want to try dry tooling, start with these steps:
- Take a class: Many climbing gyms and outdoor schools offer dry tooling instruction.
- Rent or borrow gear: Don’t invest in expensive tools until you know you enjoy it.
- Practice indoors: Artificial walls are safer and controlled.
- Learn from experienced climbers: Watch, ask questions, and climb with those who have dry tooled before.
- Build up strength: Focus on grip, core, and shoulder exercises.
One thing beginners often miss: dry tooling is not just about strength. Good technique, balance, and efficient movement are much more important for success.
Dry Tooling Competitions
Competitive dry tooling is growing rapidly. Events are held indoors and outdoors, with routes set for maximum difficulty and creativity. The UIAA Ice Climbing World Cup is the best-known series, drawing athletes from around the world.
Competitors use the most advanced techniques, including figure-fours, stein pulls, and dynamic moves. Even if you don’t plan to compete, watching these events can be inspiring and educational.
If you want to learn more about the international competition scene, check out the UIAA Ice Climbing World Cup.
Environmental Considerations
Dry tooling can wear down rock, especially if practiced on popular climbing routes. The best practice is to use dedicated dry tooling areas or artificial walls. Always follow local ethics and guidelines. If in doubt, ask local climbers or climbing organizations where dry tooling is allowed.
Some regions have “no dry tooling” signs at popular crags. Respect these rules to keep the sport sustainable and maintain good relationships within the climbing community.
Frequently Asked Questions
What Makes Dry Tooling Different From Ice Climbing?
Dry tooling uses ice climbing tools on rock, while ice climbing uses them on ice. The movement is more about hooking and torqueing rather than swinging.
Is Dry Tooling Dangerous?
All climbing has risks, but dry tooling adds unique dangers like rockfall and gear slippage. Using the right equipment and climbing with experienced partners reduces these risks.
Do I Need Special Tools For Dry Tooling?
Yes. Leashless, aggressive ice tools and mono-point crampons are ideal. Standard ice climbing gear can work for beginners, but specialized equipment is safer and more effective.
Where Can I Practice Dry Tooling?
Look for dedicated dry tooling areas, artificial climbing walls, or gyms that allow it. Never dry tool on classic rock climbs without permission.
Can Dry Tooling Help My Ice Climbing?
Absolutely. Dry tooling improves tool handling, footwork, and core strength—all vital for harder ice and mixed routes.
Dry tooling brings a new twist to climbing. It’s tough, technical, and rewarding for those who enjoy a challenge. With the right mindset and respect for the environment, it opens up new possibilities for adventure on the vertical world.