Mounting your snowboard bindings is an important skill for any rider. Whether you are a beginner or have been on the slopes for years, knowing how to set up your own bindings gives you more control over your riding experience.
Bindings connect your boots to your snowboard, so the way you mount them affects your comfort, control, and safety. Setting them up correctly can make a huge difference on the mountain, while mistakes can lead to a less enjoyable or even risky ride.
Most snowboarders rely on shop technicians to mount their bindings, but it’s not as complicated as it looks. With some simple tools and a bit of time, you can learn to mount your bindings yourself. This guide will walk you through every step, explain the most important choices, and share tips that even some experienced riders miss.
Understanding Snowboard Bindings
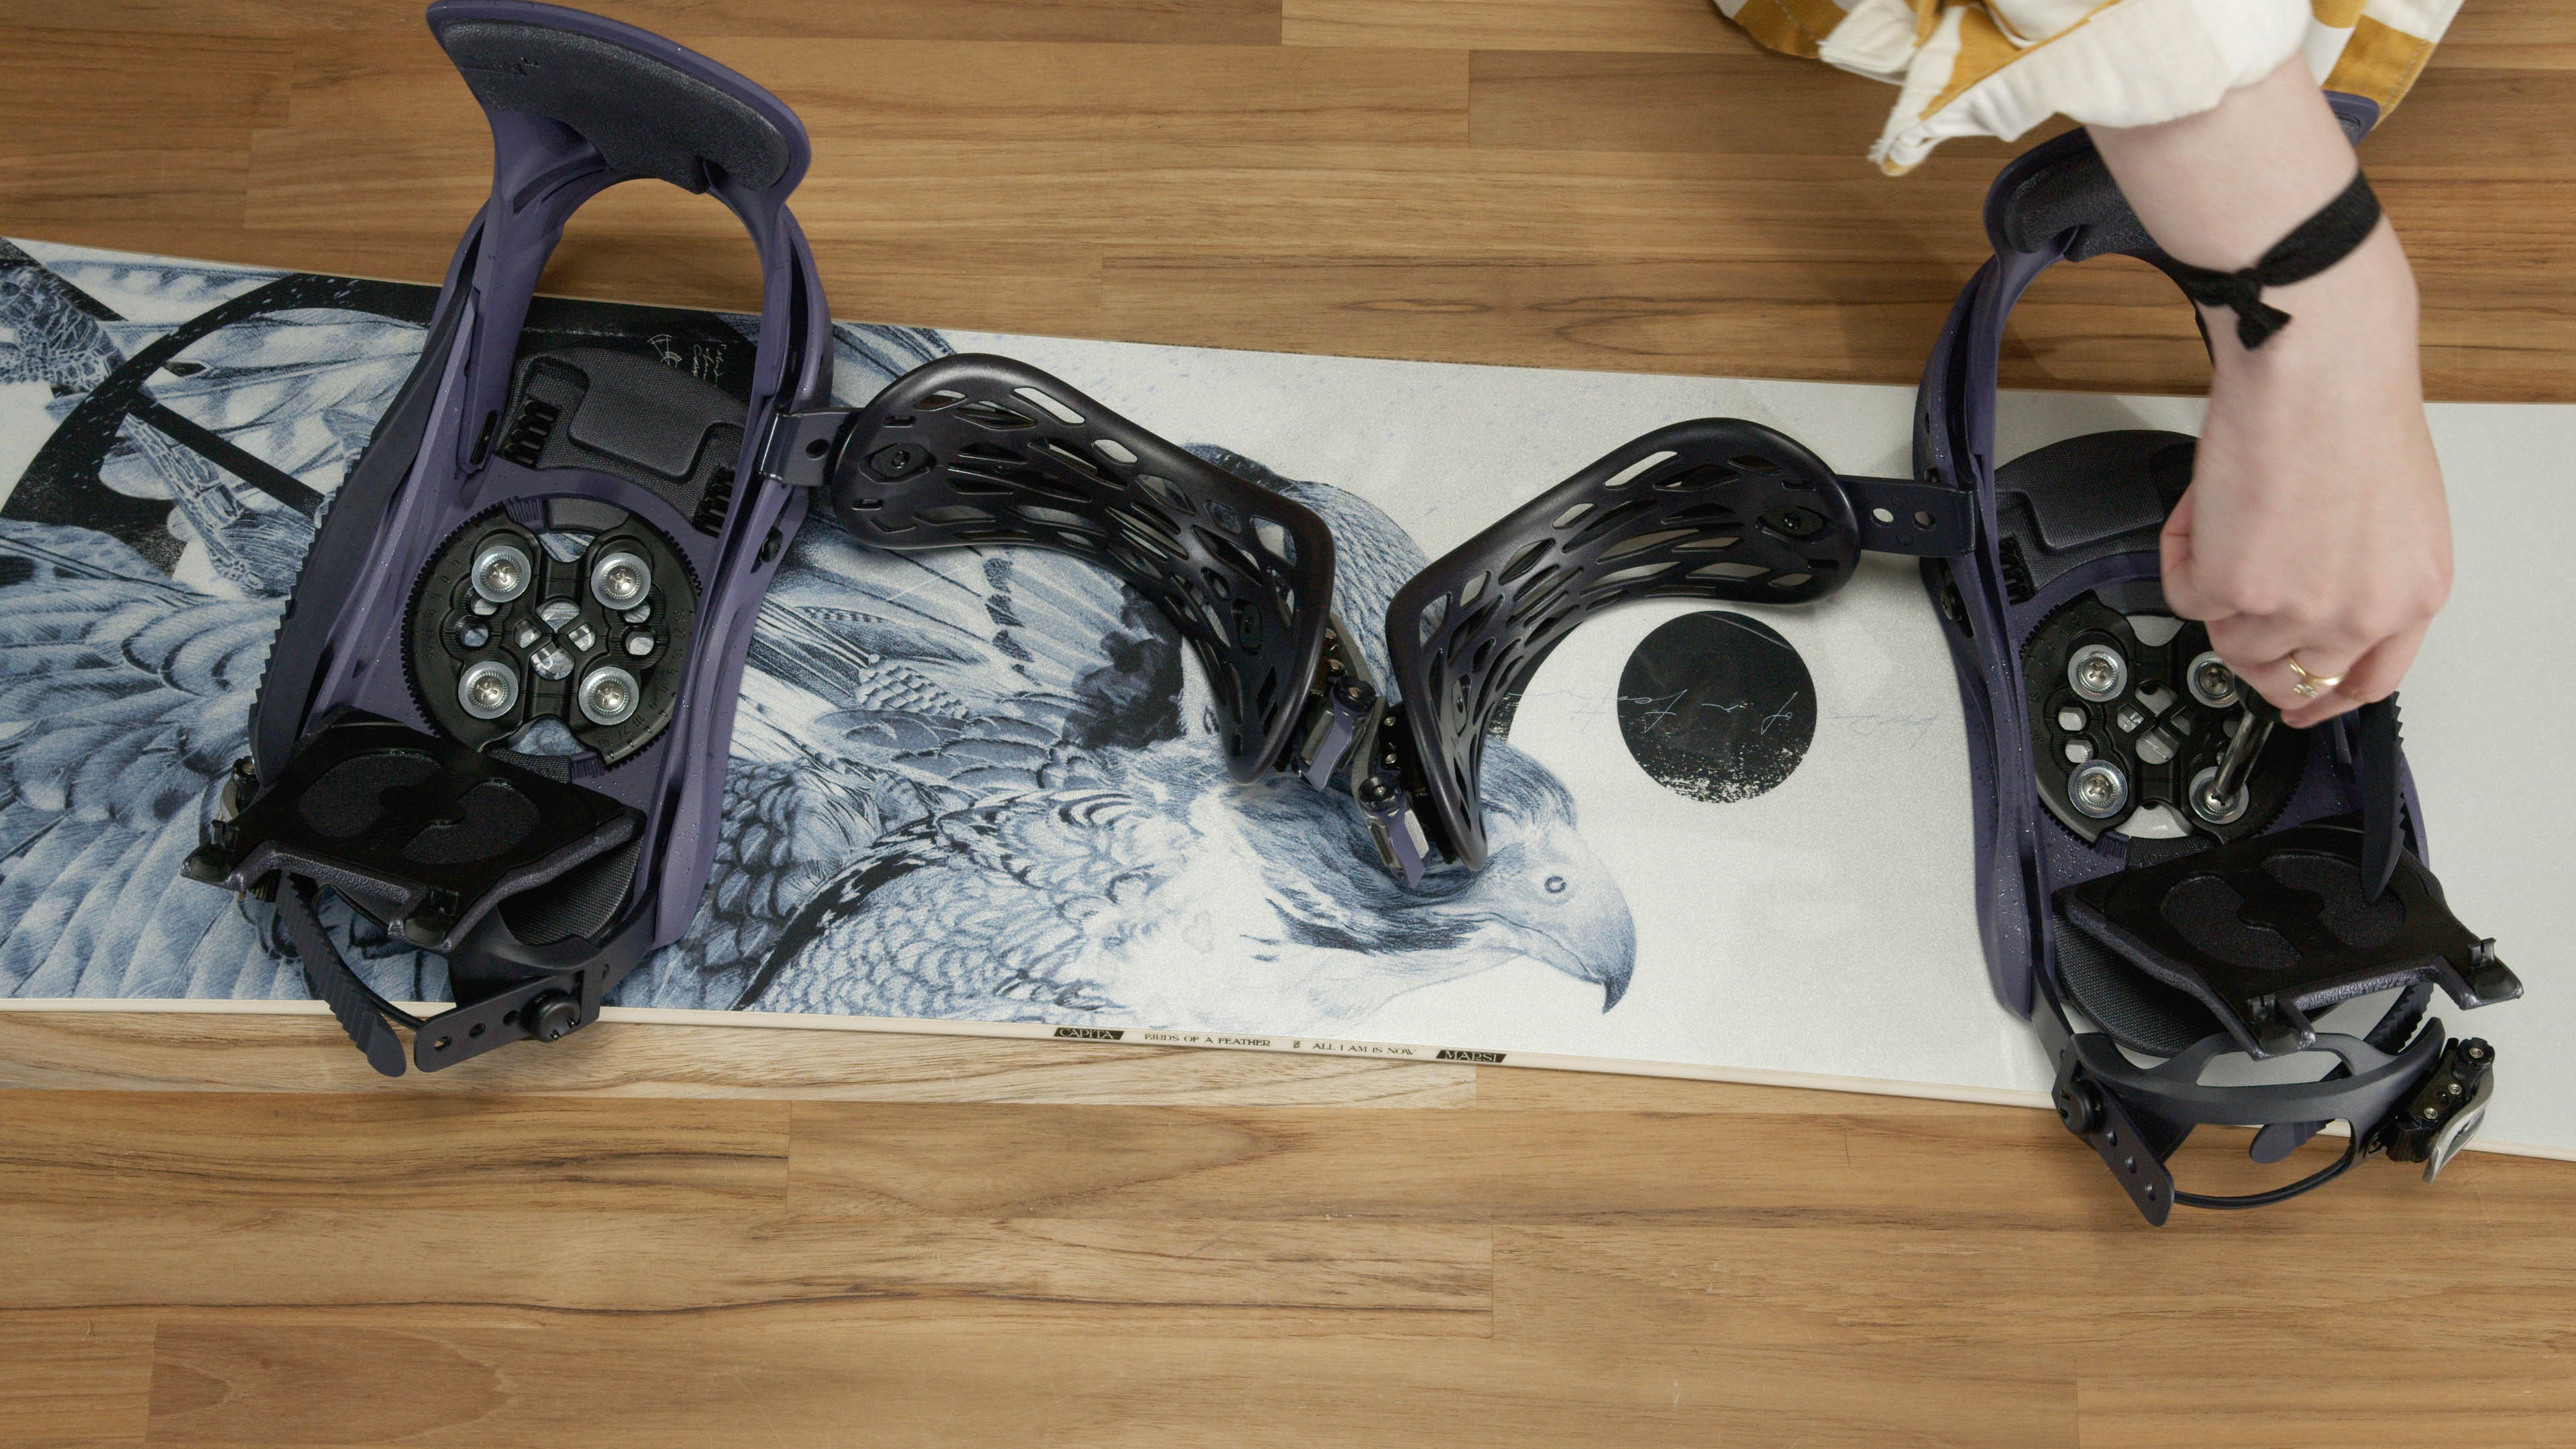
Before you start, it’s helpful to know a few basics about snowboard bindings. Bindings come in different types, but the most common are strap-in bindings and rear-entry bindings. Strap-in bindings use two straps to secure your boot, while rear-entry bindings have a highback that opens up so you can slide your boot in quickly.
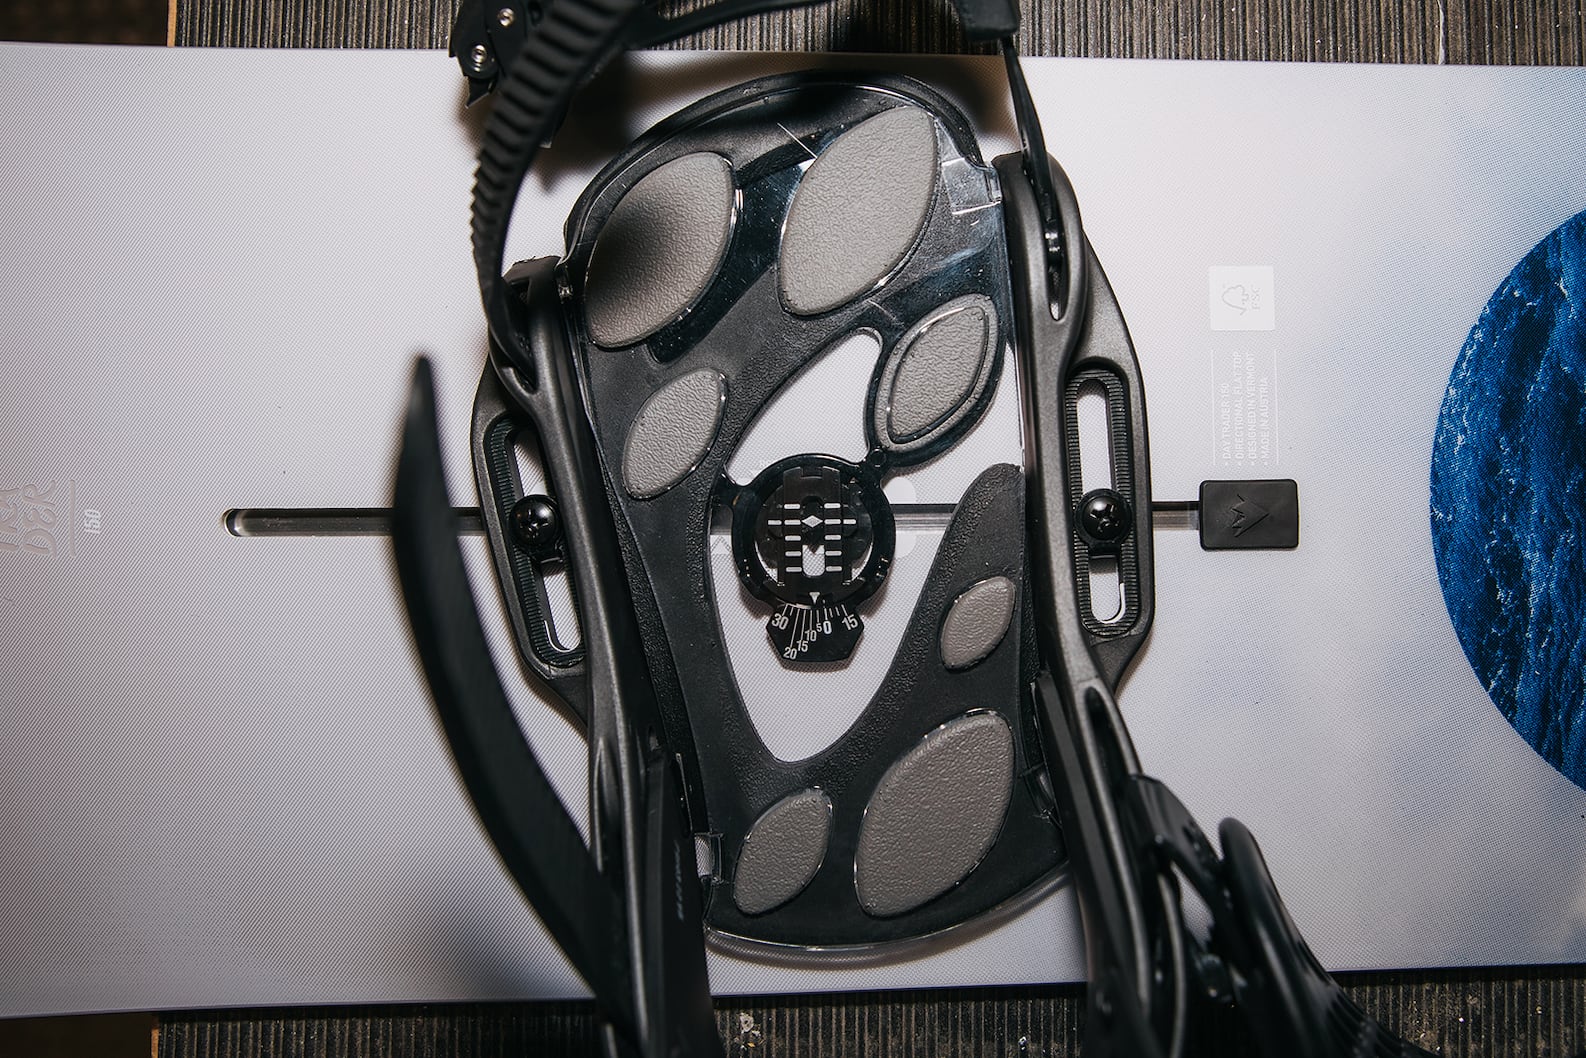
Bindings are attached to the board using screws and discs. The discs fit into mounting holes on your snowboard, and the screws hold everything tight. Most snowboards have one of these mounting systems:
- 4×4: Four holes in a square pattern
- 2×4: More holes, closer together, for finer adjustment
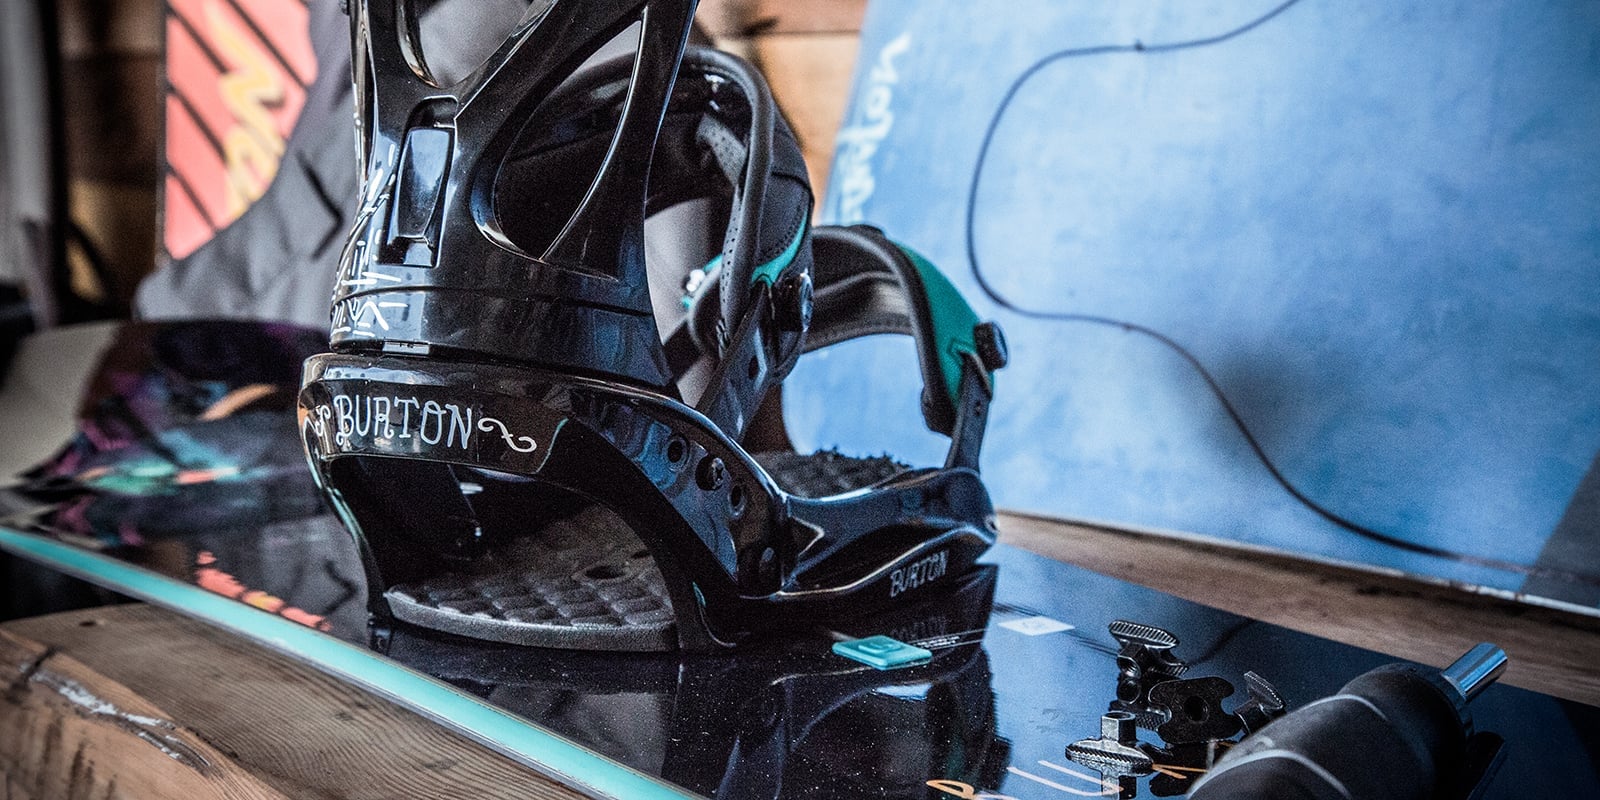
- Channel: A long slot for sliding the bindings to any position (used by Burton)
Choosing the right binding type and making sure it matches your board’s mounting system is the first step.
Tools And Equipment Needed
Mounting your bindings does not require many tools. Here’s what you’ll need:
- A Phillips #3 screwdriver (standard for most bindings)
- Your snowboard
- Your bindings (with screws and discs)
- Your boots (for testing fit and stance)
You might also want a tape measure to check your stance width, and a ruler or angle finder for precise adjustments. It’s best to work on a clean, flat surface with good lighting.
Deciding Your Stance
One of the most important choices is your stance. This means how you stand on the snowboard—regular or goofy, your stance width, and the angle of your feet.
Regular Vs. Goofy
- Regular stance means your left foot is at the front of the board.
- Goofy stance means your right foot is at the front.
Not sure which is best? Try sliding across a smooth floor in socks; the foot you put forward naturally is usually your lead foot.
Stance Width
Stance width is the distance between the center of your bindings. A good starting point is the width of your shoulders. For adults, this is usually between 18 and 22 inches (45-56 cm), but it varies by height and riding style.
Stance Angles
The angle of your bindings matters for comfort and control. Most riders use a duck stance (toes point out), with the front binding set between +12° and +18°, and the back binding between 0° and -12°. Freestyle riders often use a more symmetrical duck stance (like +15° / -15°), while all-mountain riders might use a more forward stance (like +18° / -6°).
Centered Or Setback
Centered stance means your bindings are the same distance from the tip and tail—good for park and all-mountain riding. Setback means your bindings are closer to the tail, which helps in powder and freeride conditions.
Step-by-step Guide To Mounting Bindings
Now let’s get hands-on. Here’s how to mount your snowboard bindings:
1. Place Your Board On A Flat Surface
Lay your board base-down on a carpet, table, or another soft surface. This prevents scratches.
2. Choose Your Stance And Mark Reference Points
Decide if you are riding regular or goofy. Use a tape measure to find your preferred stance width. Mark the center points with a piece of tape or a marker for easy alignment.
3. Select The Right Holes
On most snowboards, you will see several sets of holes. Choose the pair that matches your stance width. If you want a centered stance, use the middle holes. For a setback stance, use holes closer to the tail.
4. Set The Binding Angles
Take the disc from your binding and adjust the angle to your chosen settings. The angle is usually marked on the disc. Rotate the disc until the arrow lines up with your desired angle.
5. Attach The Bindings
Place the binding over the holes. Insert the screws through the disc and into the board holes. Do not tighten them fully yet. Repeat for the second binding.
6. Align And Adjust
Stand on your board with your boots in the bindings. Make sure your stance feels natural. Adjust the bindings left or right so your boots are centered on the board (toes and heels hang over the edges equally).
7. Tighten The Screws
Once you are happy with the position, use the screwdriver to tighten all screws. Start with one screw, then move diagonally to the opposite one, like tightening the wheel on a car. This makes sure the pressure is even.
8. Double-check Everything
Check that all screws are tight, bindings are secure, and the angles are correct. Give the bindings a firm wiggle—they should not move.
Fine-tuning Your Binding Setup
Small changes in your binding setup can have a big effect on your ride. Here are tips to help you fine-tune:
- Boot Centering: Your boots should be centered so your toes and heels are balanced over the edge. This helps you turn more easily.
- Highback Rotation: Some bindings let you rotate the highback to match the edge of your board. This gives better power transfer.
- Forward Lean: Adjusting the forward lean of your highback can make your turns sharper or more relaxed. More lean means quicker heel response, less lean means a looser feel.
Common Mistakes To Avoid
Even experienced snowboarders sometimes make these mistakes:
- Mounting bindings backwards: Always check which binding is for the left and right foot.
- Over-tightening screws: This can strip the threads in your board.
- Not re-checking screws: Screws can loosen after riding, so check them every few days.
- Wrong stance width or angle: Too wide or too narrow can hurt your knees or reduce control.
- Using wrong hardware: Not all screws and discs fit all boards. Make sure you have the right ones for your system.
Adjusting Bindings For Your Riding Style
Your binding setup should match your riding style. Here’s a quick comparison:
| Riding Style | Stance Width | Angles | Stance Position |
|---|---|---|---|
| Freestyle (Park) | Shoulder width | +15° / -15° | Centered |
| All-Mountain | Shoulder width | +18° / -6° | Centered or slight setback |
| Freeride (Powder) | Wider | +21° / 0° | Setback |
Experiment with your setup on easy terrain first. Small adjustments can help you find the most comfortable stance.
Matching Bindings To Your Board
Not all bindings fit every board. Here’s a summary of compatibility:
| Binding Disc Type | 4×4 | 2×4 | Channel |
|---|---|---|---|
| Standard 4-hole | Yes | Yes | No |
| Channel Disc (EST) | No | No | Yes |
| Universal Disc | Yes | Yes | Yes |
Always check your board and binding manuals before mounting. Some brands, like Burton, use the channel system, which needs special discs.
How Often Should You Adjust Or Remount?
- After your first few days: Your stance may feel different after some riding. Make small changes to improve comfort and control.
- Each season: If your style or skill changes, adjust your stance.
- After changing boots or boards: New gear can affect your setup.
- If you feel discomfort: Pain in knees, hips, or feet often means your stance or angles need adjusting.
Non-obvious Tips Most Beginners Miss
- Try on your boots while adjusting: Always wear your boots when setting stance and angles. Sneakers or barefoot feel very different.
- Symmetry is not always best: Many riders believe both bindings must have the same angle. In reality, your back foot angle can be less open for more comfort and control, especially for beginners.
Safety And Maintenance
Your binding setup is not “set and forget.” Regular checks keep you safe:
- Re-tighten screws every few rides, especially after hard landings or riding in deep snow.
- Inspect bindings for cracks or wear, especially the straps and ratchets.
- Carry a small multi-tool in your jacket for quick fixes on the mountain.
When To Ask For Help
If you are not confident, or your bindings do not seem to fit your board, ask a professional. Most snowboard shops will mount bindings for free if you buy the gear from them. Watching a technician can also teach you a lot for next time.
For more technical details about snowboard stance and adjustments, check out this resource from Wikipedia.
Frequently Asked Questions
How Tight Should I Screw In My Bindings?
Screws should be snug but not overtightened. Use firm hand pressure with a screwdriver. If you use a power drill, be gentle so you do not strip the threads.
Can I Use Any Bindings With Any Snowboard?
No. Most bindings fit most boards, but some systems, like Burton’s Channel, need special discs. Always check your snowboard and binding specs for compatibility.
What Stance Is Best For Beginners?
A centered stance with angles around +15° on the front and 0° to -6° on the back is comfortable for most beginners. Adjust after a few days as you find your style.
How Do I Know If My Bindings Are In The Right Position?
Your boots should be centered on the board, and your stance should feel balanced and natural. If you feel pain or have trouble turning, try adjusting the stance width or angles.
How Often Should I Check My Bindings?
Check your binding screws every few rides, especially after a big fall or a long day on the mountain. Loose screws are common and can cause accidents.
Mounting your snowboard bindings yourself is not just about saving money—it lets you tailor your setup to your unique riding style. With careful steps and regular checks, you can enjoy more control and confidence every time you ride.
