
Learning how to adjust snowboard bindings can change your riding experience completely. Bindings connect your boots to your snowboard, translating your movement to the board itself. Many new riders don’t realize that improper binding setup can cause discomfort, poor control, or even injury. On the other hand, a well-adjusted setup fits your riding style and body, making turns, tricks, and stops feel much easier. Understanding the process isn’t just for experts—every snowboarder, beginner or advanced, should know how to adjust bindings safely and confidently.
Exclusive Deals
Limited-time Exclusive Deals. Check current discount on Amazon.
Check Price on Amazon As an Amazon Associate I earn from qualifying purchases.This guide covers everything you need to know, including stance width, angle settings, binding position, and common mistakes. Whether you’re getting ready for your first day or looking to fine-tune your technique, you’ll find clear steps, practical tips, and expert insights.
No special skills required—just a screwdriver, your snowboard, and a bit of patience.
Why Binding Adjustment Matters
Bindings aren’t just hardware—they’re the critical link between your intentions and your board’s performance. The wrong settings can cause pain in your knees, hips, or feet. They can also make it hard to turn or keep your balance. For example, a stance that’s too wide can make your legs tired quickly, while a stance that’s too narrow limits your power.
Exclusive Deals
Limited-time Exclusive Deals. Check current discount on Amazon.
Check Price on Amazon As an Amazon Associate I earn from qualifying purchases.Each rider’s body, boots, and riding style is different. Adjusting your bindings properly lets you:
- Control the board more easily
- Reduce injury risk
- Ride longer without getting tired
- Learn tricks more safely
It’s worth spending time to get your setup right. Many beginners skip this step and struggle, not knowing the real problem is their binding position.
Tools You’ll Need
Before you start, gather these essentials:
Exclusive Deals
Limited-time Exclusive Deals. Check current discount on Amazon.
Check Price on Amazon As an Amazon Associate I earn from qualifying purchases.- #3 Phillips screwdriver (most common for snowboard bindings)
- Your snowboard with bindings attached
- Your boots (for checking fit)
- A tape measure (optional, for stance width)
Some modern bindings are “tool-less” and can be adjusted without a screwdriver. Check your gear first.
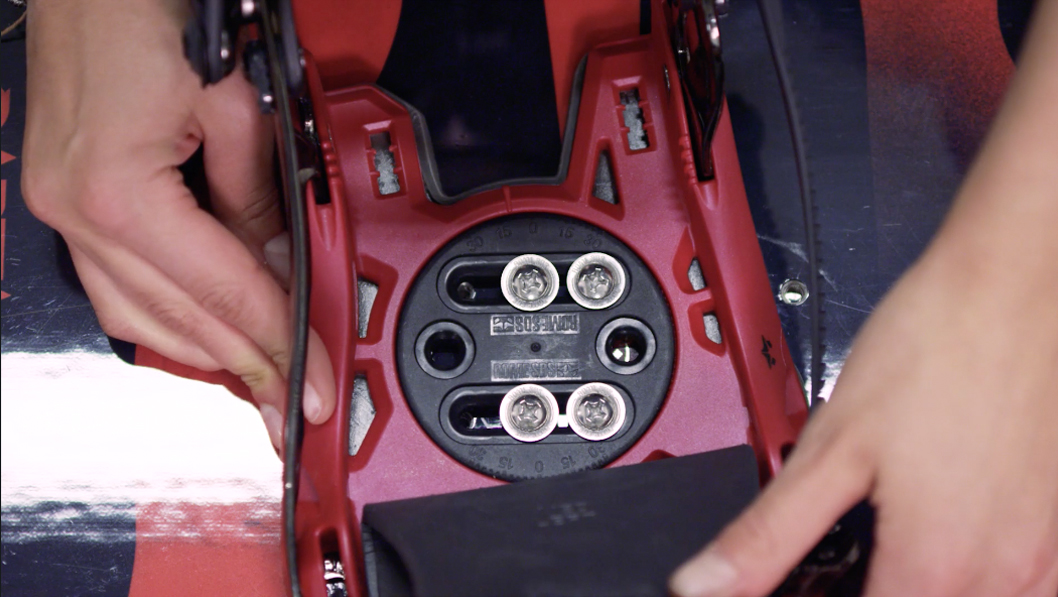
Key Parts Of A Snowboard Binding
Understanding the main parts of a binding helps you adjust them correctly:
- Baseplate: The part that connects the binding to your board
- Straps: Secure your boots to the bindings (usually toe and ankle straps)
- Highback: The vertical plate behind your calf, helps control heel-to-toe movement
- Discs or plates: Circular pieces under the baseplate, allow you to change angle and position
Bindings may look different by brand, but these parts are always there.
Determining Your Stance
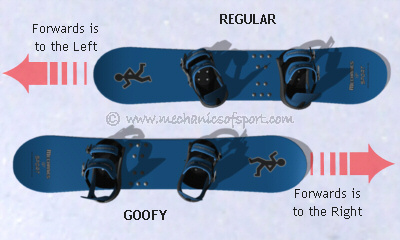
Your stance is how you stand on your board. It includes your stance width, stance angles, and whether you ride regular (left foot forward) or goofy (right foot forward).
How To Find Your Stance (regular Vs. Goofy)
Many people naturally prefer one foot forward. Here’s a quick test:
- Imagine running and sliding across a floor. Which foot goes forward? That’s your lead foot.
- If you kick a ball, which foot stays on the ground? That’s your lead foot.
Most people are regular, but there’s no right or wrong. Try both if you’re unsure.
Choosing The Right Stance Width
Stance width is the distance between the centers of your bindings. A comfortable stance gives you balance and control.
A good starting point is shoulder width or about 30% of your height. Here’s a simple formula:
- Your height (in centimeters) x 0.3 = Recommended stance width (in cm)
If you’re 170 cm tall: 170 x 0.3 = 51 cm stance width.
Adjust wider for more stability (good for jumps and freestyle), or narrower for faster turning (good for carving).
Setting Stance Angles
Stance angles affect how your feet point on the board. They’re measured in degrees from the centerline:
- Positive angle: Toes point toward nose of board
- Negative angle: Toes point toward tail
Common setups:
- Beginner/freestyle: +15° front, -15° back (“duck stance”)
- All-mountain: +15° front, 0° to -6° back
- Carving: +21° front, +6° to +12° back
Try a basic duck stance if you’re new—it’s comfortable for most riders.
Centering Bindings On The Board
Your boots should be centered between the toe and heel edges. If your boots stick out too far, you may catch an edge and fall.
Mount bindings so your boots have equal overhang on both sides. If your boots are size US 11 or larger, consider a wide board to prevent toe drag.
Step-by-step: Adjusting Your Bindings
Here’s a complete process for adjusting your snowboard bindings:
- Remove bindings: Loosen the screws and take bindings off (if they’re already on the board).
- Set the discs: Place the discs in the baseplate, aligning the holes for your desired angle.
- Attach bindings loosely: Put the bindings on the board, but don’t tighten fully yet.
- Adjust stance width: Move bindings closer or further apart to match your chosen width.
- Set angles: Rotate the disc to the correct angle (e.g., +15° front, -15° back).
- Center bindings: Slide bindings left/right to center your boots over the board.
- Tighten screws: Once everything is in place, tighten the screws firmly (but don’t over-tighten).
- Check with boots: Put your boots in the bindings. Check that straps fit comfortably and the boots are centered.
- Fine-tune: Make small changes if needed. Check stance width, angles, and centering again.
Example: Typical Duck Stance Setup
For a freestyle rider, you might set your front binding at +15°, back at -15°, with a 53 cm stance width. Center the bindings so your boot overhang is equal on both sides.
Highback And Strap Adjustments
Proper highback and strap settings are often overlooked, but they’re key for comfort and control.
Highback Rotation And Forward Lean
Highback rotation means aligning the highback with your heel edge. Not all bindings allow this, but if yours do, rotate them so they match the edge. This gives better energy transfer.
Forward lean is the angle of the highback toward your calf. More lean gives quicker heel response, but can tire your legs. Beginners should start with little or no forward lean.
Adjusting Straps
- Ankle strap: Should sit over the middle of your boot, not your toes or ankle bone.
- Toe strap: Should fit snugly over the toe of your boot, not loose or crushing.
Straps should be snug, but not so tight they hurt. Loose straps reduce control; overtight straps can cause pain or numbness.

Binding Position: Reference Stance Vs. Setback
Snowboards have a “reference stance”—the default position from the factory. This is usually marked on the board with small lines.
- Centered stance: Bindings are equal distance from nose and tail. Good for freestyle and park.
- Setback stance: Bindings are closer to the tail. Good for powder and freeride, helps with float in deep snow.
Here’s a quick comparison:
| Stance Type | Best For | Benefits | Drawbacks |
|---|---|---|---|
| Centered | Freestyle, park, all-mountain | Easy switch riding, balanced feel | Less float in powder |
| Setback | Powder, freeride | Better float in deep snow | Harder to ride switch |
For most beginners, the reference stance is a safe starting point.
Common Binding Systems And Compatibility
There are a few major mounting systems. Not all bindings fit all boards:
- 4×4 and 2×4: Standard hole patterns, most bindings fit these
- Channel system: Used by Burton, allows almost unlimited stance options
- 3D pattern: Older Burton boards, fewer options
Always check compatibility before buying bindings or a new board.
Here’s a quick compatibility overview:
| Binding Brand | 4×4/2×4 | Channel | 3D |
|---|---|---|---|
| Burton | Yes (with disc) | Yes | Yes (older models) |
| Union | Yes | Yes (with adapter) | No |
| Ride | Yes | No | No |
If you’re unsure, visit your local shop or check the manufacturer’s website.
Fine-tuning For Different Riding Styles
Freestyle: Centered stance, duck angles (+15°/-15°), medium width. Loose highbacks for flexibility.
Freeride: Setback stance, forward angles (+21°/+6°), wider for stability. More forward lean for edge hold.
Beginner: Shoulder-width, mild duck stance, minimal forward lean. Focus on comfort and control.
Don’t be afraid to experiment. Small changes can make a big difference.
Two Insights Most Beginners Miss
- Boot overhang matters more than you think. If your boots stick out too far, you risk “toe drag”—catching your toe on the snow during a turn. This can cause sudden falls. Always check your boots are centered, even if your stance feels right.
- Your needs change as you improve. Many riders set bindings once and never adjust again. As your skills and style develop, revisit your setup. A small change in angle or width often unlocks better performance.
Common Mistakes To Avoid
- Copying someone else’s settings exactly: Everyone’s body is different. Use recommendations as a starting point, but adjust for your own comfort.
- Over-tightening screws: You want them snug, but not so tight you strip the holes.
- Ignoring pain: If your feet or knees hurt, something is wrong. Adjust stance width, angles, or highbacks.
- Not re-checking after the first run: Bindings can shift. Always check screws and fit after your first ride of the day.
Safety Tips
- Check screws before each ride—bindings can loosen from vibration.
- Always test your setup on an easy run before trying difficult terrain.
- If you’re not sure, ask for help at a snowboard shop or rental center.
Practical Example: Setting Up For A Beginner Rider
Imagine you’re 170 cm tall, size US 9 boots, just starting out. Here’s a suggested setup:
- Stance width: 51 cm (shoulder width)
- Stance angles: +15° front, -6° back
- Centered stance, bindings centered on the board
- Minimal forward lean on highbacks
- Straps snug but comfortable
After a few runs, you might adjust the angles or width slightly for more comfort or control.
When To Re-adjust Your Bindings
You should re-check your bindings if:
- You buy new boots or a new board
- You switch from park to powder riding
- You feel pain or discomfort
- Your riding style changes
Even small tweaks can help you ride better and longer.
Useful Resources
If you want to go deeper, the official Burton Snowboards site has excellent guides and videos: Burton Binding Adjustment Guide.
Frequently Asked Questions
What If I’m Not Sure About My Stance Width?
Start with shoulder width or the formula (height x 0.3). Try a few runs, then adjust a little wider or narrower to see what feels best.
How Tight Should My Straps Be?
Straps should be snug but not painful. You should not feel pressure points or numbness. If your foot moves inside the binding, tighten a bit more.
Can I Adjust My Bindings On The Mountain?
Yes! Bring a small multi-tool or screwdriver. Many riders make small adjustments during the day as they test different settings.
What Happens If My Screws Come Loose?
Loose screws can cause dangerous falls. Always check screws before each ride. If they keep coming loose, use a thread locker (like Loctite) or ask a shop for help.
Do Binding Angles Matter For All Riders?
Yes. Angles affect comfort, control, and injury risk. Even beginners benefit from setting proper angles. Try common setups, then adjust as you gain experience.
With the right binding adjustments, snowboarding feels easier, more fun, and much safer. Take time to get it right, and your board will respond exactly how you want. Happy riding!

