
If you are learning how to snowboard, stopping is one of the most important skills you must master. It keeps you safe, lets you control your speed, and helps you avoid accidents. Many beginners feel nervous about stopping, especially on steep slopes or crowded runs.
Exclusive Deals
Limited-time Exclusive Deals. Check current discount on Amazon.
Check Price on Amazon As an Amazon Associate I earn from qualifying purchases.The good news is that anyone can learn to stop with practice, patience, and the right technique. This guide will show you, step by step, how to stop while snowboarding, why it matters, and how to avoid the most common mistakes.
By the end, you will feel more confident and ready to ride safely on any mountain.
Why Stopping Is Crucial In Snowboarding
Snowboarding is fun and fast, but it also comes with risks. If you cannot stop when you want, you could run into someone, crash, or lose control. Stopping is not just for emergencies. You use it to slow down, take a break, wait for friends, or adjust your path.
Exclusive Deals
Limited-time Exclusive Deals. Check current discount on Amazon.
Check Price on Amazon As an Amazon Associate I earn from qualifying purchases.Good stopping skills build your overall confidence and make your time on the slopes much safer.
Some beginners worry that stopping is hard or that they will fall every time. This is normal, but with the right approach, you will get better quickly. In fact, learning to stop is usually faster than learning to turn or ride switch.
Basic Principles Of Stopping
Before you try to stop, you need to understand a few key concepts:
Exclusive Deals
Limited-time Exclusive Deals. Check current discount on Amazon.
Check Price on Amazon As an Amazon Associate I earn from qualifying purchases.- Edge control: Snowboards have two edges—the toe edge (front of your boots) and the heel edge (back of your boots). You use these edges to control your board and stop.
- Body position: Keeping your knees bent, your weight centered, and your eyes looking ahead helps you balance as you stop.
- Speed management: The faster you go, the longer it will take to stop. Practicing at slow speeds first is safest.
Many new snowboarders think stopping is just about digging your edge into the snow. But the real secret is smooth, controlled movement—not sudden or jerky actions.

The Two Main Ways To Stop
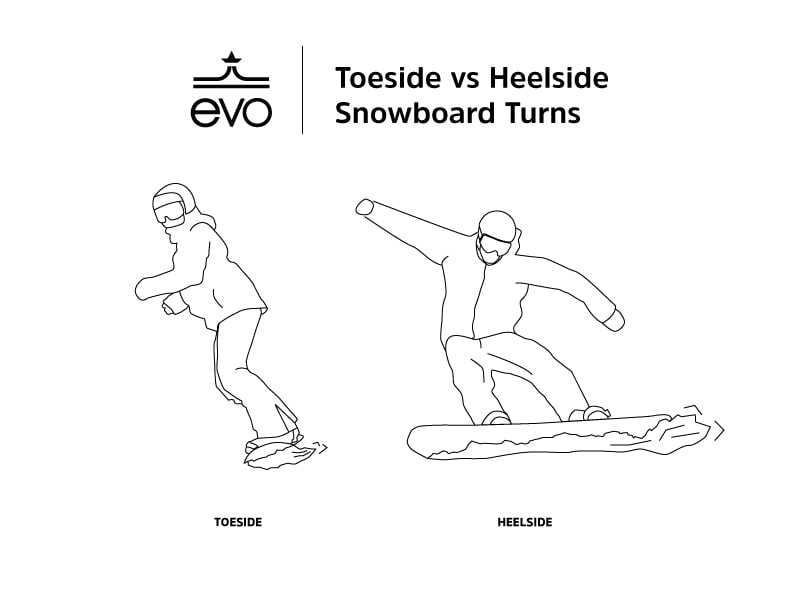
Most snowboarders use two basic stopping methods: the heel-side stop and the toe-side stop. Each uses a different edge of your board.
Heel-side Stop
This is the most common way to stop, especially for beginners. Here’s how to do it:
- Start by gliding straight down a gentle slope.
- Shift your weight to your heels by leaning slightly back (not sitting down). Your toes should lift gently inside your boots.
- Turn your board across the slope so it is perpendicular to the hill.
- Dig your heel edge into the snow as you keep your knees soft and your back straight.
- Apply gradual pressure until you slow down and come to a complete stop.
A heel-side stop feels like sitting in a chair, but do not lean too far back or you will fall. Try to keep your shoulders aligned with your board.
Toe-side Stop
This stop uses the front edge of your board. It is less natural at first, but it is important for learning full control.
- Begin by gliding slowly and facing uphill.
- Shift your weight onto your toes by gently pressing the balls of your feet into the board.
- Turn your board sideways across the hill.
- Dig your toe edge into the snow while keeping your body facing up the slope.
- Bend your knees and stay balanced as you apply pressure to stop.
The toe-side stop can feel strange because your heels are off the snow. Try not to lean forward too much, or you could catch your edge and fall.
Practicing Both Stops
Practicing both stops is essential for safe riding. Many beginners focus only on the heel side, but this creates bad habits and limits your control. Spend equal time on both edges. Start on gentle slopes where you feel safe.
Set small goals, like stopping within a certain distance or holding your balance for a few seconds after stopping. As you get better, try stopping on steeper slopes or at higher speeds.
Side-slipping: The First Step To Stopping
Before you can stop smoothly, you need to learn side-slipping. This skill teaches you how to control your edge and speed.
- Heel-side side-slip: Stand with your board across the slope, weight on your heels, and slide slowly down the hill.
- Toe-side side-slip: Stand facing uphill, weight on your toes, and slide down while looking over your shoulder.
Try to control your speed by pressing harder or lighter on your edge. Side-slipping is not just for beginners—it is useful on steep or icy sections even for advanced riders.
Common Mistakes When Learning To Stop
Even with good instructions, beginners often repeat a few mistakes. Knowing these ahead of time can save you frustration.
- Leaning too far back: This causes you to sit down or fall backward during heel-side stops.
- Standing too straight: Locked knees make balance harder. Always keep knees bent.
- Looking down: Your body follows your eyes. Look where you want to go, not at your feet.
- Stopping too suddenly: Slamming your edge into the snow can cause you to catch an edge and crash. Apply pressure slowly.
- Relying on one edge: Practice both heel and toe stops to stay balanced.
How Long Does It Take To Learn To Stop?
Most people can learn basic stopping in one or two days of practice. However, stopping confidently on steeper slopes or at high speeds can take a few more sessions. Your fitness, balance, and past board sport experience all affect your progress.
Here’s a quick comparison of learning time for different skills:
| Skill | Average Time to Learn | Key Challenges |
|---|---|---|
| Stopping (Heel/Toe) | 1-2 days | Edge control, balance |
| Turning | 2-4 days | Linking turns, speed control |
| Carving | 5+ days | Precision, body position |
Stopping On Steep Slopes Or Icy Terrain
Stopping becomes more difficult when the slope is steep or icy. The board slides faster, and your edge can slip more easily. In these conditions:
- Lower your center of gravity by bending your knees more.
- Apply edge pressure gradually, not all at once.
- Stay relaxed in your upper body.
- Do not lean too far uphill, or your edge may wash out.
On ice, small movements help. Try to find patches of soft snow to stop if you can. If you cannot stop, steer yourself to a flatter area or the edge of the slope.
How To Stop Safely In Crowded Areas
Busy slopes can be stressful, especially for beginners. If you need to stop:
- Look uphill first to check for other riders.
- Move to the side of the run before stopping, so you do not block traffic.
- Use hand signals (raise your hand) to let others know you are stopping if it is crowded.
- Never stop in blind spots (like just over a hill or around a corner).
Most accidents happen when people stop suddenly in the middle of the run. Being aware of your surroundings is as important as your stopping technique.
Advanced Stopping Techniques
Once you are comfortable with basic stops, you can try more advanced methods:
Hockey Stop
This fast, sharp stop is useful when you need to stop quickly. It looks similar to a stop in ice hockey.
- Approach at moderate speed.
- Turn your board sharply across the slope, using your hips and shoulders to guide.
- Dig your edge in hard, causing a small spray of snow.
- Keep your weight centered to avoid falling.
The hockey stop takes practice and should only be tried after you master the basic heel and toe stops.
Dynamic Stopping (using Turns)
On steeper slopes, making a series of sharp turns before stopping can help you control your speed and stop more safely.
- Link quick turns across the slope.
- Gradually increase edge pressure as you complete your final turn.
- Finish with a strong heel or toe-side stop.
This technique is especially useful on busy or narrow trails.
How Equipment Affects Your Ability To Stop
Your gear can make stopping easier or harder. Here are some important points:
- Edge sharpness: Dull edges do not grip the snow well. Keep your edges sharp, especially for icy conditions.
- Board flex: Softer boards are more forgiving for beginners. Stiffer boards require more precise movements.
- Boot fit: Boots should be snug but not painful. Loose boots make it harder to control your board.
A poorly maintained snowboard can make stopping much more difficult. Ask a technician to check your equipment at the start of each season.
Understanding Snow Conditions
Snow conditions change every day. Hard-packed snow or ice is slippery, and you need stronger edge pressure to stop. Soft, powdery snow makes stopping easier but can hide bumps or dips.
Here’s a quick comparison of how snow type affects stopping:
| Snow Type | Stopping Difficulty | Best Technique |
|---|---|---|
| Powder | Easy | Gentle edge pressure |
| Groomed | Moderate | Normal heel/toe stop |
| Hard-packed/Icy | Challenging | Strong edge, low stance |
Knowing the conditions before you ride helps you choose the right stopping technique.
Tips For Faster Progress
- Take a lesson. A professional instructor can show you the right technique and correct mistakes early.
- Film yourself. Watching a video of your stops can reveal habits you might not notice.
- Practice on different slopes. Do not always practice on the same hill—try different pitches and snow types.
- Stay relaxed. Tension makes balance harder. Take deep breaths and shake out your arms between runs.
- Celebrate small wins. Every time you stop successfully, you are improving.
Two Insights Beginners Often Miss
First, many new snowboarders think that stopping is only about pushing hard on the edge. But fine edge control—making small, smooth adjustments—actually works better and prevents falls. Second, stopping well is not just physical, but also mental. If you feel nervous, your body tenses up, making it harder. Practicing relaxation and visualization can improve your stopping just as much as technical drills.
Safety Reminders
- Always wear a helmet and wrist guards.
- Check your bindings before each run.
- If you fall while stopping, try to relax your body instead of stiffening up.
- If you cannot stop, steer to the side or into a gentle slope to slow down naturally.
For more on snowboarding safety, visit Wikipedia’s snowboarding guide.
Frequently Asked Questions
How Do I Stop Quickly If I Am Going Too Fast?
To stop quickly, turn your board sharply across the slope and dig your edge in smoothly (not suddenly). A hockey stop works well, but only try it after you are comfortable with heel and toe stops. If you panic, focus on turning first, then stopping.
Why Do I Always Fall Backward When I Try To Stop?
Falling backward usually means you are leaning too far onto your heels or straightening your legs. Keep your knees bent and your weight centered over your board. Practice on gentle slopes until you feel more balanced.
Is It Easier To Stop On A Snowboard Or Skis?
Stopping on a snowboard can be harder for absolute beginners, but with practice, it becomes just as easy as skiing. Skiers can use a “pizza” or wedge, while snowboarders rely on edge control.
What Should I Do If I Cannot Stop And There Are People In Front Of Me?
Try to turn sharply to the side to avoid a collision. If possible, aim for an empty area or slow yourself down by riding into softer snow. Shout a warning if you are close to others.
Should I Learn To Stop Before Learning To Turn?
Yes, stopping is the first skill every snowboarder should learn. Once you can stop safely, turning and other skills become much easier to practice and master.
Learning how to stop while snowboarding is not only about technique—it is about safety, confidence, and control. With patience, practice, and the right guidance, you will master stopping and enjoy the freedom of the slopes.


