
Are you ready to get your Schwinn 270 Recumbent Bike up and running but don’t know where to start? You’re in the right place.
Assembling your bike might seem tricky at first, but with the right steps, you’ll have it ready to ride in no time. This guide breaks down the process into simple, clear instructions that anyone can follow. Keep reading, and you’ll avoid common mistakes, save time, and get your workout going sooner than you think.
Your perfect ride is just a few easy steps away!
Unboxing And Checking Parts
Starting with unboxing and checking parts is important before assembling your Schwinn 270 Recumbent Bike. It helps you confirm everything is ready and nothing is missing or damaged. Taking time here saves frustration later during assembly. Let’s explore what to expect inside the box and how to inspect the parts carefully.
What’s Included In The Box
The Schwinn 270 box contains many parts and tools. You will find the main frame, seat, pedals, console, and hardware packs. The manual is also included to guide you step-by-step. Most parts are pre-assembled to make the process easier. Keep the box nearby in case you need to check anything again.
Inspecting Components For Damage
Check each part carefully for scratches, dents, or cracks. Damaged pieces can affect safety and performance. Look over the frame, seat, and console closely. Verify the pedals spin freely and the hardware looks intact. Report any damage immediately to avoid delays. Use soft surfaces to avoid further scratches during inspection.
Preparing Your Workspace
Preparing your workspace is the first step to assemble your Schwinn 270 recumbent bike smoothly. A tidy and organized area helps you work faster and avoid losing parts. It also keeps you safe from accidents during assembly.
Choosing A Suitable Area
Pick a flat surface with enough space around. A garage, basement, or large room works well. Make sure the floor is clean and dry to prevent slipping. Good lighting helps you see small pieces clearly. Avoid crowded places to keep parts safe and easy to find.
Gathering Necessary Tools
Collect all tools before starting. Most Schwinn 270 bikes come with basic tools. You may also need a wrench, screwdriver, or Allen keys. Check the instruction manual for a full list. Having tools ready saves time and avoids frustration. Keep them close to your workspace for easy access.
Assembling The Frame
Assembling the frame of the Schwinn 270 Recumbent Bike is the first step to start your workout. The frame holds all parts together and provides stability. Follow clear steps to connect the main pieces safely. Take your time to ensure everything fits well.
Connecting The Main Frame
Begin by placing the main frame on a flat surface. Align the front and rear sections carefully. Use the bolts and washers included in the package. Tighten the bolts with the provided wrench or a suitable tool. Check that the frame feels solid and does not wobble. Proper connection of the frame avoids problems during use.
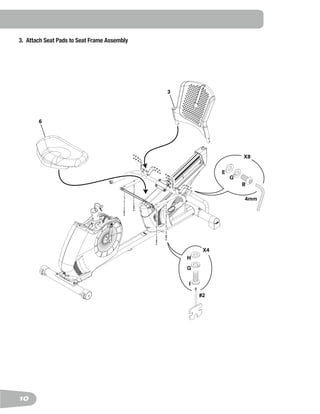
Securing The Seat And Backrest
Locate the seat and backrest components next. Slide the seat onto its rail and lock it in place. Attach the backrest to the rear of the seat using the screws provided. Ensure all screws are tight but do not overtighten. The seat and backrest should feel firm and comfortable. A secure seat supports good posture while riding.

Attaching The Pedals And Crank Arms
Attaching the pedals and crank arms is an essential step in assembling your Schwinn 270 recumbent bike. These parts connect your legs to the bike, allowing smooth pedaling. Proper installation ensures safety and better performance. Take your time to do this correctly.
Identifying Left And Right Pedals
Each pedal has a specific side. The right pedal screws into the crank arm on the bike’s right side. The left pedal goes on the left crank arm. Look closely for “L” and “R” markings on the pedals. These letters help you place the pedals correctly.
The threads on each pedal are different. The right pedal has standard threads. The left pedal has reverse threads to prevent loosening during use. This design keeps pedals secure during your workouts.
Properly Screwing In Pedals
Start by hand-threading each pedal into its crank arm. Turn the right pedal clockwise. Turn the left pedal counterclockwise. Hand-threading prevents cross-threading and damage to the bike parts.
Use a pedal wrench or a 15mm spanner to tighten the pedals. Apply firm pressure but do not over-tighten. Over-tightening can strip the threads or damage the crank arms. The pedals should feel secure and firm.
Check the pedals before riding. Make sure they spin freely without wobbling. Proper installation helps you pedal smoothly and safely.
Installing The Handlebars And Console
Installing the handlebars and console is a key step in assembling your Schwinn 270 recumbent bike. These parts give you control and show important workout information. Careful installation ensures a comfortable ride and clear display. Follow the instructions closely to set them up right.
Mounting The Handlebars
Start by locating the handlebar post on the bike frame. Slide the handlebars onto the post carefully. Align the holes on the handlebars with those on the post. Use the provided bolts and washers to secure them tightly. Tighten all bolts with a wrench until the handlebars feel stable. Check for any movement by gently shaking the handlebars. Adjust if needed to keep them firm and straight. Proper mounting helps with safe and comfortable exercise sessions.
Setting Up The Console Display
Place the console on the designated bracket above the handlebars. Connect the console wires to the bike’s main wiring harness. Ensure the connectors fit snugly without forcing them. Tighten the console screws to hold it firmly in place. Turn the console on to verify it powers up correctly. Follow on-screen prompts to set language, time, and units. This setup helps track your speed, distance, and calories during workouts.
Connecting Cables And Wires
Connecting cables and wires is a key step in assembling your Schwinn 270 Recumbent Bike. Proper connection ensures the console and sensors work perfectly. Incorrect wiring can cause errors or stop the bike from tracking your workout. Take your time and follow each step carefully.
Linking The Console To Sensors
Start by locating the console cable and sensor wires. The console cable usually has a plug that fits only one way. Match the connector from the console to the sensor wire. Push the plug firmly until it clicks into place. Avoid forcing the connection to prevent damage. Check that all plugs fit tightly to ensure good signals during your workout.
Securing Cables To Avoid Snags
Next, secure cables along the bike frame using zip ties or clips. Keep wires close to the frame to prevent them from hanging loose. Loose cables can catch on moving parts or cause tripping hazards. Trim extra zip tie lengths for a neat finish. Regularly check cables for wear or looseness to keep the bike safe and functional.
Final Adjustments And Safety Checks
Final adjustments and safety checks ensure your Schwinn 270 Recumbent Bike is ready for use. These steps help prevent accidents and improve comfort. Carefully completing these tasks guarantees a smooth workout experience.
Adjusting Seat Position
Set the seat so your legs stretch comfortably while pedaling. Slide the seat forward or backward to find the right spot. Check that your knees bend slightly at the pedal’s farthest point. Lock the seat in place to avoid movement during exercise.
Tightening Bolts And Screws
Check all bolts and screws for tightness. Use the correct tools to avoid stripping them. Tighten each bolt firmly but do not over-tighten. Secure pedals, seat, and handlebars to prevent wobbling or loosening over time.
Testing Stability
Place the bike on a flat surface to test stability. Gently rock the bike to check for any movement. Ensure the bike stands firmly without tipping or shifting. Confirm that all parts feel solid and secure before use.

First Ride Tips
Starting your first ride on the Schwinn 270 Recumbent Bike can be exciting. It helps to prepare well to enjoy the workout and avoid any discomfort. Simple tips will make your first exercise session safe and effective.
Adjusting Resistance Levels
Resistance controls how hard you pedal. Begin with a low resistance to warm up your muscles. Gradually increase resistance as you feel stronger. This approach prevents strain and builds endurance steadily. The Schwinn 270 allows easy resistance changes using the console buttons. Find a level that feels challenging but comfortable.
Basic Workout Settings
The bike offers preset workouts for different fitness goals. Choose a beginner program for your first ride. These workouts guide your speed and resistance automatically. Use the console to select time, distance, or calorie goals. Keep sessions short at first, about 10 to 15 minutes. Increase workout length as your fitness improves.
Frequently Asked Questions
How Long Does It Take To Assemble A Schwinn 270 Bike?
Assembling a Schwinn 270 recumbent bike typically takes 45 to 60 minutes. Having basic tools ready speeds up the process. Following the instruction manual carefully ensures proper setup and safety.
What Tools Are Needed To Assemble Schwinn 270?
You need a Phillips screwdriver, adjustable wrench, and Allen wrenches. These tools help attach pedals, seat, and console correctly. All essential hardware usually comes with the bike package.
How Do I Attach The Pedals On Schwinn 270?
Identify left and right pedals marked accordingly. Screw the right pedal clockwise and the left pedal counterclockwise. Tighten firmly using a wrench to avoid pedal loosening during use.
Is Professional Assembly Recommended For Schwinn 270?
Professional assembly is optional but helpful if unsure. It guarantees correct setup, safety, and saves time. However, many users successfully assemble it themselves using the provided guide.
Conclusion
Assembling the Schwinn 270 recumbent bike is simple with clear steps. Take your time and follow each instruction carefully. Check all parts before starting to avoid mistakes. Use the right tools for easy assembly. After putting it together, test the bike for safety.
Enjoy your new workout equipment at home. Regular maintenance keeps it running smoothly. Stay consistent with your exercise routine. This bike can help improve your fitness over time. Patience and care make the process stress-free. Ready to ride?
