
Snowboarding is more than just sliding down a snowy hill. It is about control, balance, and comfort. One of the most important things every snowboarder should understand is the snowboard stance. Whether you are a beginner or someone who has been riding for years, your stance can shape your entire experience. Knowing how to set up your stance is essential for safety, performance, and fun on the slopes.
Many new riders focus on the snowboard itself or the boots, forgetting that the way they stand affects everything from turning to stopping. Even small changes can make a big difference. A good stance helps you ride longer with less fatigue and reduces your risk of falls.
If you want to get the most out of your snowboard, it is important to understand what a snowboard stance really is, why it matters, and how to find the best stance for you.
What Is A Snowboard Stance?
A snowboard stance is the way you position your feet and body on the snowboard. This includes the direction your feet point, how far apart they are, which foot is forward, and even how your bindings are angled. Your stance decides how you balance, turn, and control the board. It is much more than simply standing on the board—it is about finding a setup that matches your body and riding style.
When you set your stance, you are adjusting four main things:
- Stance width (distance between your feet)
- Stance angles (direction your feet point)
- Stance setback (how centered you are on the board)
- Lead foot (which foot is in front)
Even experienced snowboarders often revisit their stance to improve comfort and performance. The right stance makes learning easier for beginners and allows advanced riders to push their limits.
Why Is Snowboard Stance Important?
Your stance is the foundation of everything you do on a snowboard. It affects your balance, turning, and even how you absorb bumps. Here are some key reasons why it matters:
- Control: A proper stance gives you better control over the board.
- Comfort: The right stance reduces pain or strain in your knees, hips, and back.
- Safety: A poor stance increases your risk of injury, especially to your knees and ankles.
- Progression: As you improve, you might need to adjust your stance for tricks or riding different terrain.
For example, if your stance is too wide, you may struggle to turn smoothly. If it is too narrow, you might lose balance easily. Understanding and adjusting your stance helps you ride with confidence.

Key Elements Of Snowboard Stance
Let’s break down the main parts of a snowboard stance. Each element can be adjusted, and small changes can have a big effect.
Stance Width
Stance width is the distance between the centers of your two bindings. This is usually measured in centimeters from the center of one binding to the center of the other. Getting the right width is important for both balance and movement.
- Too wide: Limits your ability to twist and turn, and can tire your legs quickly.
- Too narrow: Makes you unstable and may increase your risk of falling.
A common way to find your starting stance width is to measure the distance from your kneecap to the floor when sitting. For most adults, this is between 50 to 60 cm. However, personal comfort is just as important.
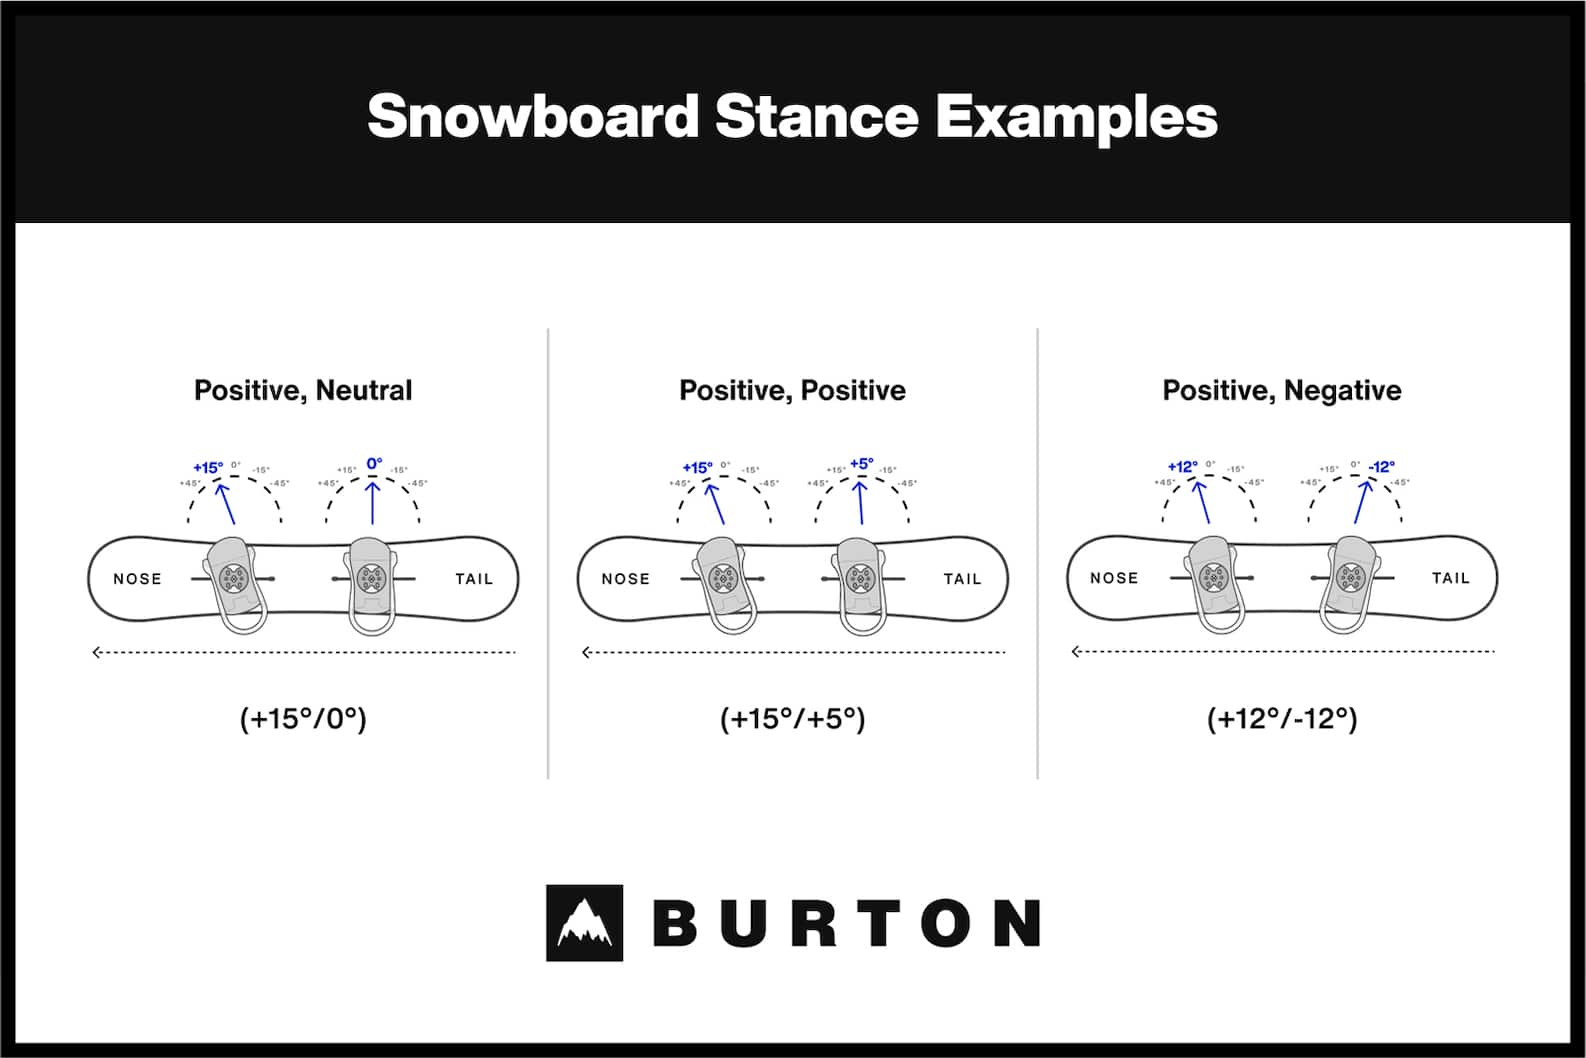
Stance Angles
Stance angles refer to how much your feet turn out from the straight-ahead position. These are usually shown in degrees (e.g., +15° for the front foot, -9° for the back foot).
- Duck stance: Both feet angled outwards (e.g., +15°/-15°). Good for freestyle and riding switch.
- Forward stance: Front foot more angled, back foot less (e.g., +18°/0°). Good for carving and speed.
- Directional stance: Front foot angled forward, back foot slightly forward (e.g., +18°/+6°). Good for all-mountain riding.
The right angles depend on your riding style and comfort. Beginners often start with a slight duck stance because it is easier to learn turns in both directions.
Stance Setback
Setback is how far back (towards the tail) your stance is from the true center of the board. Many boards have a recommended setback, especially freeride and powder boards.
- Centered stance: Bindings are equal distance from tip and tail. Good for park and freestyle.
- Setback stance: Bindings are closer to the tail. Gives better float in powder and stability at speed.
For all-mountain boards, a small setback (like 1–2 cm) is common. For freestyle boards, zero setback is normal.
Lead Foot: Regular Vs. Goofy
Your lead foot is the one that faces downhill when you ride. The two options are:
- Regular: Left foot forward.
- Goofy: Right foot forward.
There is no right or wrong. The best way to find out is to have someone give you a gentle push from behind and see which foot you step forward with first. That foot usually feels more natural in front.
How To Choose Your Snowboard Stance
Finding your ideal stance is part science, part personal feel. Here are some practical steps to help you get started:
1. Find Your Lead Foot
Most people feel more comfortable with one foot forward. Try these simple tests:
- Have a friend gently push you from behind. Which foot steps forward? That is likely your lead foot.
- Think about which foot you naturally use to kick a ball. The other foot usually leads.
2. Set Your Stance Width
Use your shoulder width or measure from your kneecap to the floor. Start with that distance and adjust slightly wider or narrower based on comfort.
3. Choose Your Stance Angles
For beginners, a duck stance (+15°/-9° or +12°/-12°) is a safe starting point. It allows you to ride in both directions and helps with balance. Freestyle riders often go for a symmetrical duck stance, while freeriders might use a more forward stance.
4. Adjust Setback
Check your board’s recommended stance. If you ride mostly in powder, set your bindings further back. For park or all-mountain, keep them centered or close to center.
5. Fine-tune For Comfort
Once you try your stance, pay attention to how your knees, hips, and ankles feel. Adjust the width, angles, or setback if you feel discomfort. Even small changes (like 1–2° in binding angle) can make a big difference.

Common Snowboard Stance Types
Different riding styles need different stances. Here are the most popular setups:
| Stance Type | Front Foot | Back Foot | Best For |
|---|---|---|---|
| Duck Stance | +15° | -15° | Freestyle, Park, Switch |
| Forward Stance | +21° | 0° | Carving, Speed |
| Directional Stance | +18° | +6° | All-Mountain |
| Powder Stance | +18° | +3° | Deep Snow |
These are just starting points. Many riders experiment with small changes to find their personal favorite.
How Stance Affects Riding
Your stance does more than just decide how you stand. It changes how your board feels under your feet.
Wider Stance
- Pros: More stability for landings and high speed.
- Cons: Harder to twist or turn quickly.
Narrower Stance
- Pros: Easier to turn and move your hips.
- Cons: Less stable, especially at speed.
More Angled Bindings
- Pros: Helps with carving and edge hold.
- Cons: May stress knees if overdone.
Centered Vs. Setback
- Centered: Best for tricks and riding switch.
- Setback: Makes riding powder easier and increases stability.
For example, a park rider might use a centered, duck stance for quick turns and tricks, while a powder hound wants a setback stance for floating on deep snow.
Mistakes Beginners Make With Stance
Even small errors can ruin your day on the mountain. Watch out for these common mistakes:
- Copying a friend’s stance: Everyone’s body is different. What works for someone else might not work for you.
- Ignoring discomfort: If your knees or hips hurt, change your stance! Do not just push through pain.
- Not checking the board’s reference points: Most boards show where bindings should be mounted. Start there.
- Setting angles too extreme: Too much angle can cause knee strain. Make small changes.
- Using same stance for all conditions: Different terrain can need a different setup. Adjust as you learn.
A non-obvious tip: stance can change depending on your boots and bindings too. Always check your setup after changing gear.
Adjusting Stance For Progression
As you learn new tricks or ride new terrain, your stance might need an update. Do not be afraid to experiment.
- Learning to ride switch: Try a more ducked, symmetrical stance.
- Going for speed: Slightly increase front foot angle and set back the stance.
- Trying jumps: Consider a wider stance for landing stability.
Write down your setup, so you can return to a previous stance if a change does not feel right. Many advanced riders have two or three favorite stances for different days.
Stance And Body Types
Your height, leg length, and flexibility all play a role. For example, taller riders often prefer a wider stance, while shorter riders feel more balanced with a narrow one. People with less hip flexibility might need less angle on their back foot.
Here is a rough guide for stance width by height:
| Rider Height | Suggested Stance Width |
|---|---|
| Under 160 cm | 48–52 cm |
| 160–175 cm | 52–56 cm |
| 175–190 cm | 56–60 cm |
| Over 190 cm | 60+ cm |
But always choose what feels best for your legs and hips. Do not follow numbers blindly.
How To Adjust Bindings For Your Stance
Adjusting your bindings is easy if you follow these steps:
- Use a screwdriver to loosen the binding screws.
- Set your stance width using the board’s reference points or your own measurement.
- Adjust angles by rotating the bindings to the desired degree marks.
- Check setback by measuring from the center of the board to each binding.
- Tighten all screws and check for movement before riding.
Many riders forget to check their screws each day. Loose bindings can ruin your stance and even cause accidents.
Testing And Fine-tuning On Snow
You cannot know your perfect stance just by looking at numbers. Test your stance on the slopes:
- Ride a few runs, then make small changes.
- Focus on how your knees and hips feel after a run.
- Ask an instructor or experienced rider for feedback.
Remember, snow conditions change. What works on hardpack might not feel good in deep powder.
Advanced Stance Adjustments
As you progress, you can explore more advanced tweaks:
- Highback rotation: Adjusting the highbacks to match your stance angle can improve control.
- Binding position: Move bindings closer to toe or heel edge for more response.
- Canted footbeds: Some bindings have angled footbeds to reduce knee strain.
These are small changes, but they can help avoid pain and boost performance, especially if you ride a lot.
Science And Research On Stance
Studies have shown that stance width and angles affect knee and hip loads. For example, a 2015 study found that wider stances can increase pressure on the knees, while extreme angles can lead to hip discomfort for some riders. Modern snowboards are designed to work best near the manufacturer’s suggested stance, but personal comfort is always the most important factor.
If you want to learn more about the science behind snowboard stance, you can find detailed research on the Wikipedia Snowboarding page.
Frequently Asked Questions
What Is The Best Snowboard Stance For Beginners?
A duck stance, such as +15°/-9° or +12°/-12°, with a stance width about shoulder-width apart, is usually best for beginners. This makes it easier to learn turns in both directions and improves balance.
How Do I Know If I Am Regular Or Goofy?
If your left foot feels more natural in front when going downhill, you are regular. If your right foot leads, you are goofy. Try having someone gently push you from behind to see which foot steps out first.
Can I Use The Same Stance For Park And Powder?
You can, but it is not ideal. Park riding often uses a centered duck stance for tricks, while powder riding feels better with a slight setback and more forward angles to help float in deep snow.
How Often Should I Check Or Change My Stance?
Check your stance at the start of each season, after buying new boots or bindings, or if you feel discomfort. Small changes can make a big difference as you progress.
Does Snowboard Stance Affect Injury Risk?
Yes. A poor stance can increase the risk of knee, ankle, or hip injuries. Always adjust your stance for comfort and control, and avoid extreme angles unless you have experience.
Finding the right snowboard stance is a personal journey. It is not about copying others but about listening to your own body and the way your board feels. Take time to experiment, make small adjustments, and ask for feedback. With the right stance, you will not only ride better—you will have more fun and stay safer on the mountain.
