
Paddle boarding is a fun and healthy way to enjoy the water, but keeping your gear in good shape is essential for a smooth experience. One small part, the paddle board valve, is easy to overlook—but if you damage it, your day can quickly be ruined. A broken valve means your board might not hold air, leading to leaks or even total failure on the water. The good news? With a little attention and care, you can avoid valve problems and keep your board ready for adventure.
Learning how to avoid damaging your paddle board valve isn’t just for experts. Even first-time paddle boarders can protect their gear by following simple habits and understanding what causes valve issues. In this guide, you’ll find practical tips, examples from real paddle boarders, and clear advice that goes beyond the basics.
Let’s dive in and make sure your paddle board stays safe and reliable for many trips to come.
Understanding The Paddle Board Valve
The valve on an inflatable paddle board is a small but critical component. It allows you to fill your board with air and keep it sealed during use. Most inflatable paddle boards use a Halkey-Roberts (HR) valve or similar design. These valves are built for high pressure—usually between 12-18 PSI depending on your board model.
A well-maintained valve:
- Holds air tightly during use
- Releases air smoothly when you deflate
- Prevents water and dirt from entering
If the valve is damaged, you may notice slow leaks, trouble inflating, or air escaping rapidly. Valve repairs can be tricky and sometimes require professional help or even a replacement. That’s why prevention is so important.
Common Causes Of Valve Damage
Before you can protect the valve, it helps to know what usually goes wrong. Here are the main causes of paddle board valve damage:
- Over-tightening or under-tightening the valve cap
- Forcing the pump nozzle into the valve
- Dirt, sand, and salt buildup inside the valve
- Accidental impacts (dropping the board or hitting the valve)
- Using wrong tools or incompatible pumps
- Improper storage (exposing the valve to heat, sun, or moisture)
Let’s look at each of these and how to avoid them.

Smart Inflation And Deflation Habits
The way you inflate and deflate your paddle board can make a big difference. Here’s how to do it safely:
Attaching The Pump Correctly
Always line up the pump nozzle with the valve before pushing it in. Forcing it at an angle can bend or crack the inner valve parts. Most valves have a simple lock or twist mechanism. If you feel resistance, stop and check the alignment.
Watching The Pressure
Do not exceed the recommended PSI for your board. Over-inflation can stress the valve and the material around it. Use a pump with a built-in gauge for best results.
Safe Deflation
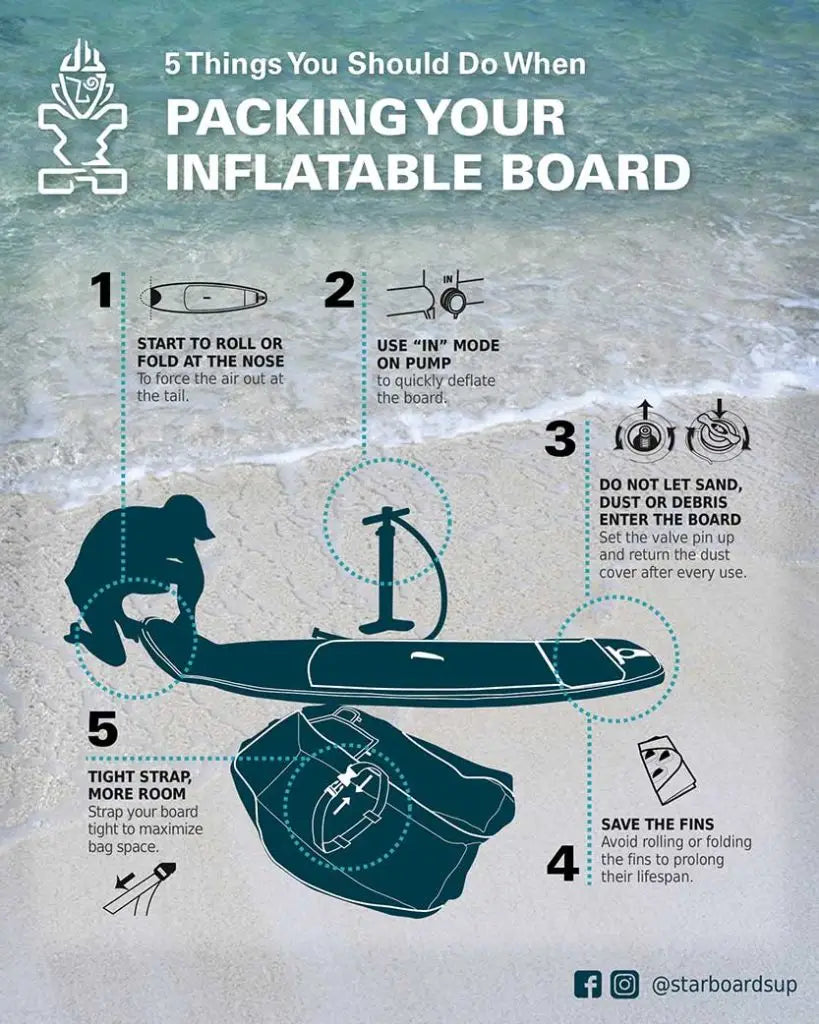
When releasing air, press the valve button gently. Don’t use sharp objects to press the button—fingers are best. Avoid letting sand or water enter the open valve during deflation.
Common Mistake: Ignoring The Valve Cap
Many beginners forget to tighten the valve cap after inflating. This small cap is the last defense against leaks and dirt. However, never use excessive force when closing the cap. Tighten it until snug, not so tight that it’s hard to remove later.
Keeping The Valve Clean
Sand, salt, and dirt are enemies of the paddle board valve. Even tiny particles can cause the seal to fail. Here’s how to keep the valve clean:
- Rinse the valve area with fresh water after every use, especially after paddling in the ocean.
- Wipe around the valve with a soft cloth before and after each trip.
- Avoid putting the board down with the valve side on the ground or in muddy areas.
If you notice sand or debris inside the valve, use a can of compressed air or a soft brush to gently remove it. Never poke inside with metal tools—they can scratch and damage the seal.
Safe Transportation And Storage
Your paddle board valve is most vulnerable when the board is out of the water. Here’s how to protect it during transport and storage:
Carrying The Board
When moving your board, keep the valve facing upward or to the side. Dropping the board on a hard surface can break the valve or its housing.
Storing The Board
Always store your paddle board in a cool, dry place out of direct sunlight. Extreme heat can soften the plastic parts of the valve, making them more likely to crack. If possible, leave the valve cap slightly open to allow any trapped moisture to escape, but only when you’re certain the storage area is clean and dry.
Transport Case Tips
If your board comes with a bag or case, check for a special pocket or padding for the valve end. Place the board inside so that the valve does not press against hard items or the side of your car.
Using The Right Tools
Not all pumps and accessories work with every paddle board valve. Using the wrong tool can easily cause damage. Here’s how to avoid this mistake:
- Always use the pump and adapter designed for your specific board.
- If you need a replacement, check with your board’s manufacturer for compatible parts.
- Never use pliers or wrenches on the valve unless you are doing an official valve replacement.
Below is a comparison of common pump types and their compatibility with paddle board valves:
| Pump Type | Valve Compatibility | Risk of Damage |
|---|---|---|
| Manual SUP Pump | High (with correct adapter) | Low |
| Electric Air Pump | Medium (check connector) | Medium |
| Car Tire Pump | Low | High |
Checking And Maintaining The Valve
Even if you’re careful, regular checks can catch problems early. Make a habit of inspecting the valve before and after each outing.
How To Inspect The Valve
- Look for cracks, chips, or loose parts around the valve
- Listen for hissing sounds that indicate leaks
- Press the valve gently to check for smooth movement
If you notice any issues, do not inflate the board until the problem is fixed.
Routine Maintenance Steps
- Rinse the valve with clean water after every use.
- Dry the valve area before storing the board.
- Lubricate the valve with silicone spray once every few months (never use oil-based products).
- Replace the valve O-ring if it shows signs of wear.
Here’s a table comparing different valve lubricants:
| Lubricant Type | Safe for Valves | Notes |
|---|---|---|
| Silicone Spray | Yes | Prevents sticking, safe for rubber |
| WD-40 | No | Can damage seals over time |
| Petroleum Jelly | No | Attracts dirt, not recommended |
What To Do If The Valve Gets Damaged
Sometimes, accidents happen. If you suspect your valve is damaged:
- Deflate the board and remove it from the water.
- Clean the valve area and inspect closely.
- Try tightening the valve with the special tool that comes with some boards. Only do this if you know the correct torque.
- For leaks, use a soapy water test: Apply soapy water to the valve and watch for bubbles.
- If the valve is cracked or broken, contact the manufacturer or a repair shop. Do not try to glue or tape the valve—this is usually a short-term fix.
For more detailed repair tips, check resources like the Red Paddle Co Valve Guide.
Two Insights Most Beginners Miss
- Valve position matters during inflation: If your board is lying on an uneven surface or the valve is twisted, pressure on the valve during inflation can cause tiny cracks. Always inflate on a flat, soft surface like grass or a towel.
- O-rings wear out quietly: The small rubber O-ring inside your valve is critical for sealing. It can dry out and crack over time, especially if you store your board in a hot place. Replacing this tiny part every year can prevent most slow leaks.
Example Scenarios
- Case 1: A beginner used a car tire pump on his SUP. The connector didn’t fit well, so he forced it. The result: a cracked valve that leaked air every 10 minutes.
- Case 2: A paddler ignored sand around the valve area after a beach trip. During the next inflation, grains of sand prevented a proper seal, causing a slow leak that was hard to find.
- Case 3: Someone left their board in the back seat of a car on a sunny day. The heat softened the plastic around the valve, making it loose and wobbly.
These are all preventable with the right habits.
Tips For Long-term Valve Care
- Keep a valve tool and spare O-rings in your paddle board repair kit.
- Rinse your board, including the valve, after every salty or sandy trip.
- Store the board partially deflated in extreme temperatures to reduce pressure on the valve.
- Check for manufacturer recalls or updates on your board’s valve type.
Frequently Asked Questions
How Do I Know If My Paddle Board Valve Is Leaking?
A leaking valve will often make a faint hissing sound. You can check by applying soapy water around the valve—if you see bubbles, air is escaping. Slow leaks might only show as a softening board over several hours.
Can I Replace A Damaged Paddle Board Valve Myself?
Some paddle boards come with a valve wrench for simple replacements. If your valve is screwed in, you may be able to unscrew and swap it. For glued or welded valves, it’s best to contact a repair shop.
Is It Safe To Use Any Air Pump On My Paddle Board?
No. Always use the pump designed for your board’s valve type. The wrong pump may not create a good seal, and can even break the valve if forced.
How Often Should I Clean The Paddle Board Valve?
Rinse with fresh water after every use, especially after paddling in saltwater or sandy areas. Deep clean and lubricate the valve every few months, or more often if you notice stiffness or leaks.
What Should I Avoid When Handling The Paddle Board Valve?
Avoid using sharp objects near the valve, over-tightening the cap, exposing the valve to extreme heat, or inflating the board on rough, uneven surfaces.
Taking care of your paddle board valve is simple but makes a big difference in the life of your gear. With smart habits, regular checks, and a little attention to detail, you’ll spend more time paddling and less time worrying about leaks. Enjoy the water—your board is ready for anything!

